

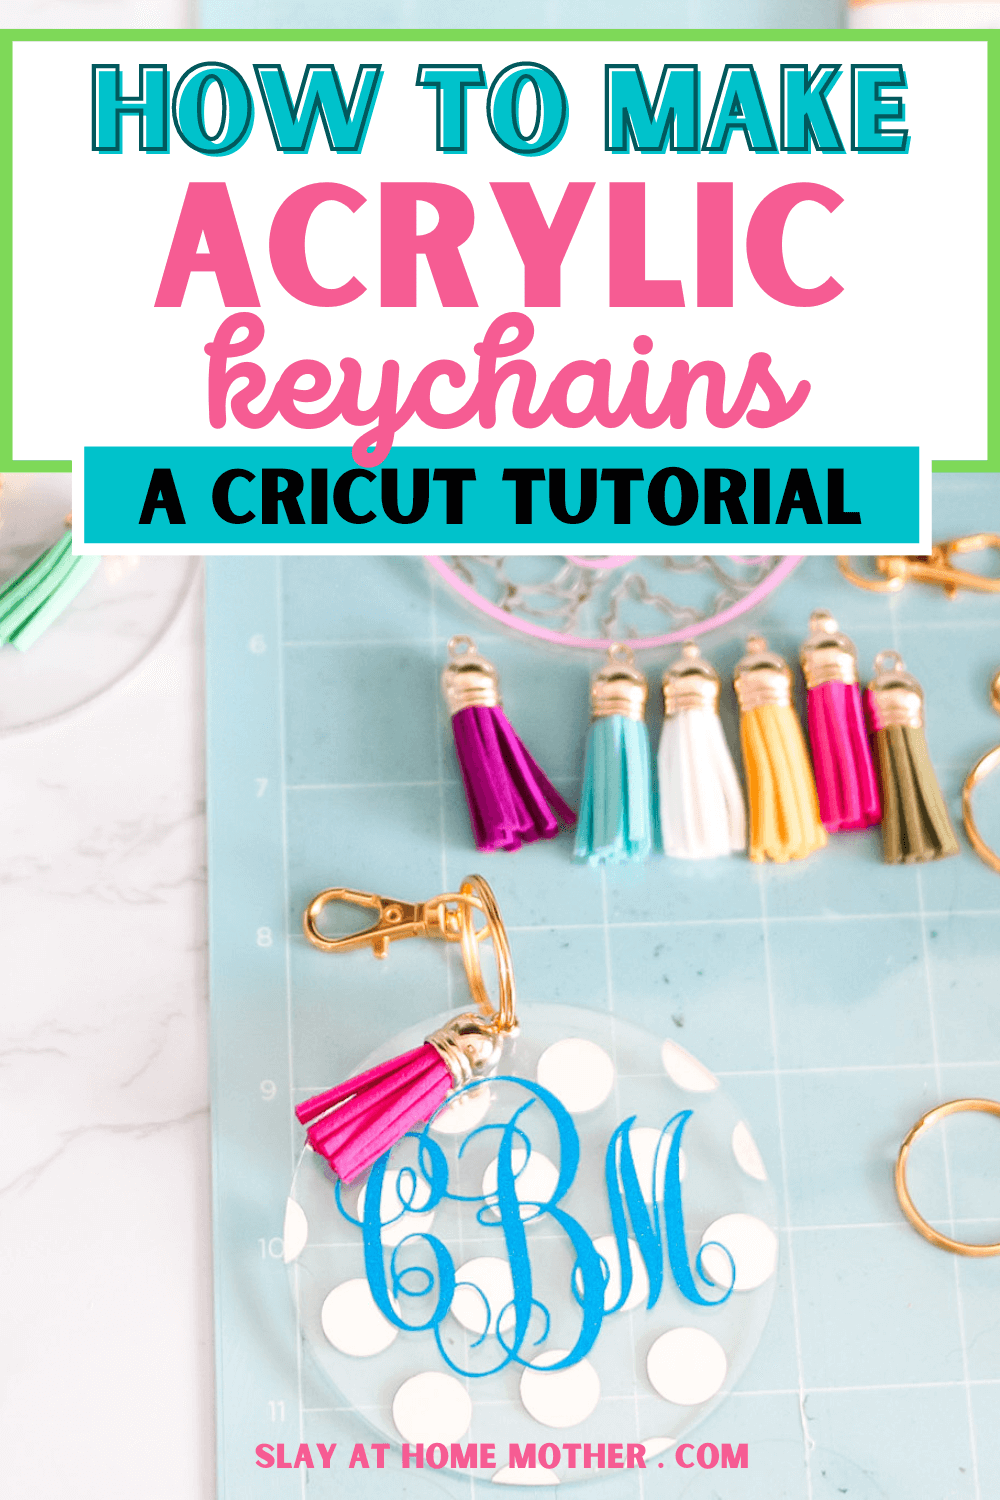
Learn how to make acrylic keychains with this easy Cricut tutorial…

Hi friends!
It’s my 30th birthday today, so I’m celebrating with a crafty DIY using one of my favorite mediums – GLITTER!
I feel so incredibly lucky to be in the place that I am in life right now – writing, photographing, creating, and being a mom to three wonderful humans!
As a boy mom, I rarely get to use glitter in my crafts and projects, although I tend to use tons of glitter iron-on when it comes to pillow covers ;).
All that is about to change now that we have little Zoey!
Anyways, back to the point of this post – I’m so happy to share an easy DIY with you guys today.
These DIY keychains make the perfect Easter basket stuffer, gift for friends and family, or even as a personalized ornament (with some twine or a piece of colorful ribbon threaded through the hole and tied into a knot).
I loved creating these and found myself making them for anyone and everyone I know, ha!
In this post, I’m sharing all the deets to make these gorgeous monogram keychains – from Design Space screenshots and fonts to use, to how to apply permanent glitter vinyl and foil decals.
*This post may contain affiliate links, however, all opinions are my own, as always.*
Materials Needed To Make Acrylic Keychains

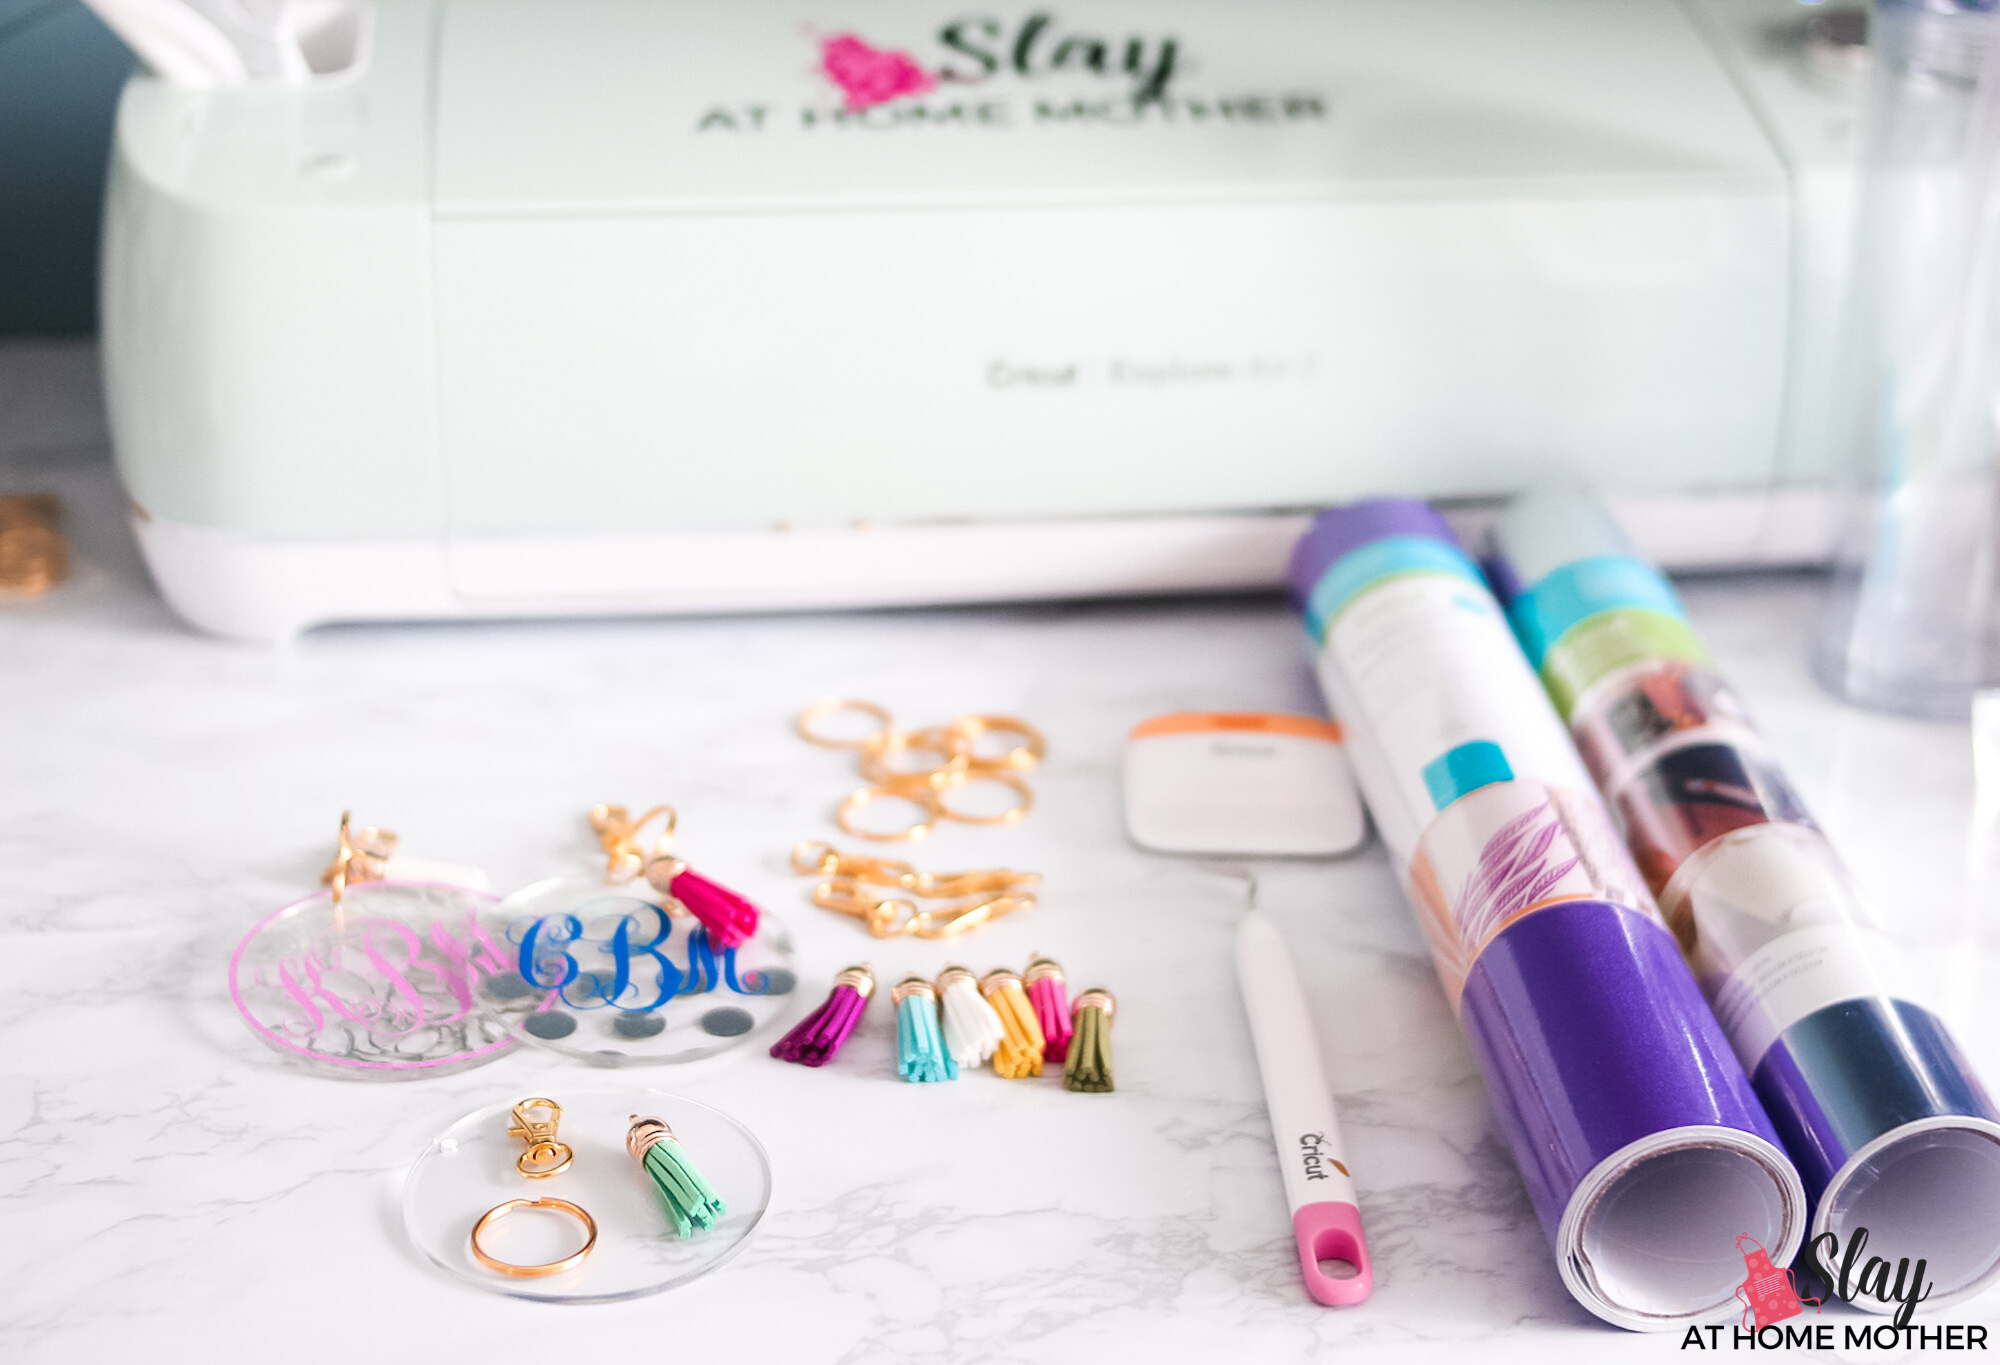
Here’s what you need to create a monogram online FREE, and make your own DIY acrylic keychains…
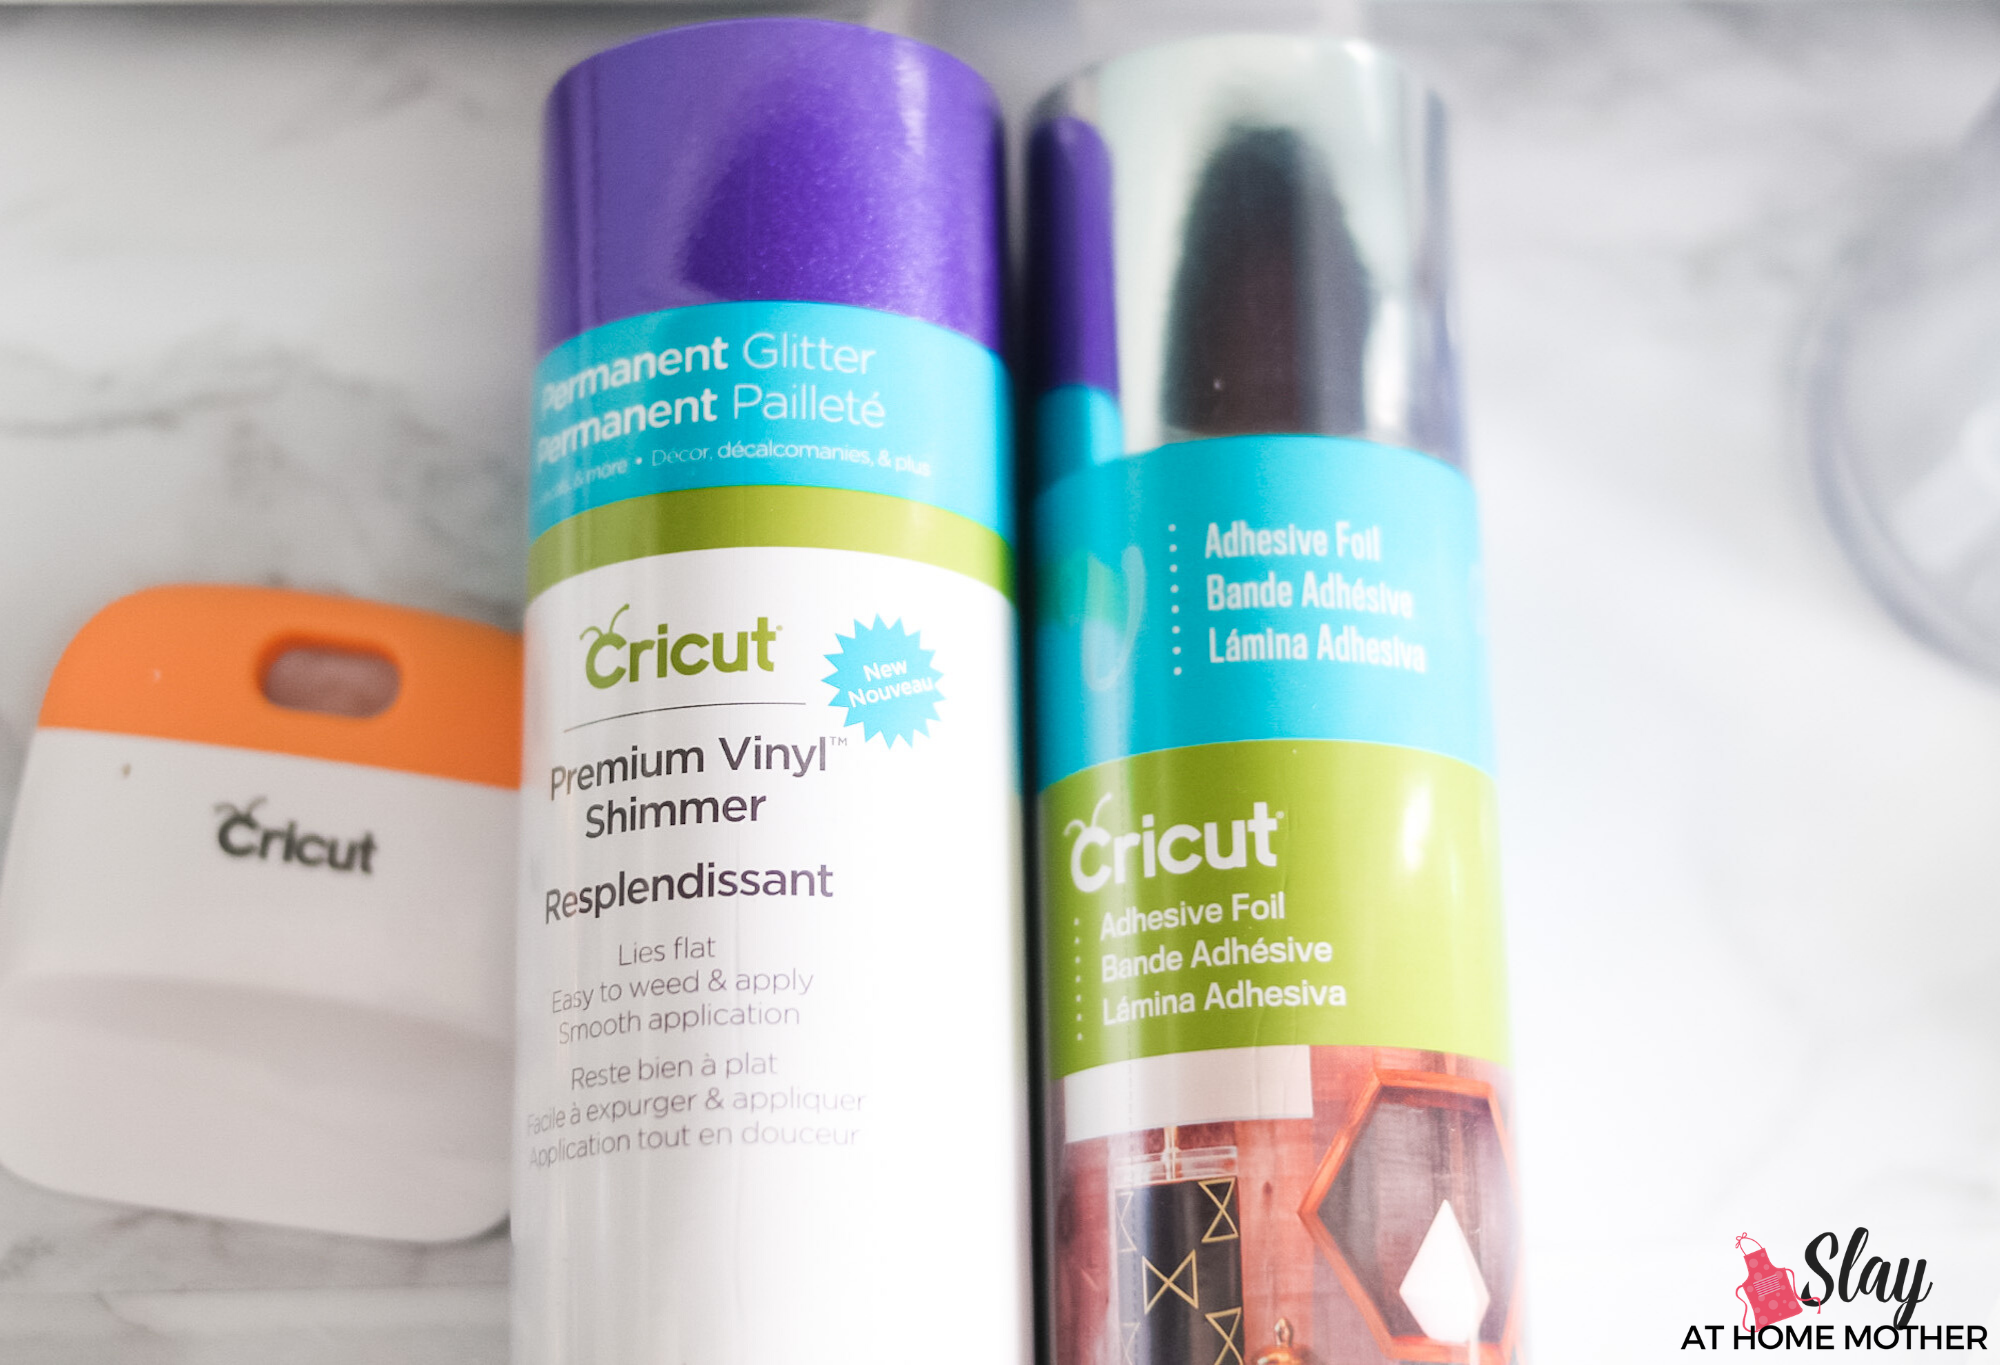
- premium vinyl shimmer (permanent glitter vinyl)
- adhesive foil vinyl
- StrongGrip transfer tape
- regular transfer tape
- StrongGrip mat (the purple one)
- weeding tool and scraper
- scissors
- 3″ acrylic discs (here are the exact ones I used)
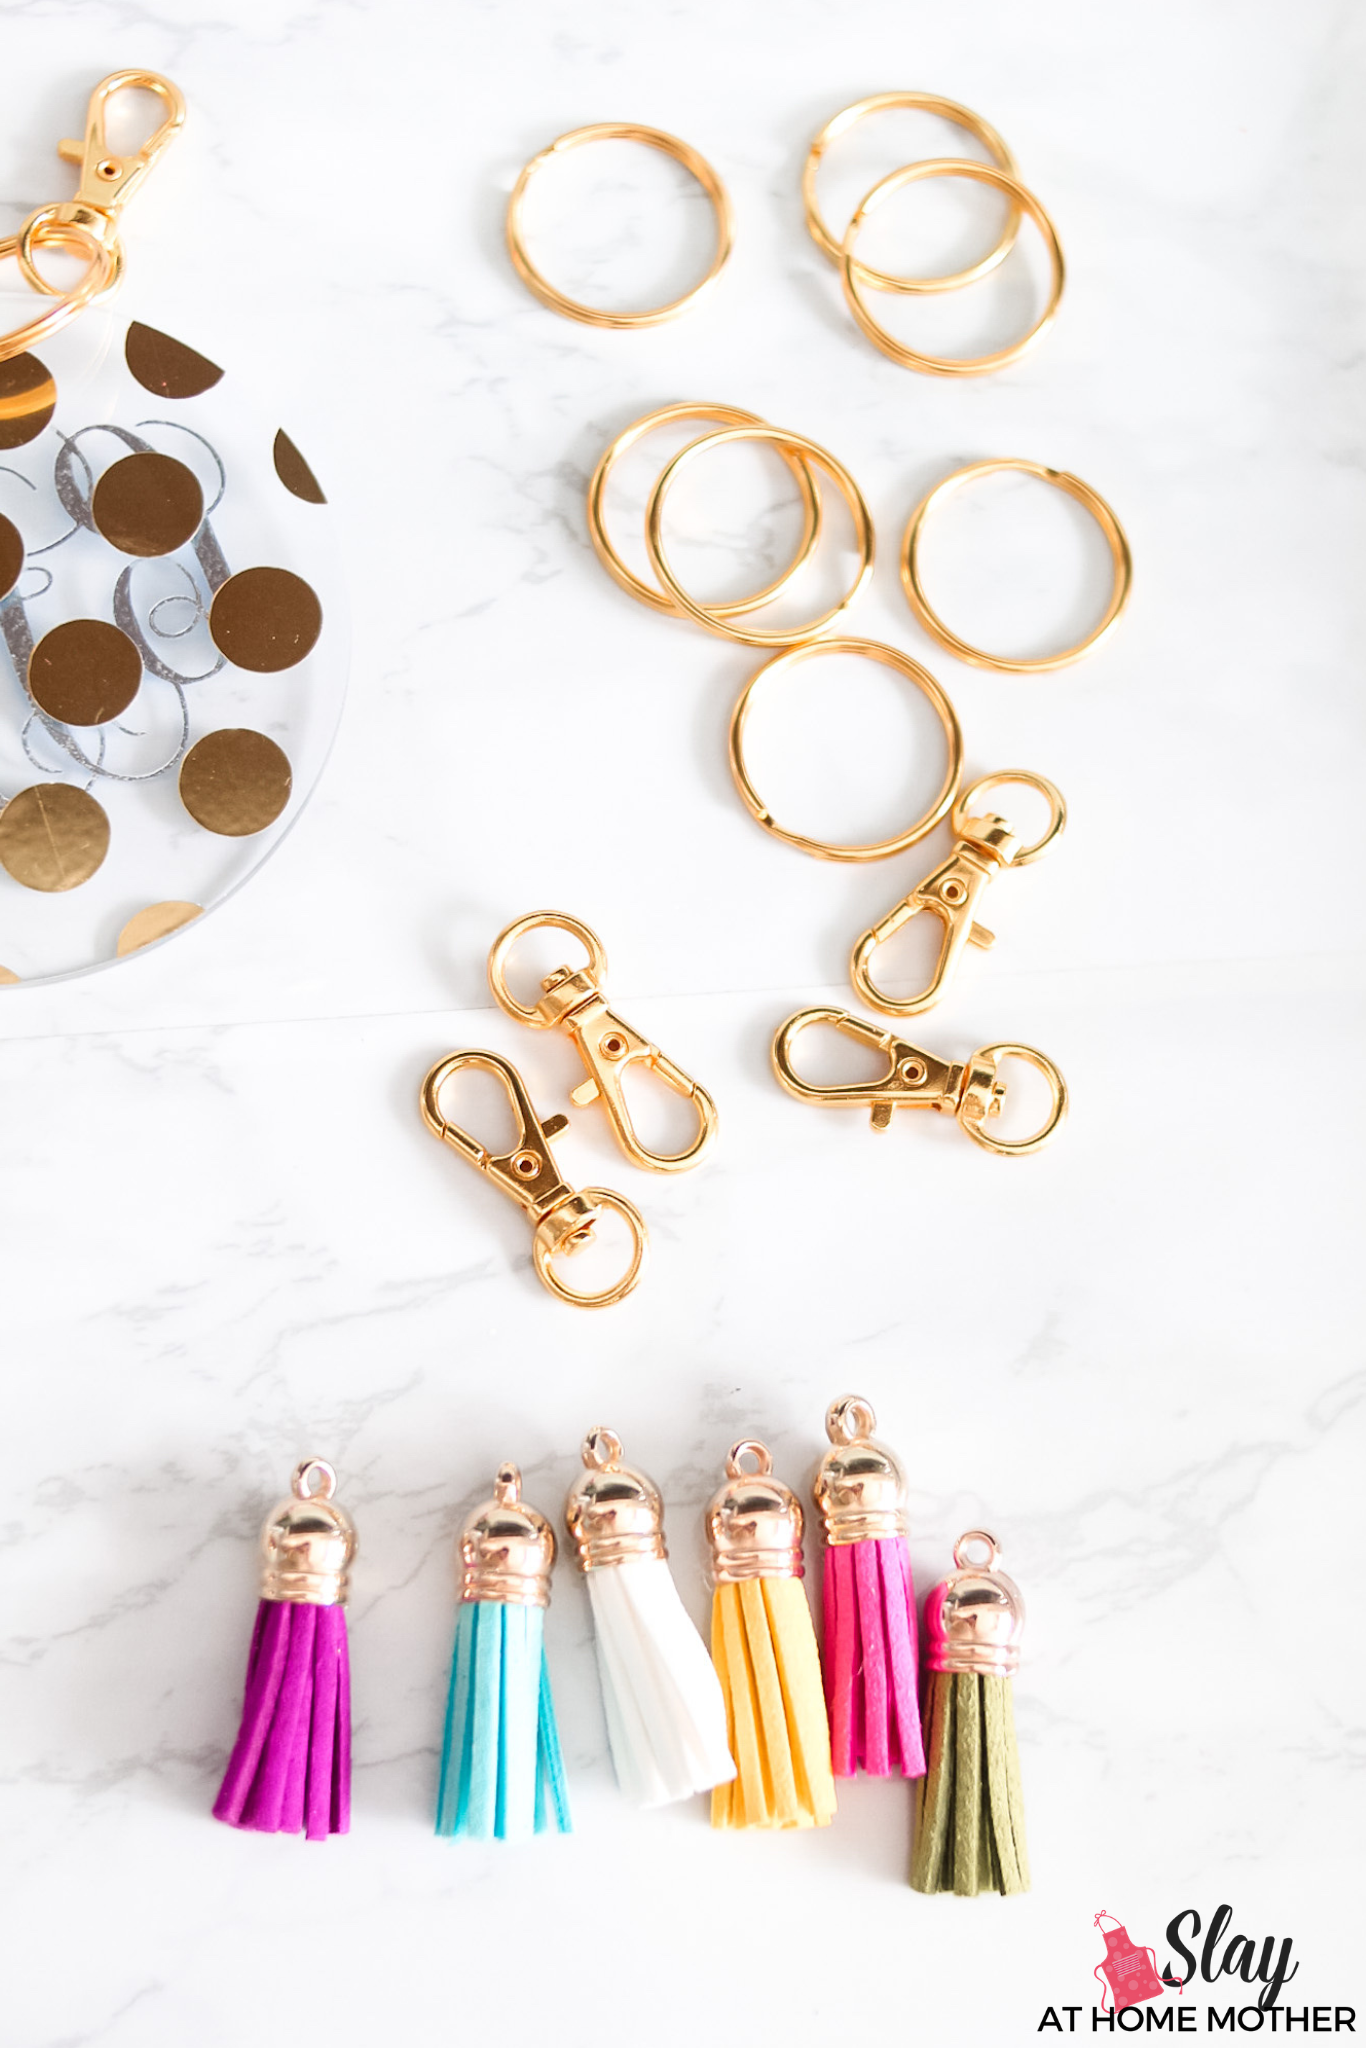
- gold and silver/or keychain hardware sets with tassels
- Cricut Explore Air 2 or Maker
For this tutorial, I’m using my Cricut machine which happens to be the Explore Air 2.

Popular Monogram Fonts To Use
- Monogram KK
- Monogramos
To use these fonts, you’ll need to download them onto your computer and install them. Once they are installed, you can delete the ZIP file.
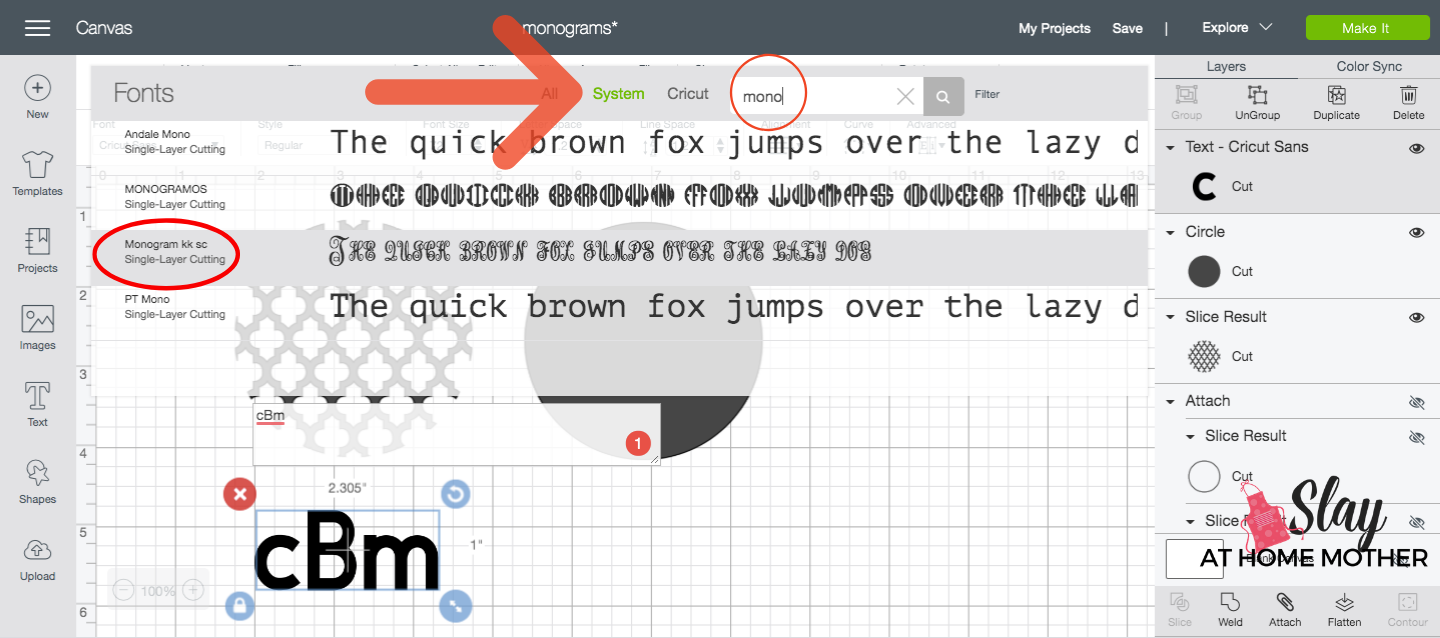
When you open Design Space, you access these downloaded fonts by clicking on Text and then System. This will bring up the fonts that come default with your computer as well as those you’ve downloaded and installed.
For this tutorial, I’ll be featuring the Monogram KK font. I featured Monogramos in my last crafting post, however, which you can check out HERE.
There’s also a quick video of the process in that post as well if you’re a visual learner like me ;).
A Note About Using Free Fonts
Maybe you’re looking at this tutorial to learn your machine a little bit better, check out some helpful screenshots to help you navigate Design Space better, or maybe you’re looking for an easy craft you can make and sell to friends, family, and at craft shows.
I pride you on whatever journey you’re on, and welcome you with open arms!
But there’s something you need to know about downloading and using free fonts from the internet – and that is that most of them are free for personal use only.
If you are planning on using fonts from Dafont.com or another free font site that you will be using on items you’ll be selling or making a profit on, you will need to purchase a commercial license from the designer.
How To Create A Monogram In Design Space
For this tutorial, I am going to give you the EXACT measurements I am using that work with these 3″ acrylic disc keychains, and show you actual screenshots to help you navigate creating your own design.
But, I’ll also be sharing the direct link to my public design on Design Space (minus the font) in case you want to use the back designs I used in this post on your own DIY keychains.
Here’s that link for you, just be sure to click Customize before making it so you can add your monograms!
I am going to walk you through the entire design process, however, so you can feel confident about creating a custom design should you want to or need to.
Why My Design Space Link Doesn’t Contain Any Fonts For You To Use
Design Space will not allow me to share the design with a personal rights downloaded font as they do not have commercial rights to it (which makes perfect sense and is in respect to the font designer), so you will still need to download your monogram font on your own computer to use within the design.
Insert A Circle Shape To Represent Your Keychain
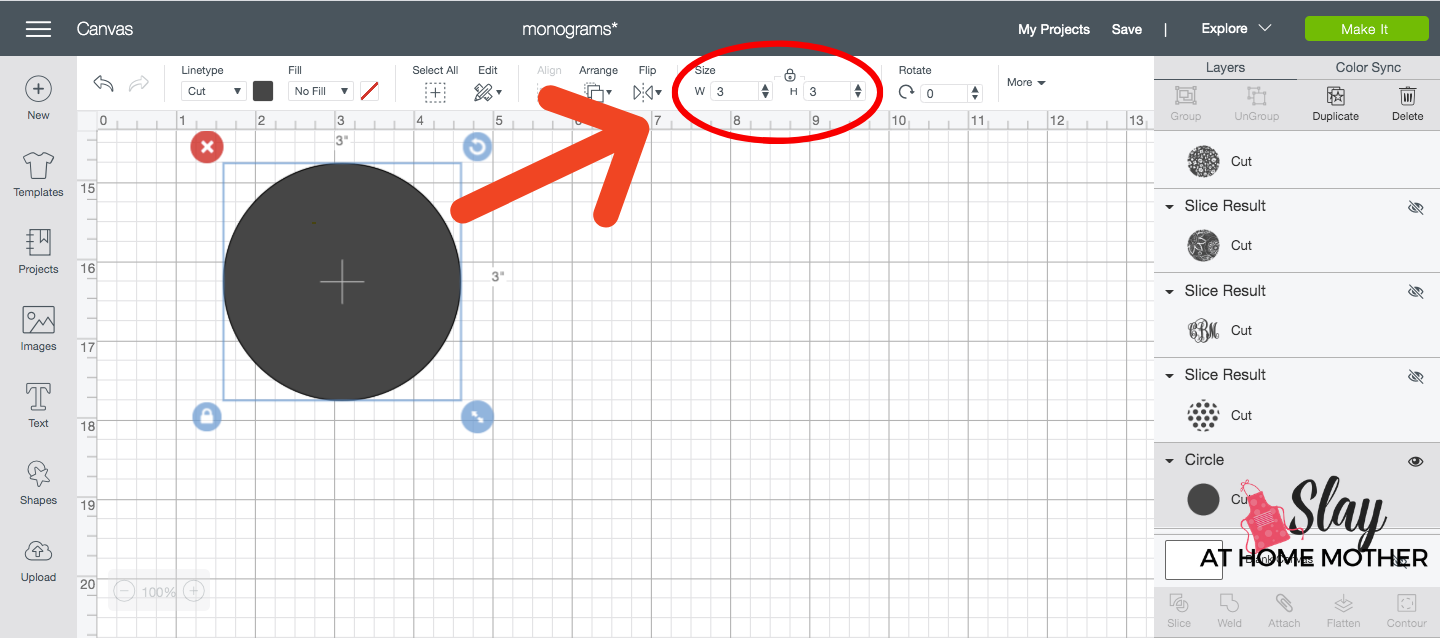
First, I recommend inserting a circle shape that will represent your clear acrylic disc keychain.
Size it to 3″x3″, and duplicate it at least three or four times.

We will also be needing this circle shape to help us slice our design…
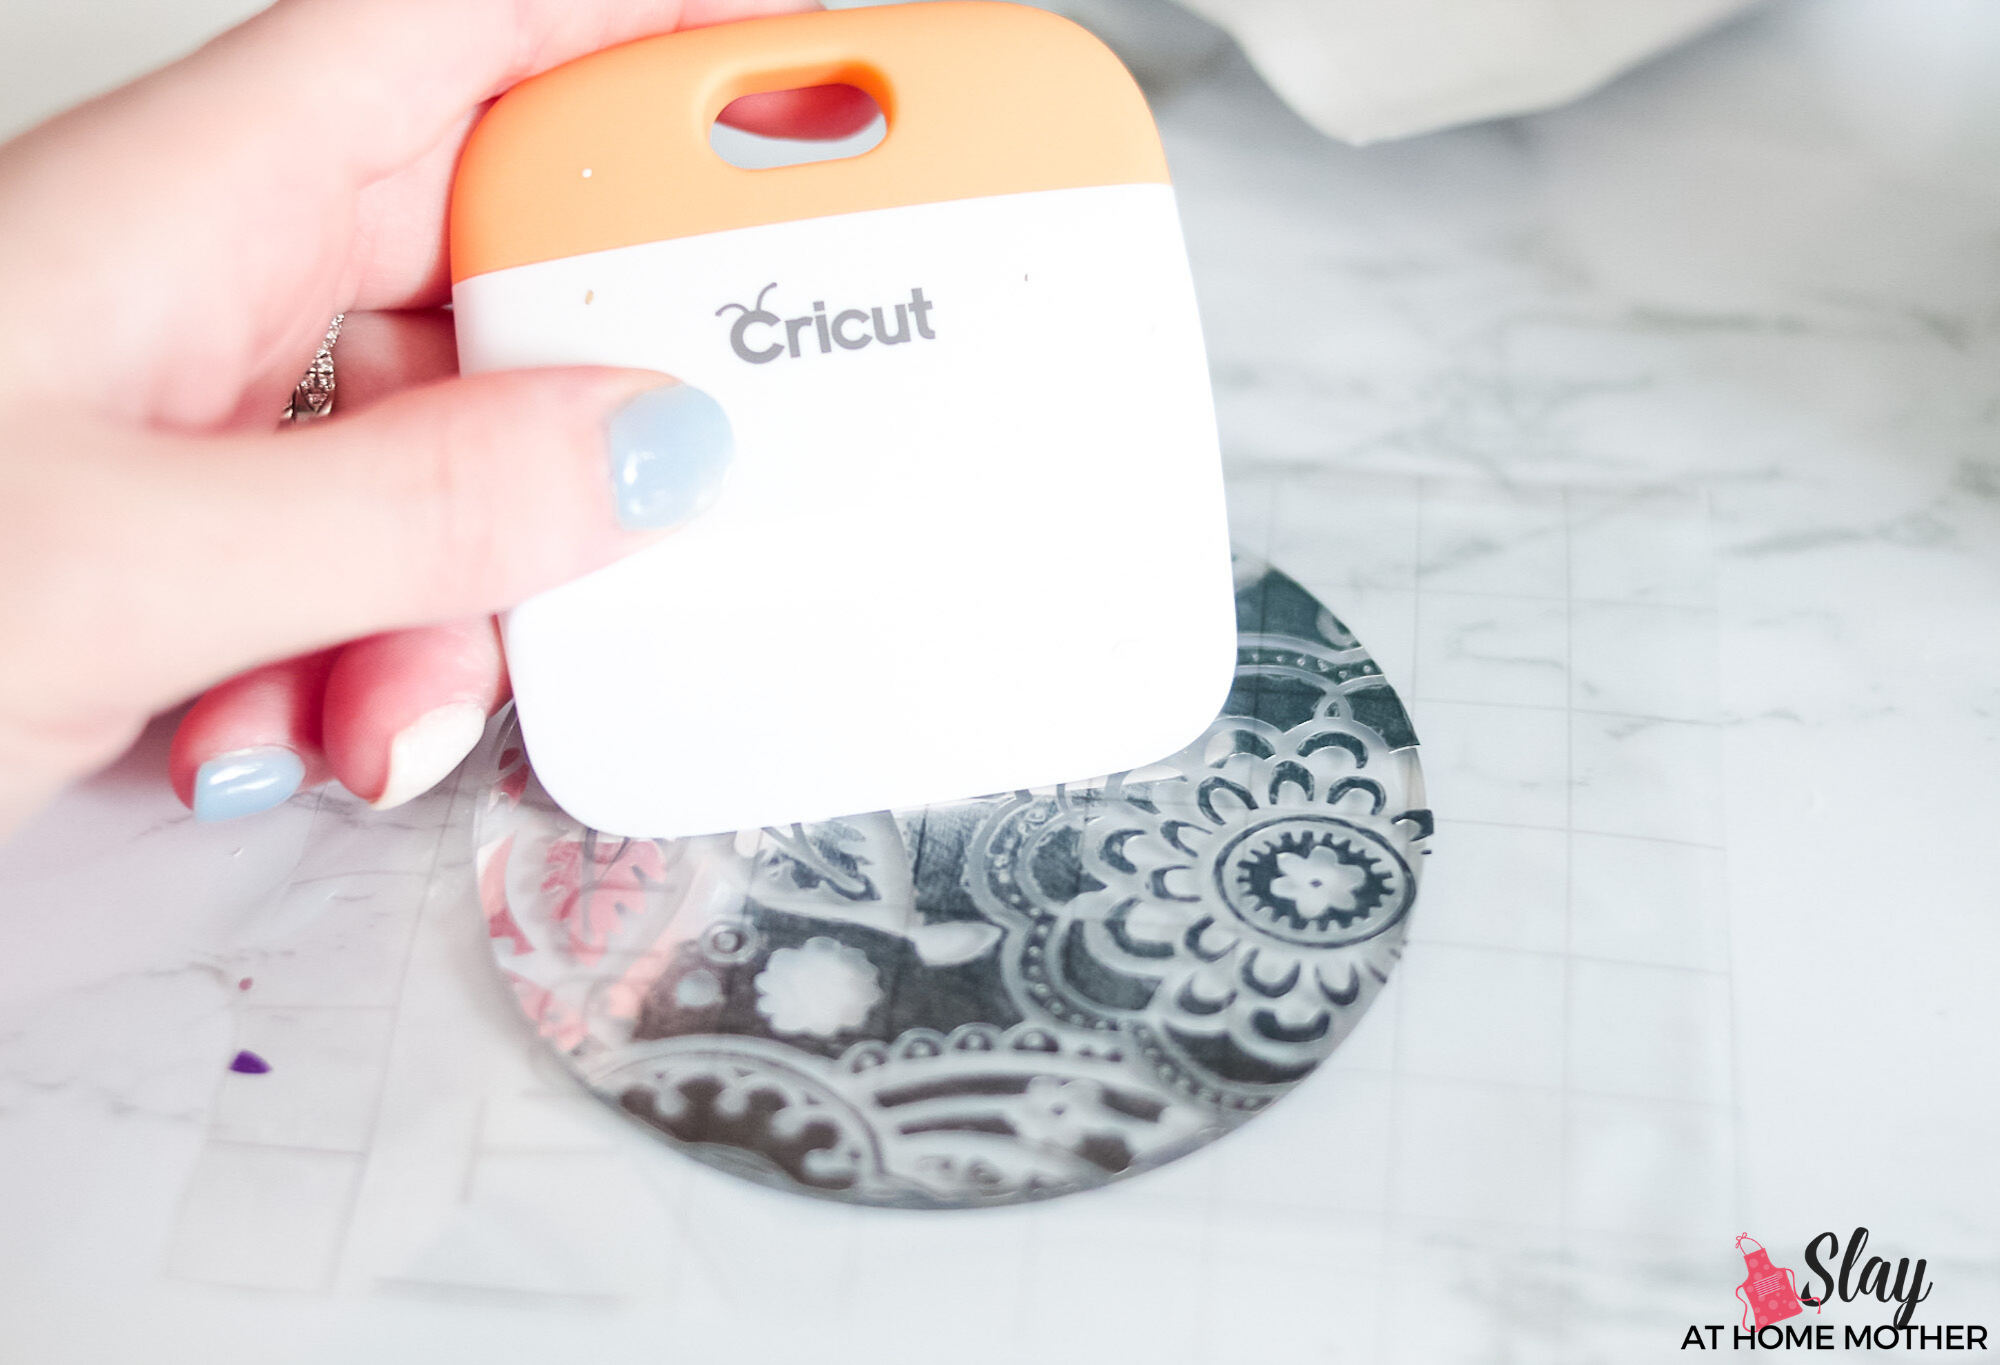
Design The Back Of Your Acrylic Keychain With A Pattern
Click on Images on the left toolbar, and filter images by selecting Backgrounds & Textures.
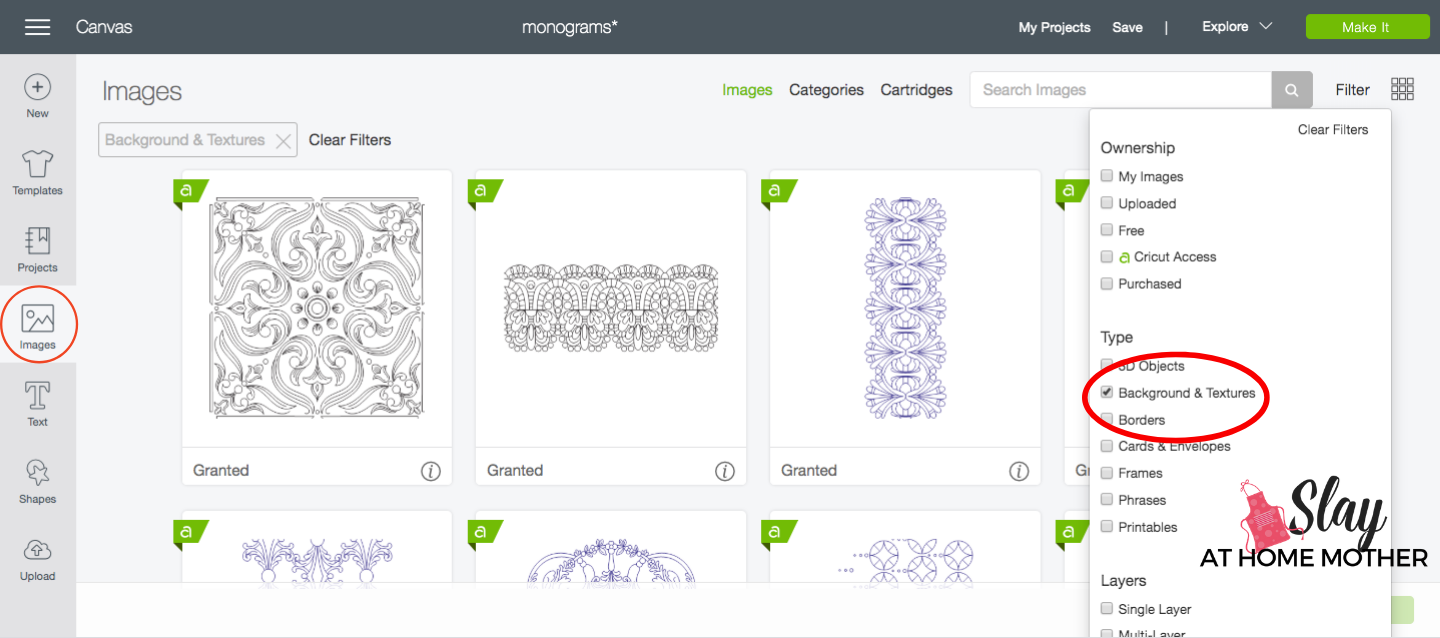
You can further search background and texture images by typing terms into the search bar, like flowers, etc.
Select one that you fancy and click Insert Images towards the lower right of the screen.

How To Slice In Design Space
Before slicing your design, size it down to about the same size as your 3″ circle, and click Align and Center.
Be mindful of where the hole in your keychain is so you can give yourself room to add your hardware at the end.
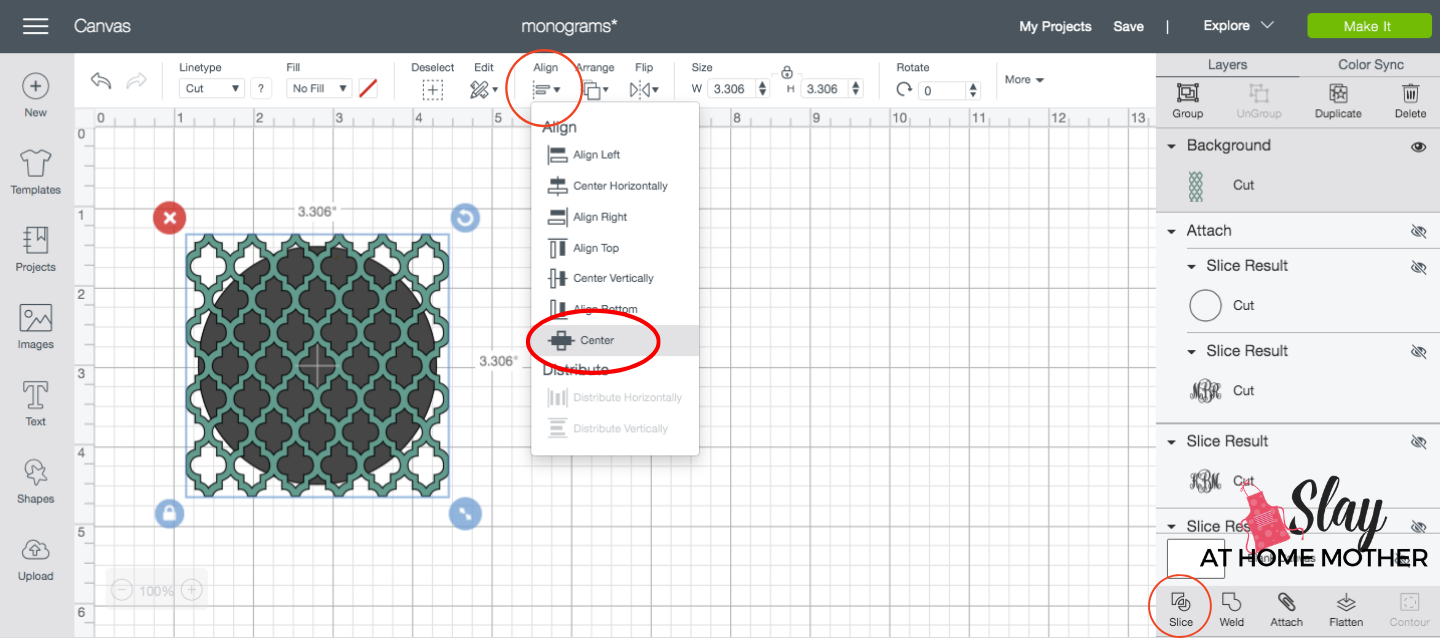
Once your pattern is centered over your circle shape, click Slice towards the lower right of the screen, remove the sliced items and delete them.
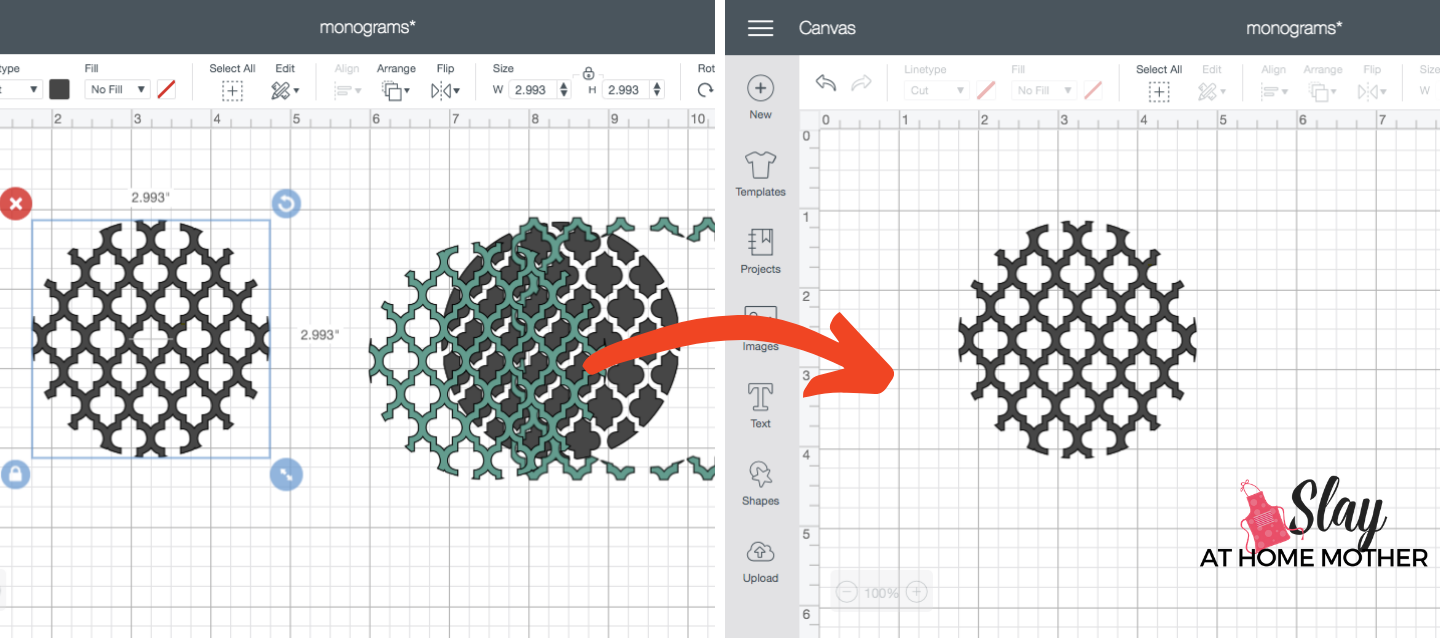
Size your new design to 2.95W x 2.95H.
This gives you room to put your design on your acrylic disc keychain without running over the edge of the disc and having the vinyl snag or peel over time but still covers just enough to not look like it isn’t an exact fit ;).
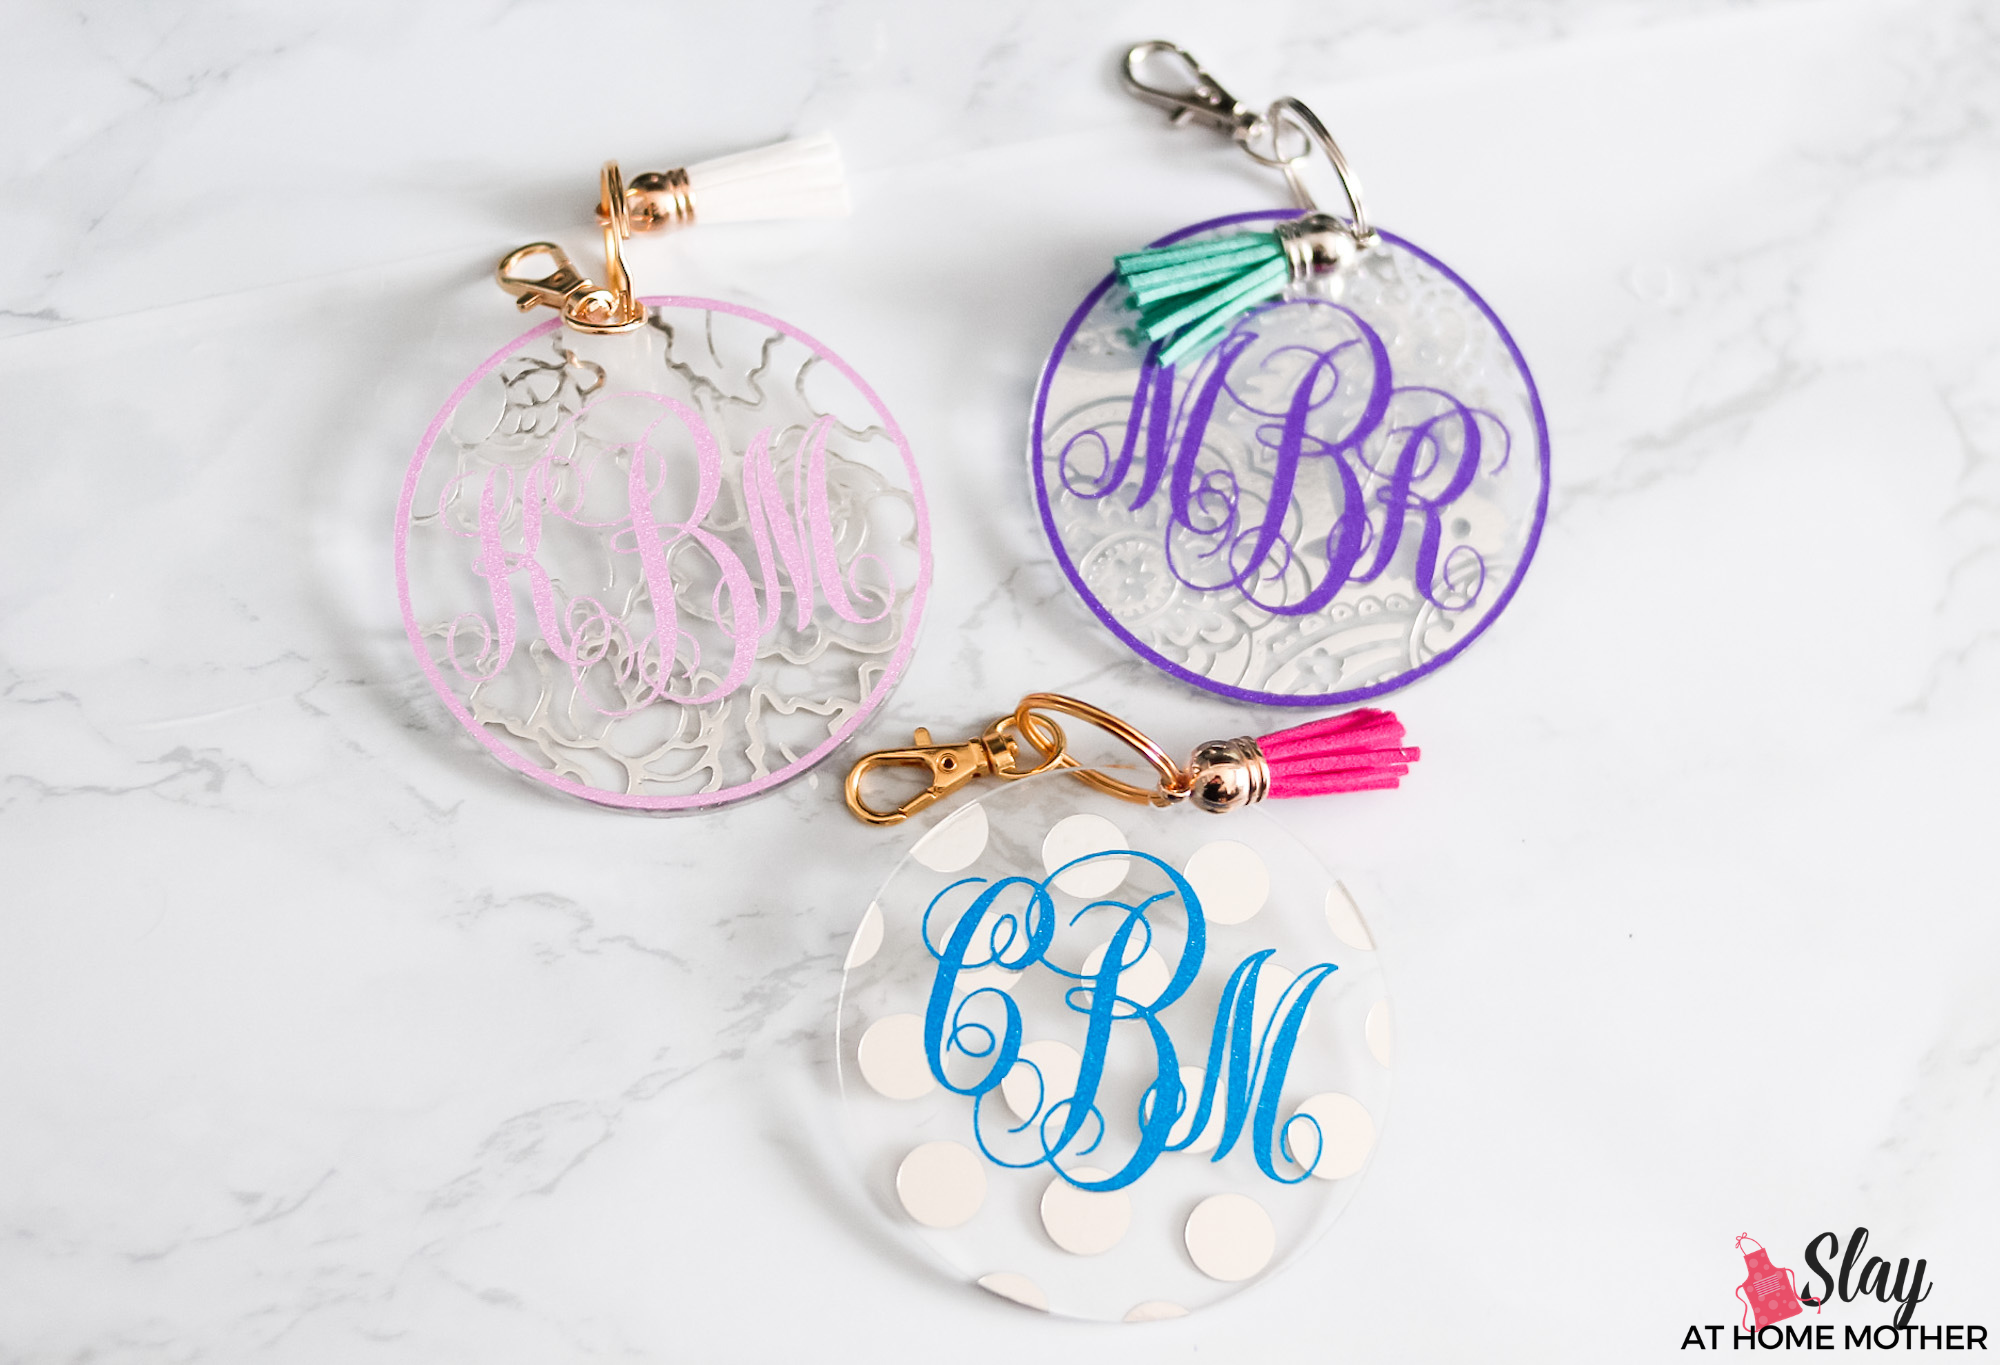
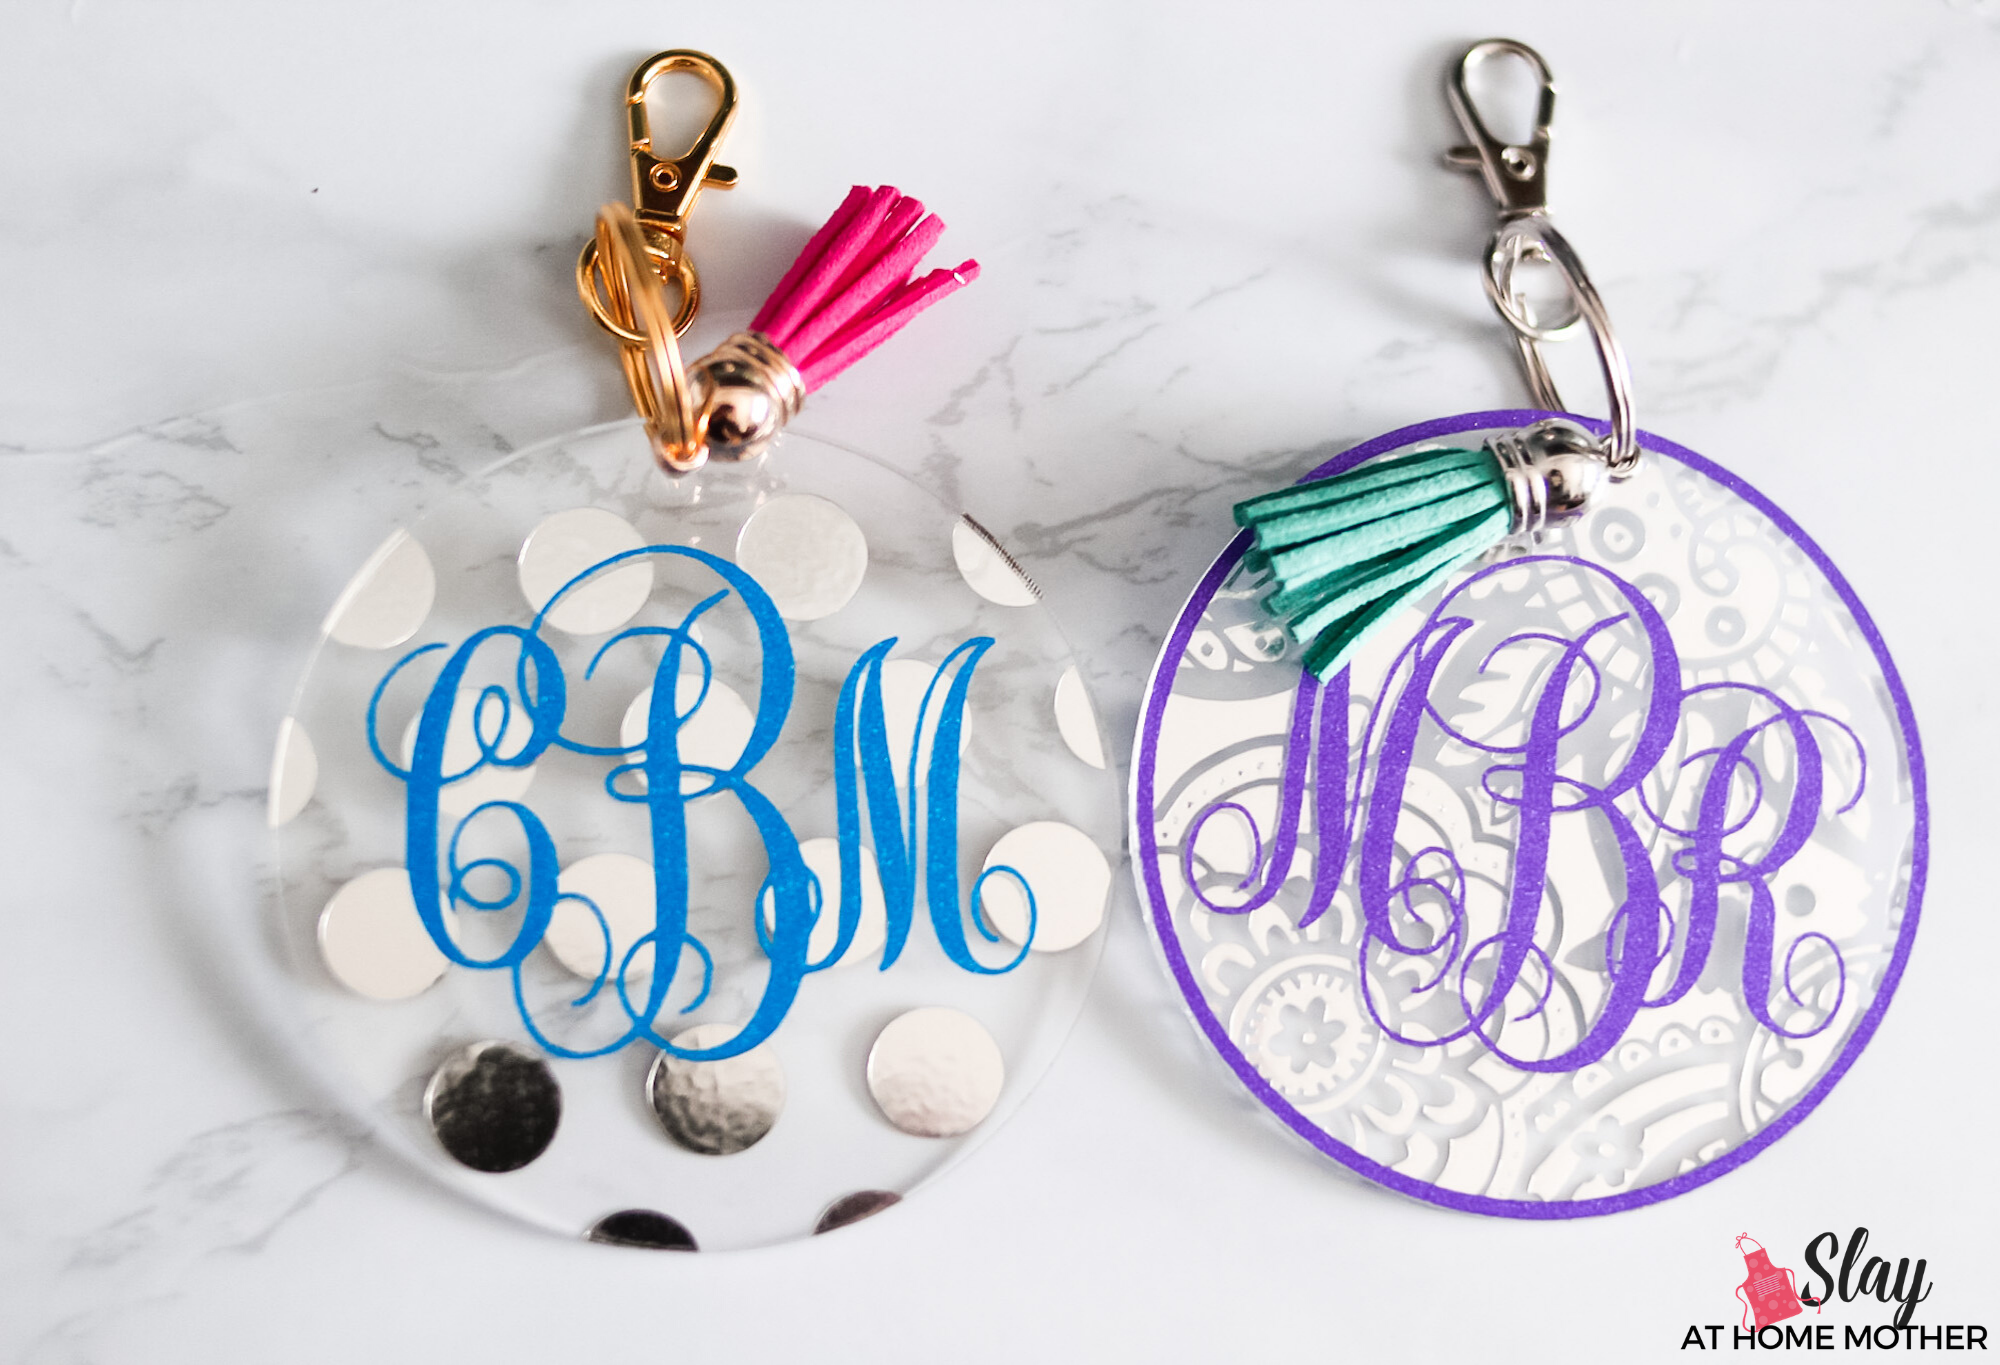
Designing Your Monogram In Design Space
Now let’s get to making our monogram! As I mentioned earlier in this post, I’ll be featuring a font that you can download from Dafont.com called Monogram KK.
It’s a gorgeous cursive font that I just can’t get enough of ;). But feel free to use whatever font you like!
Drag one of your 3″ circles up next to your sliced circle. Add a text box, and type in your monogram.
With this font, you’ll do a lowercase letter (first initial), uppercase letter (last initial), and lowercase letter (middle initial).
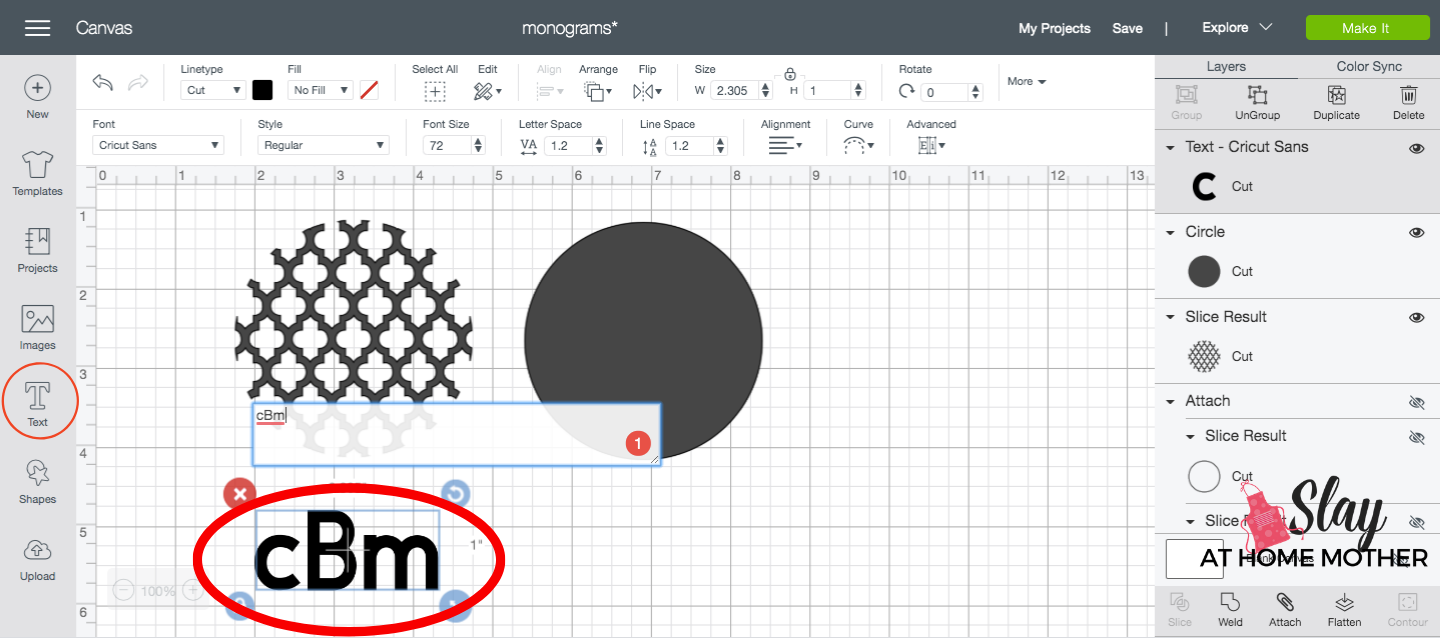
Change the font to Monogram KK by clicking on System and typing in the name of your font.
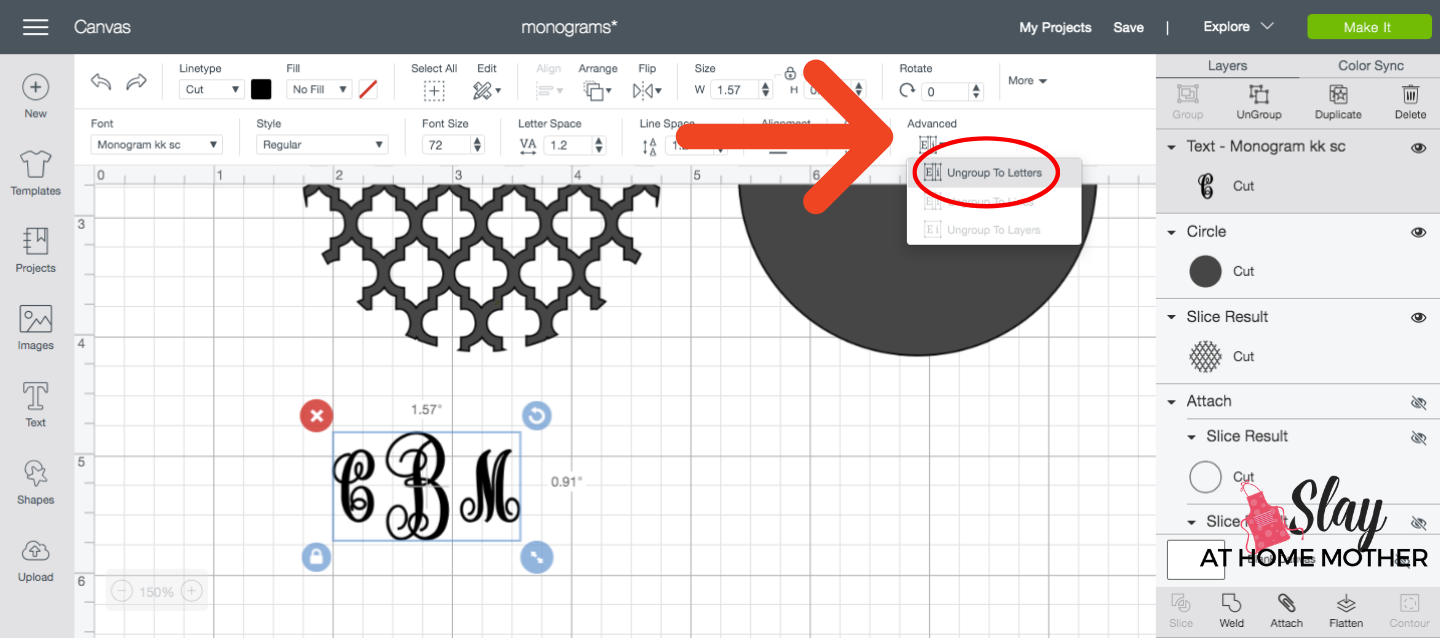
Your font will now look pretty and cursive, but the letters will look like they are spaced too far apart. You can fix that by selecting Advanced (see screenshot below) and clicking Ungroup To Letters.
This will separate the letters so you can move them individually and close the gaps as you like.
You can also select an individual letter and resize it – for instance, if you’d like the middle letter that represents your last initial to be larger, you can resize it without affecting the other two letters.
Once you’ve brought your letters in closer together, go ahead and select Weld towards the lower right corner.
This both attaches your letters to one another and gets rid of the individual cuts so your monogram will cut out as one single design.
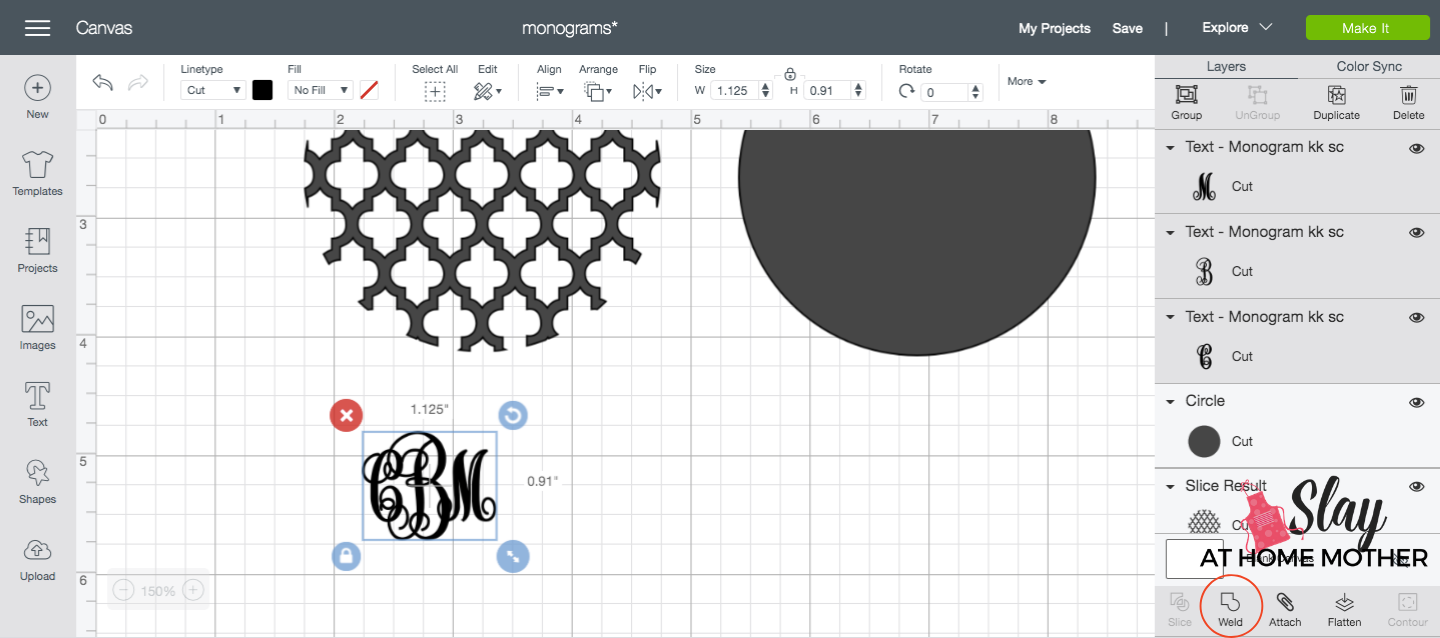
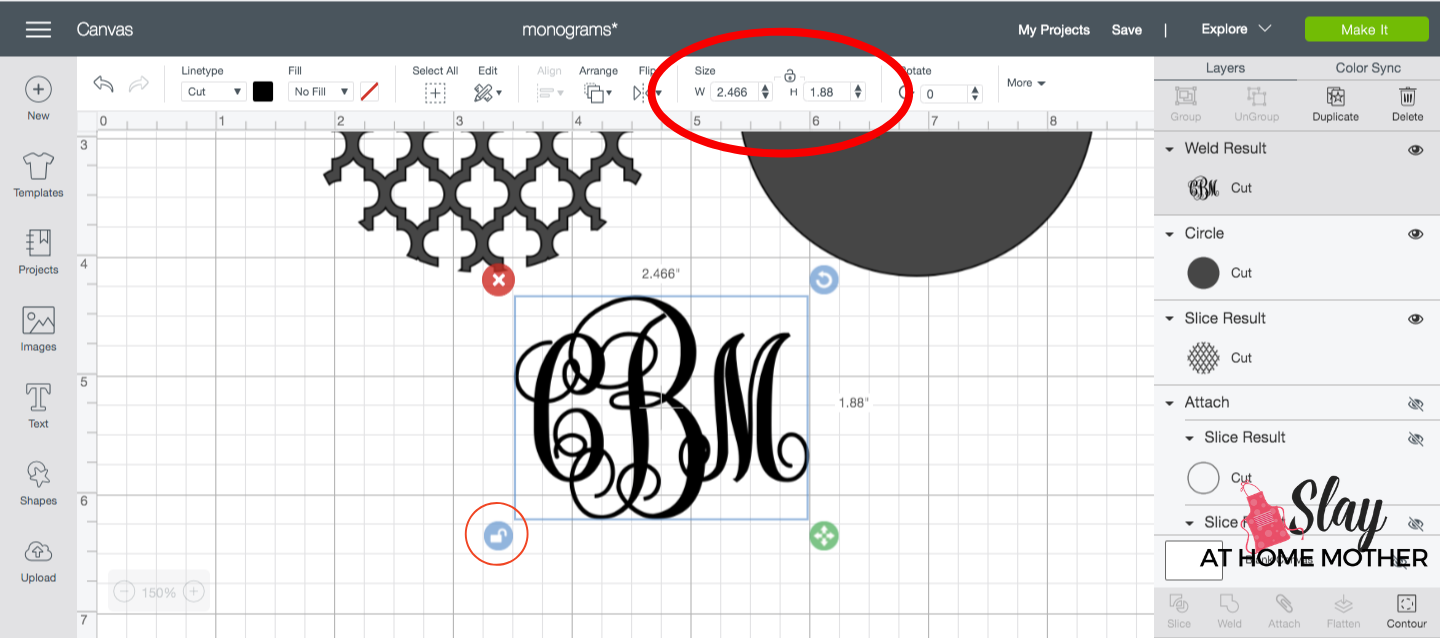
Unlock your monogram by clicking on the lock icon, and adjust the size to fit your circle disc.
For my 3″ discs, I chose my monogram to be 2.466W x 1.88H.
You can position your monogram over your 3″ circle shape at any time to make sure it’s the size you want.
You can also create a ring to go around your acrylic keychain by slicing a slightly smaller circle into your disc shape if you so choose – not a required step.
My rings are included in my free-to-the-public-and-all-of-my-loyal-readers design.
I think the circle looks really nice and draws more attention to the monogram, but that’s just me.
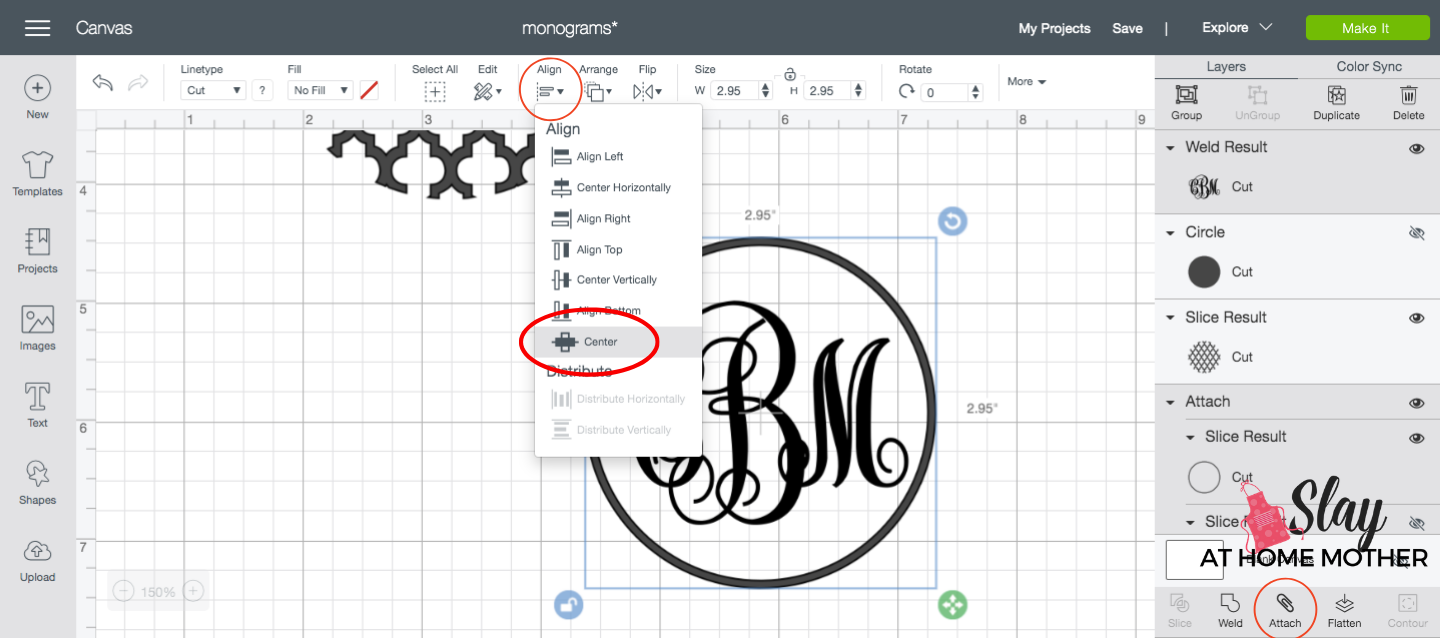
Center align your circle and your monogram to prep it for cutting and Attach the two so they will cut together and in position when you’re ready.
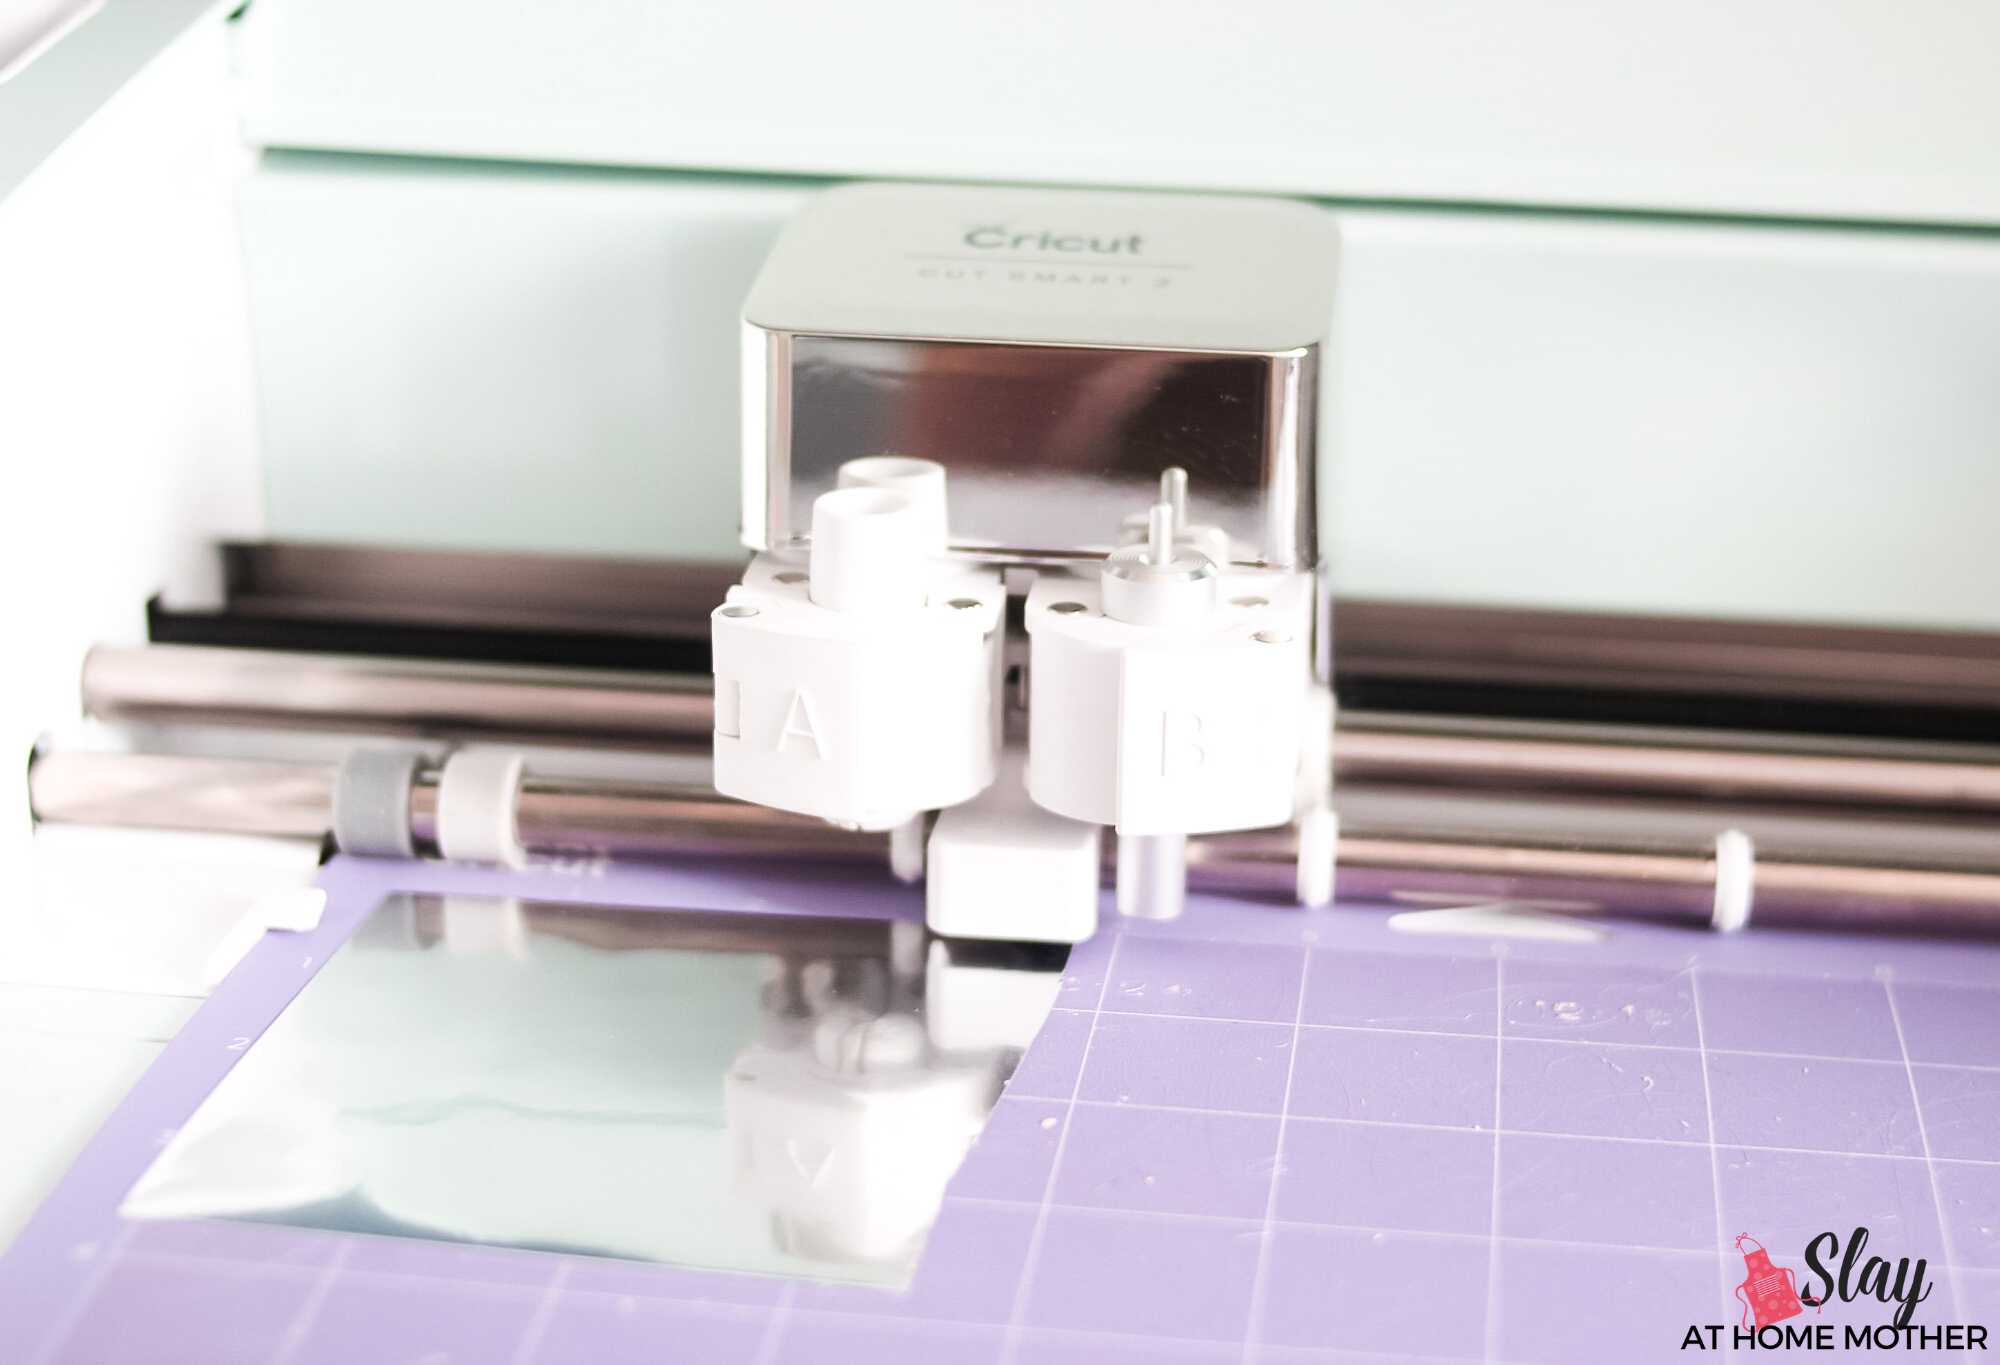
Cutting Special Materials On Cricut Explore Air 2
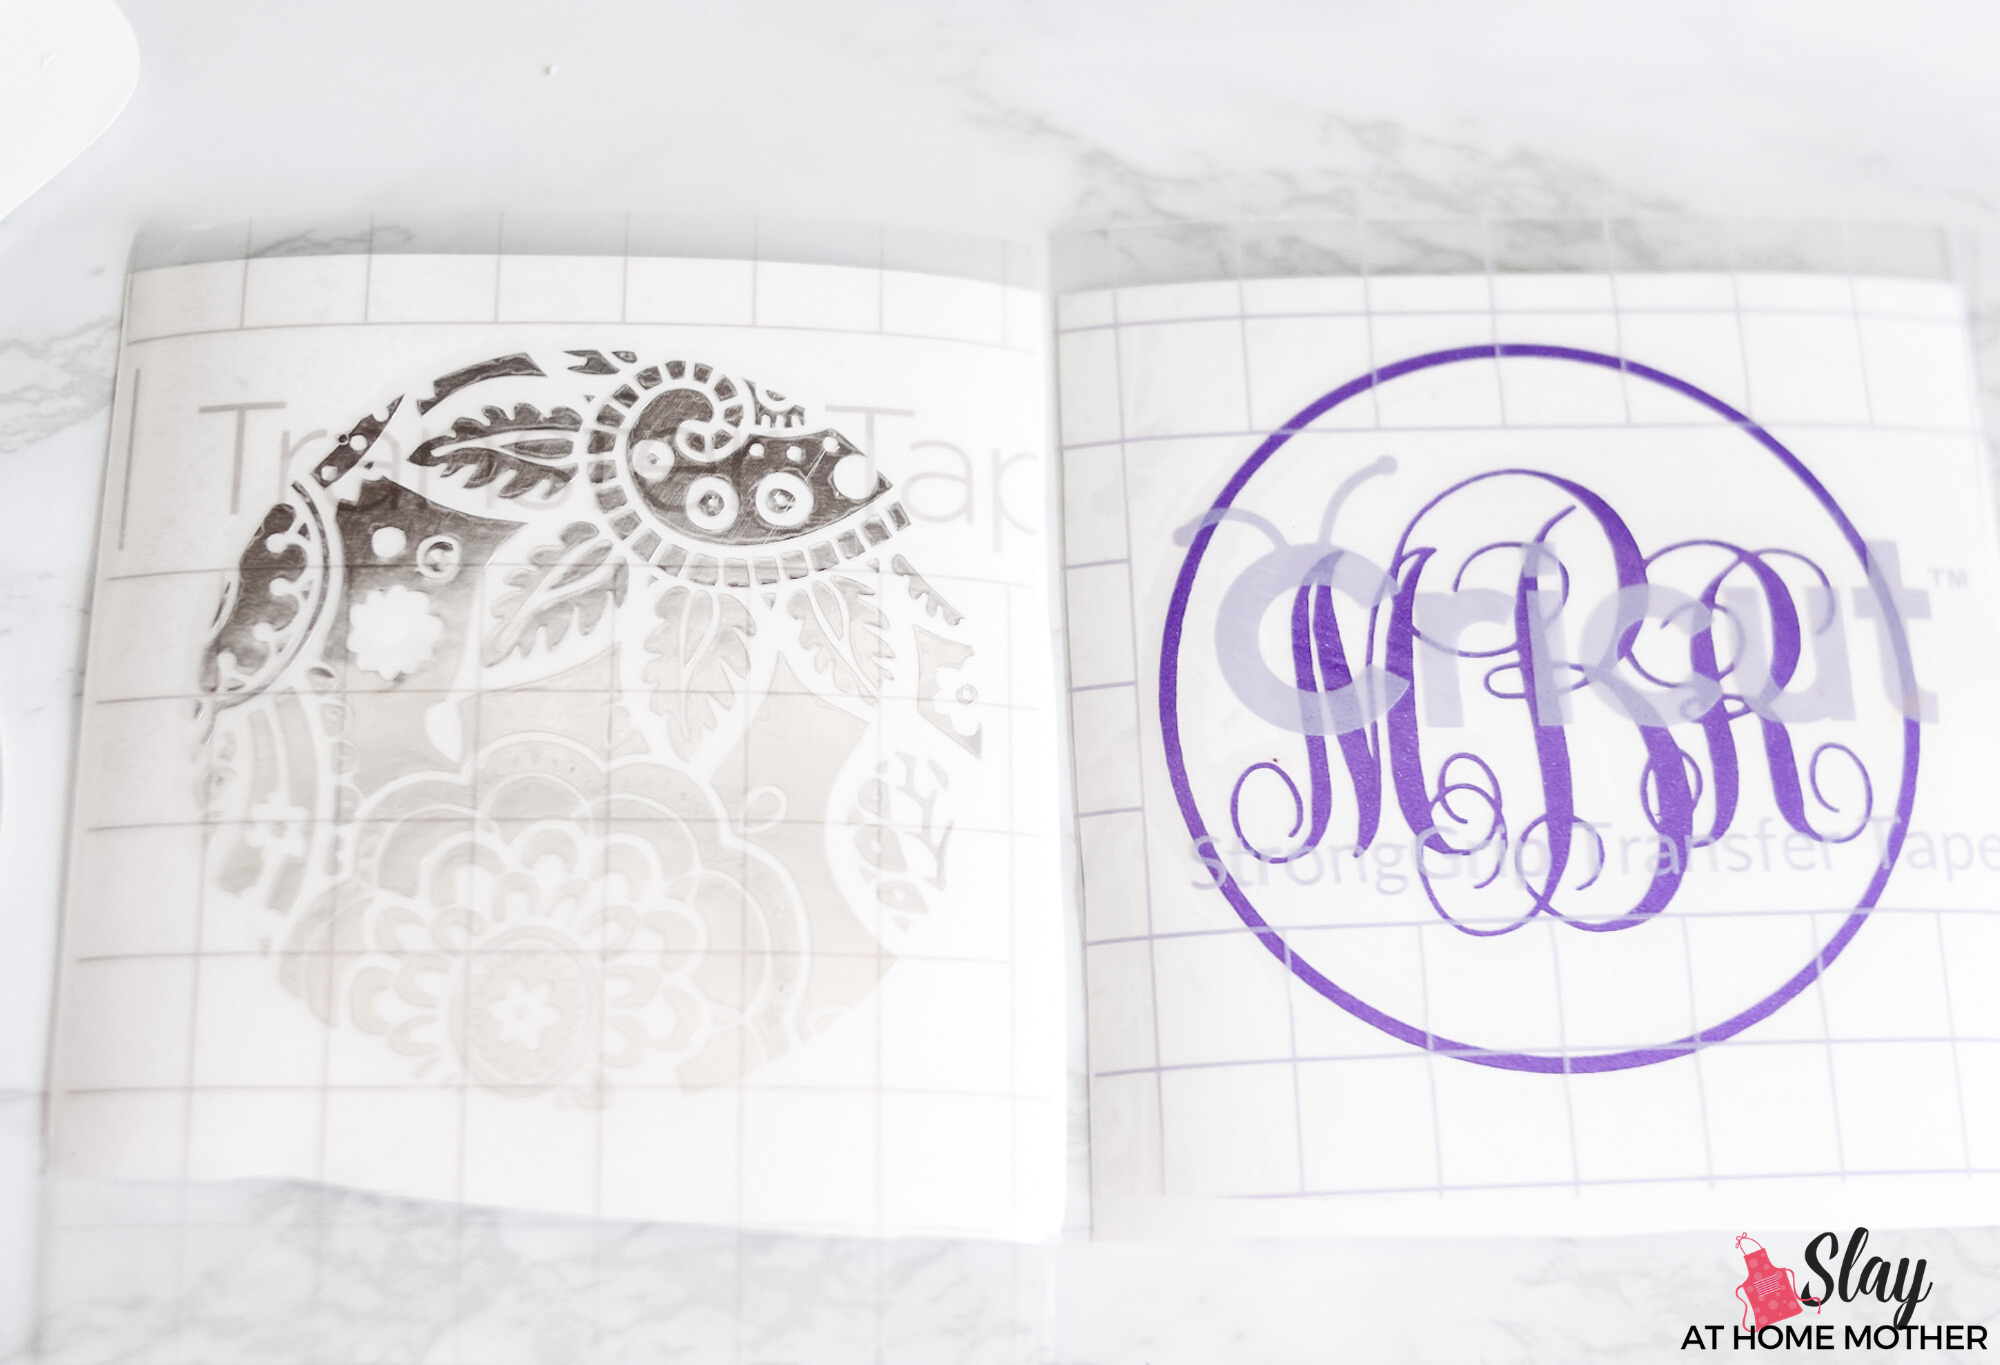
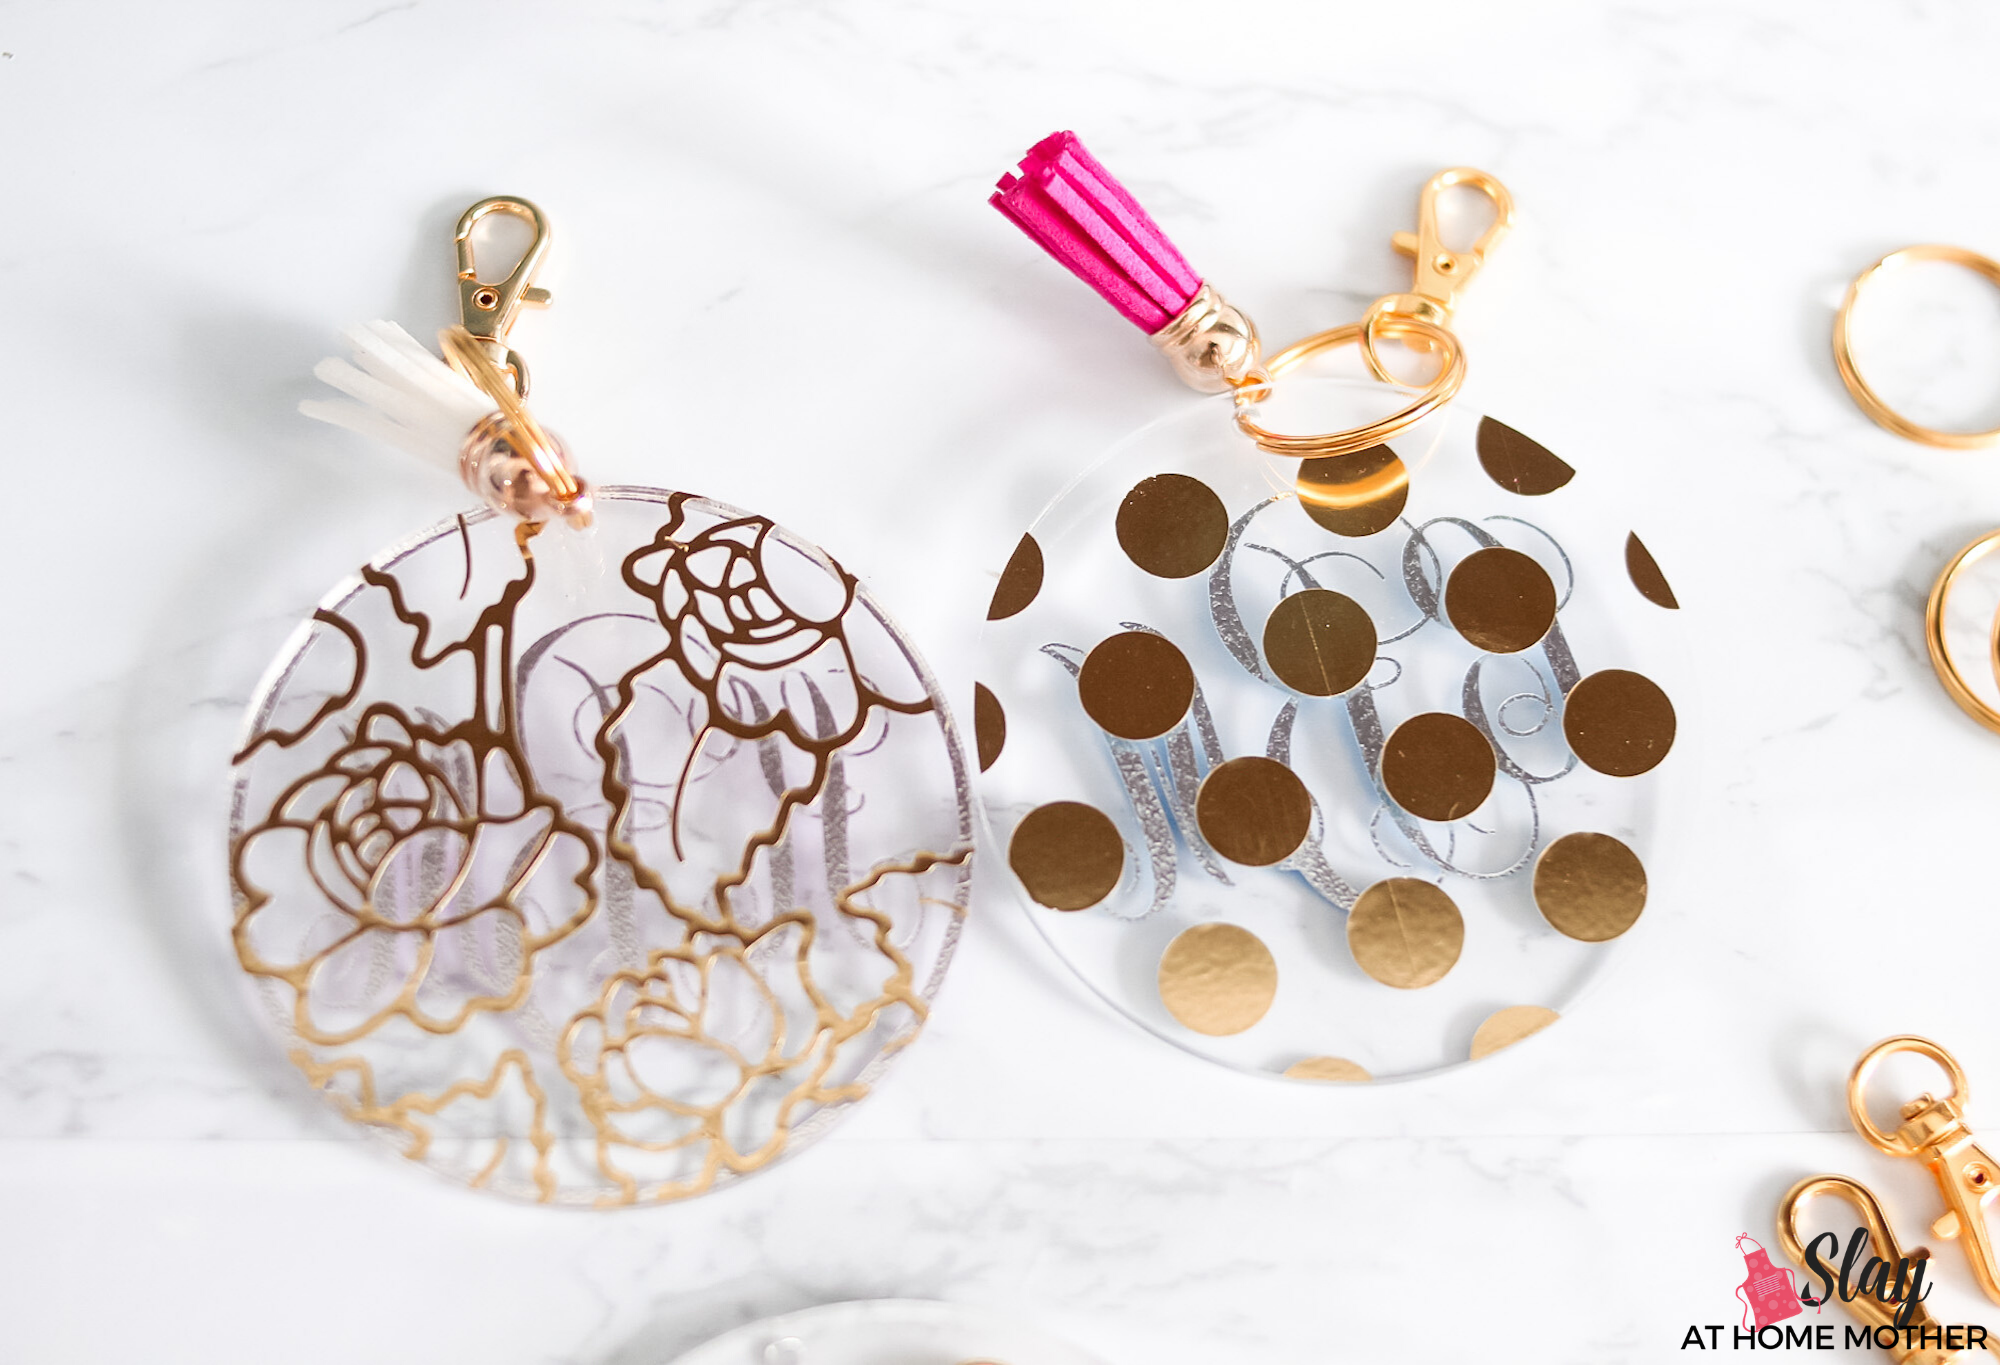
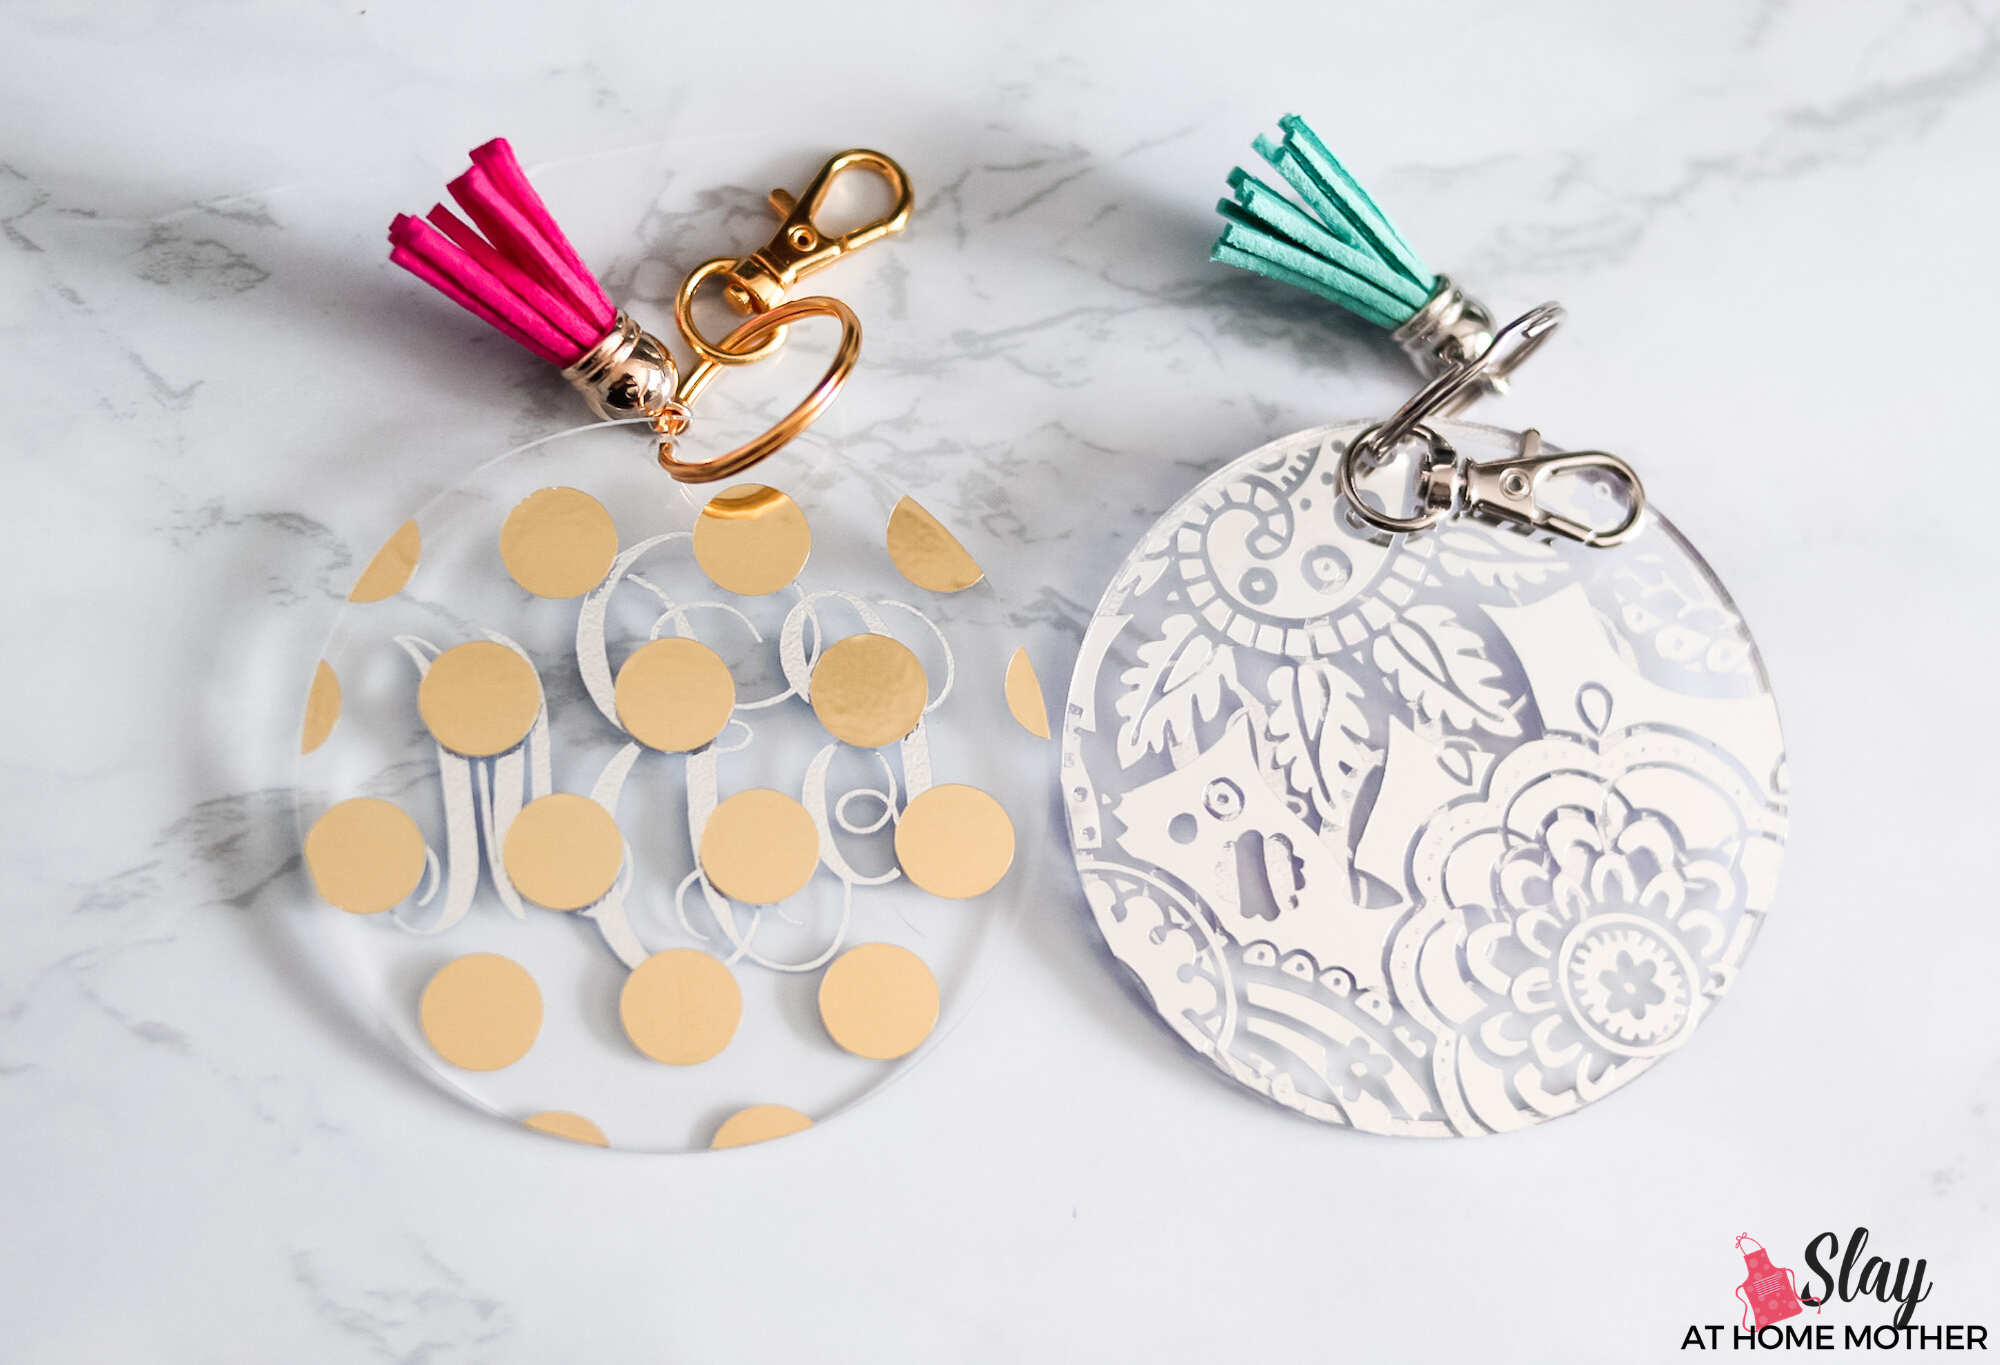
For the backs of each keychain, I am using Cricut Adhesive Foil in the colors silver and gold to match the hardware I chose.
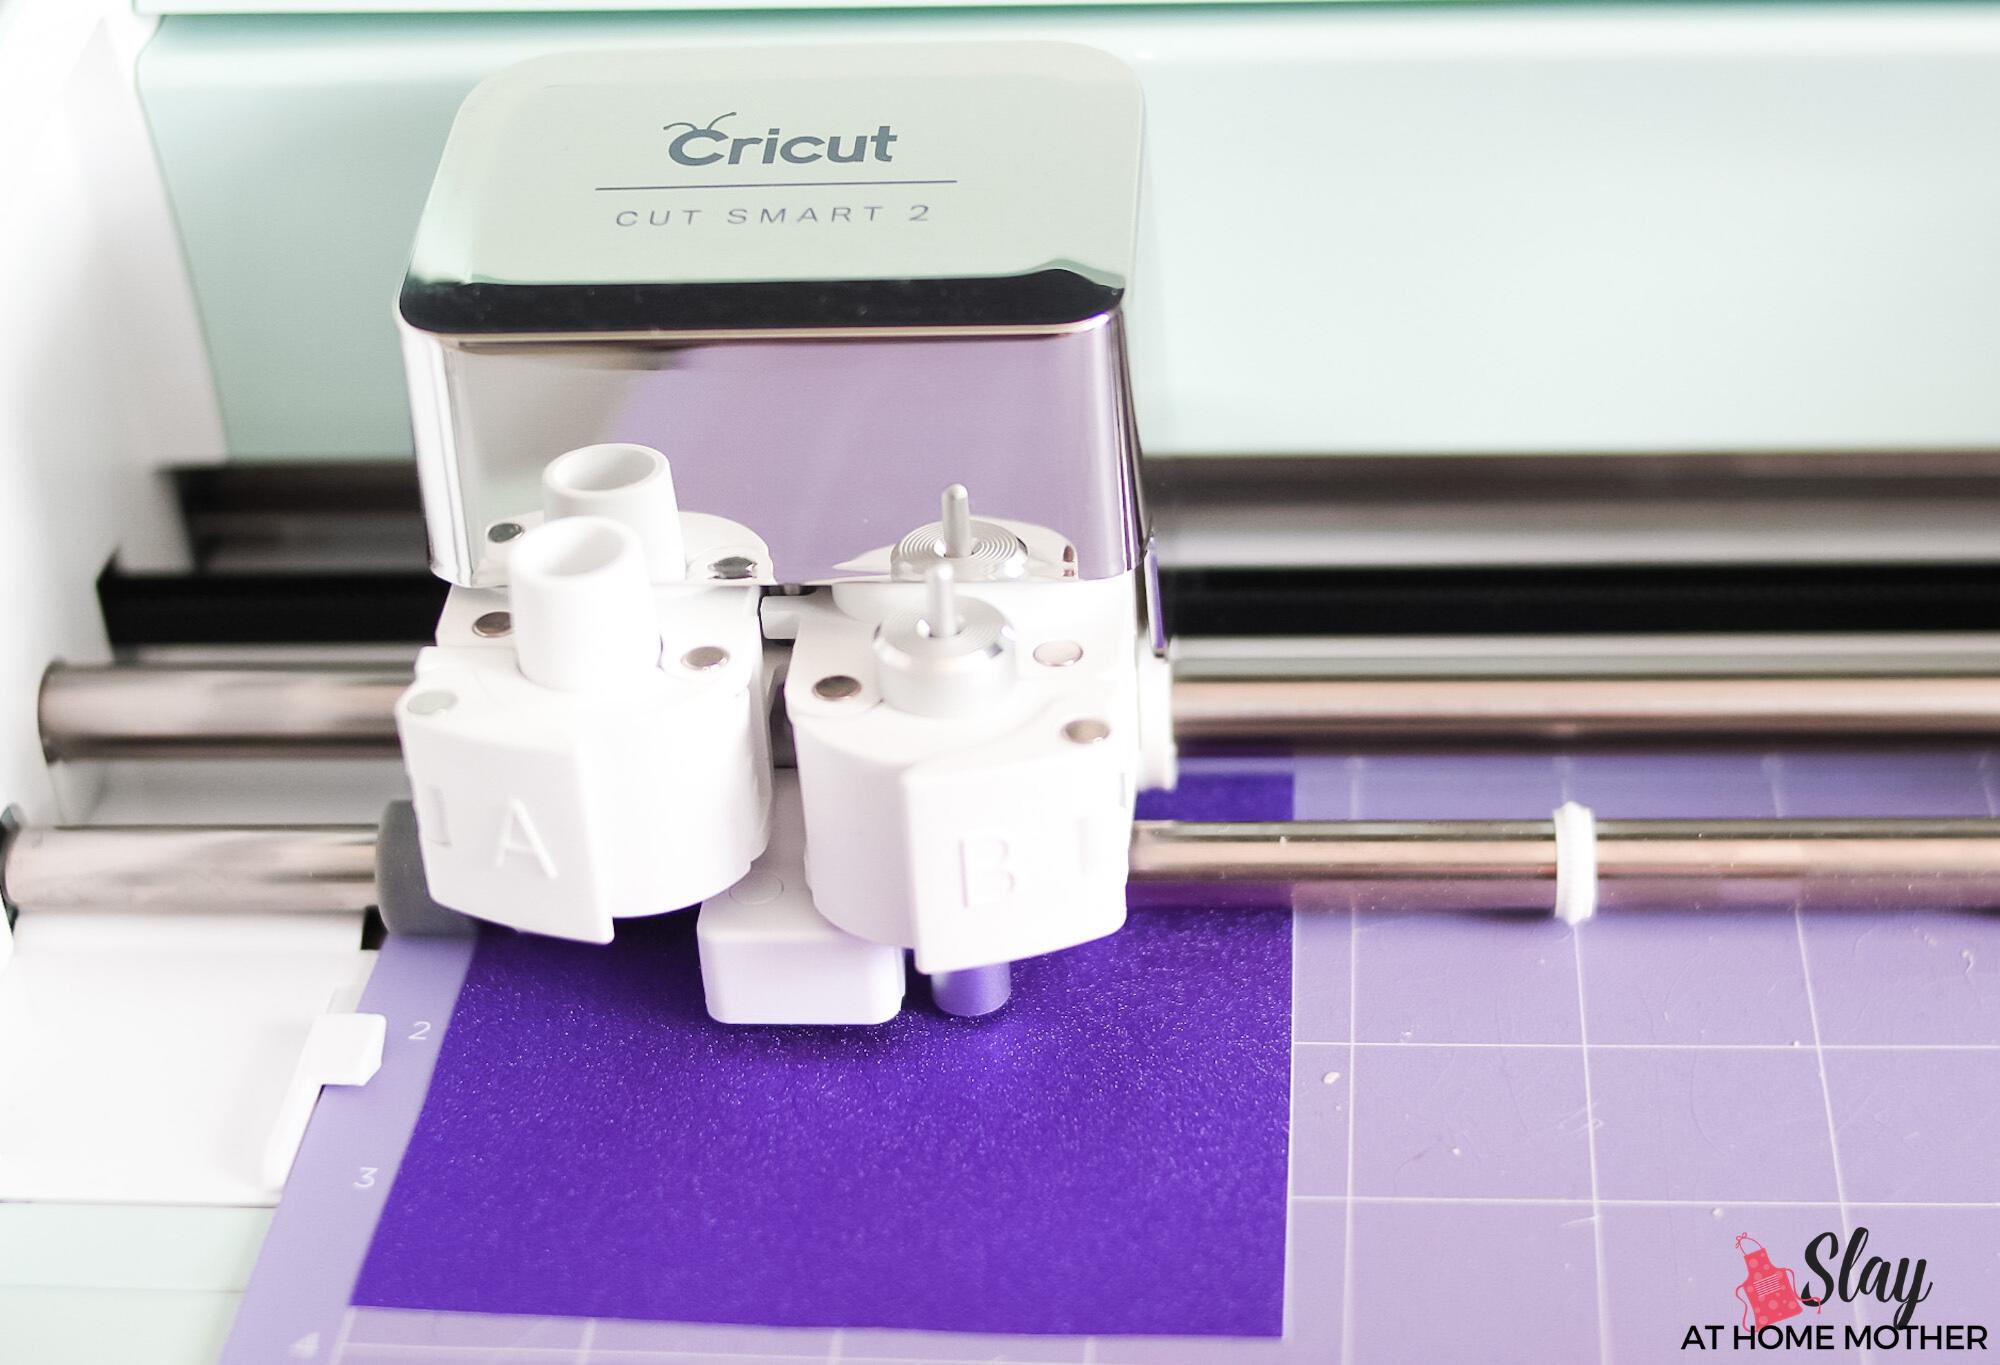
For the front monogram designs, I am using Cricut’s Premium Vinyl Shimmer (or permanent glitter vinyl). Both of these materials require the StrongGrip (purple) mat for cutting.
First, I like to cut the more intricate design, which in this project happens to be the backs of the keychains. Select your monogram and click on the eye icon towards the right of the screen to hide it for now. Any items that are ‘hidden’ from view will not be cut by your machine until they are ‘revealed’ again.
Set your dial to Custom, and select your material as Adhesive Foil.
Cut a square of adhesive foil the size you need and attach it with the foil facing UP to your StrongGrip mat. Cut with your Cricut machine, and then remove the mat from the machine and remove the foil from the mat.
In Design Space, click the eye icon next to your monogram to reveal it on the screen again, and click the eye icon next to your pattern image to hide it since we’ve already cut it.
Cut out a piece of Premium Vinyl Shimmer material and attach it to your StrongGrip mat, glitter side facing UP. Be sure to select your material in Design Space before cutting.
Cut with your Cricut machine.
Once your material has been removed from the mat, you can go ahead and weed your monogram and pattern design with a weeding tool.
You May Also Like: DIY Mermaid Monogram Tumblers
Transferring Your Designs To Your DIY Keychain
Once your designs are fully weeded and ready to transfer, you’ll need to roll out the transfer tape!
For adhesive foil, you’ll need regular Cricut transfer tape.
For the premium vinyl shimmer material, you’ll need StrongGrip transfer tape.
Cricut brand StrongGrip transfer tape has purple grid lines.
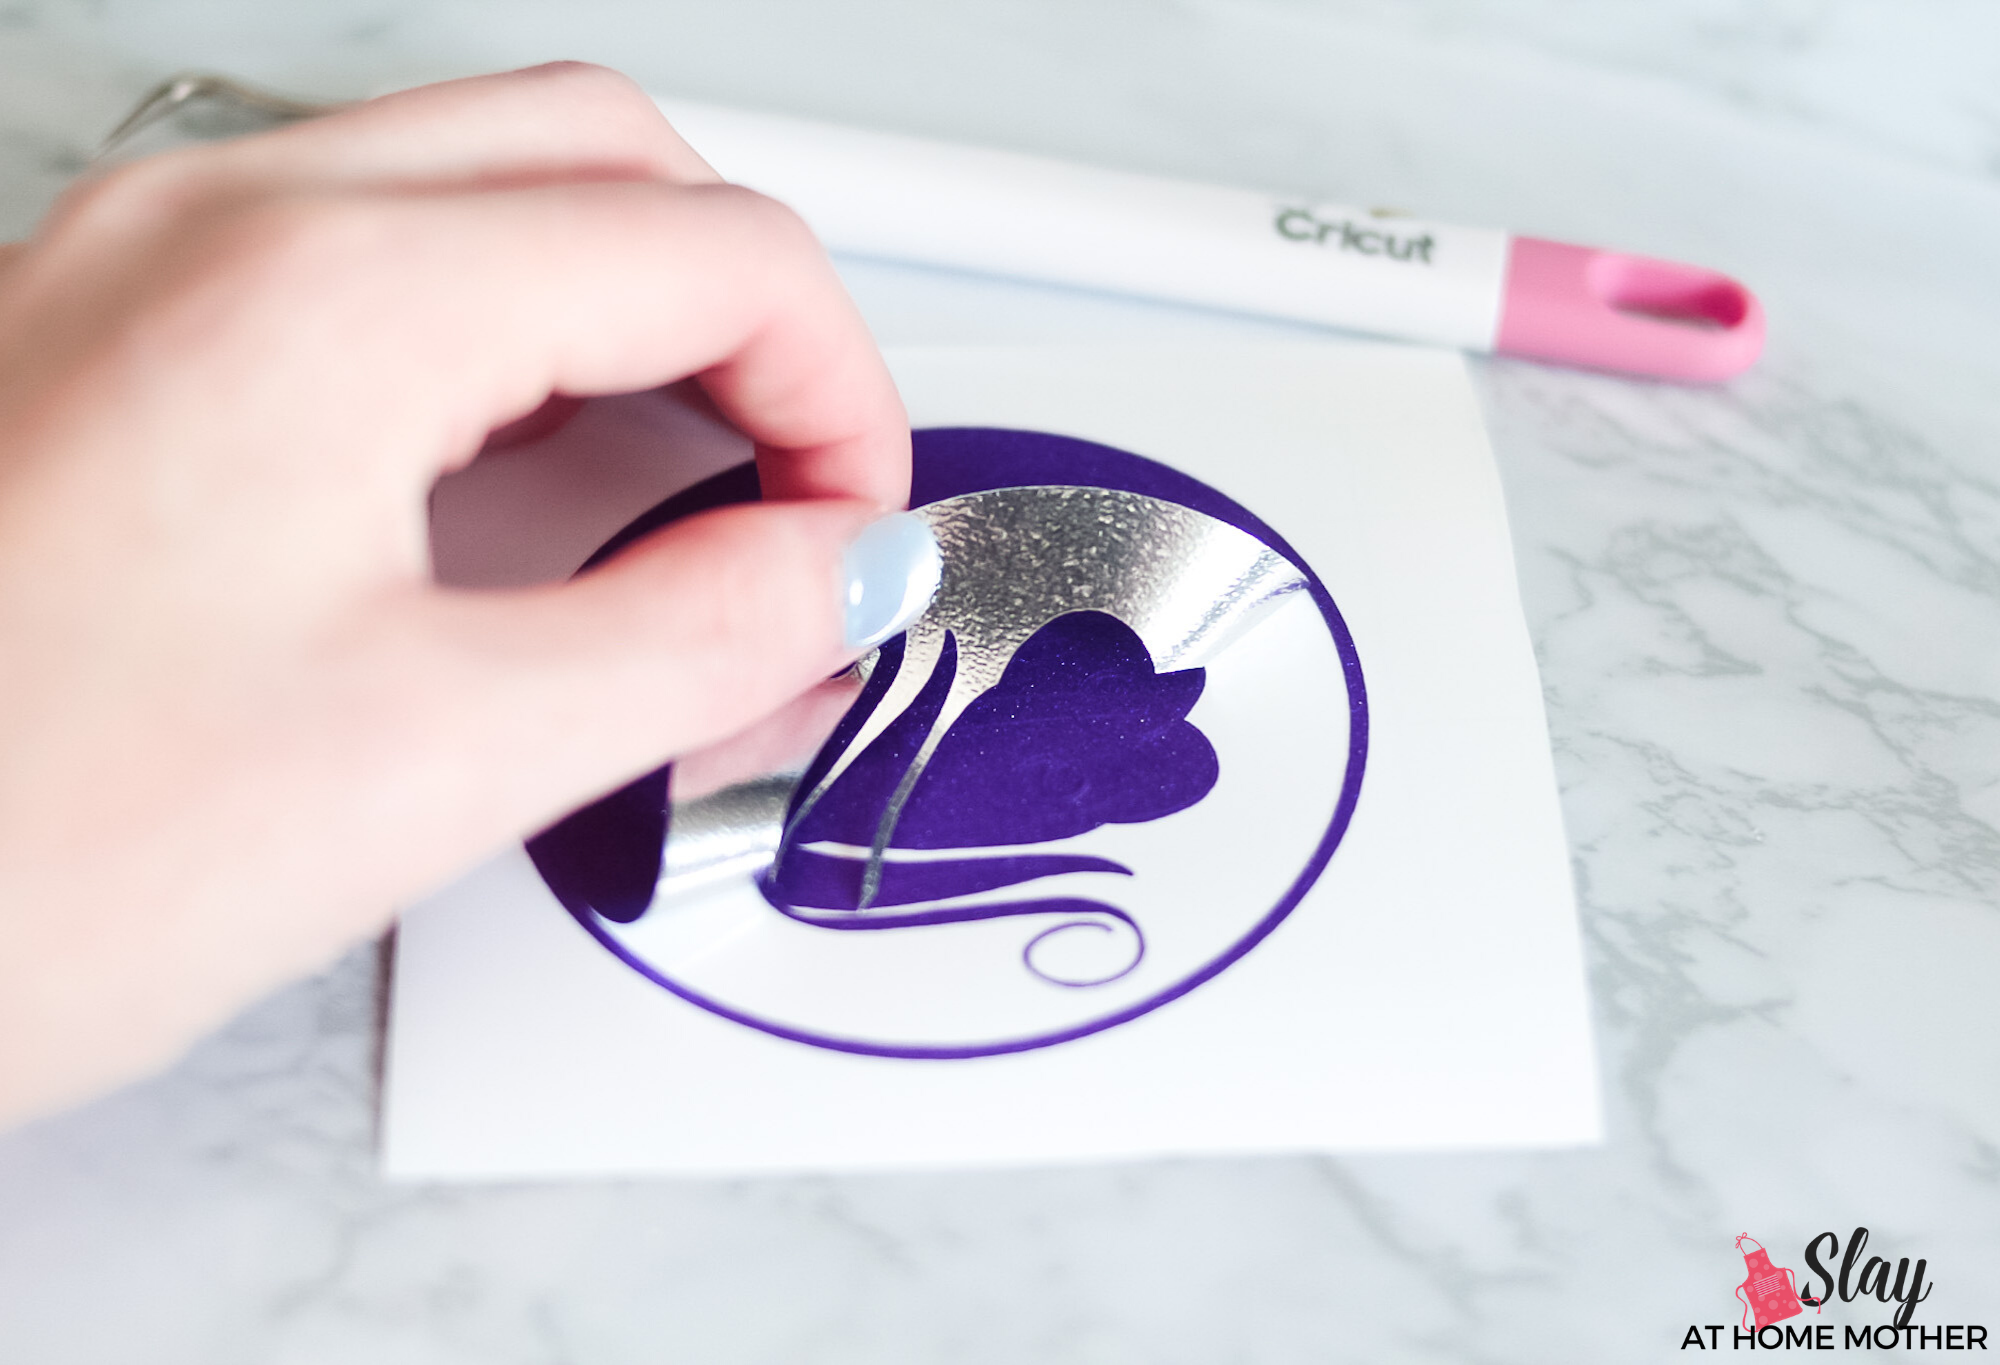
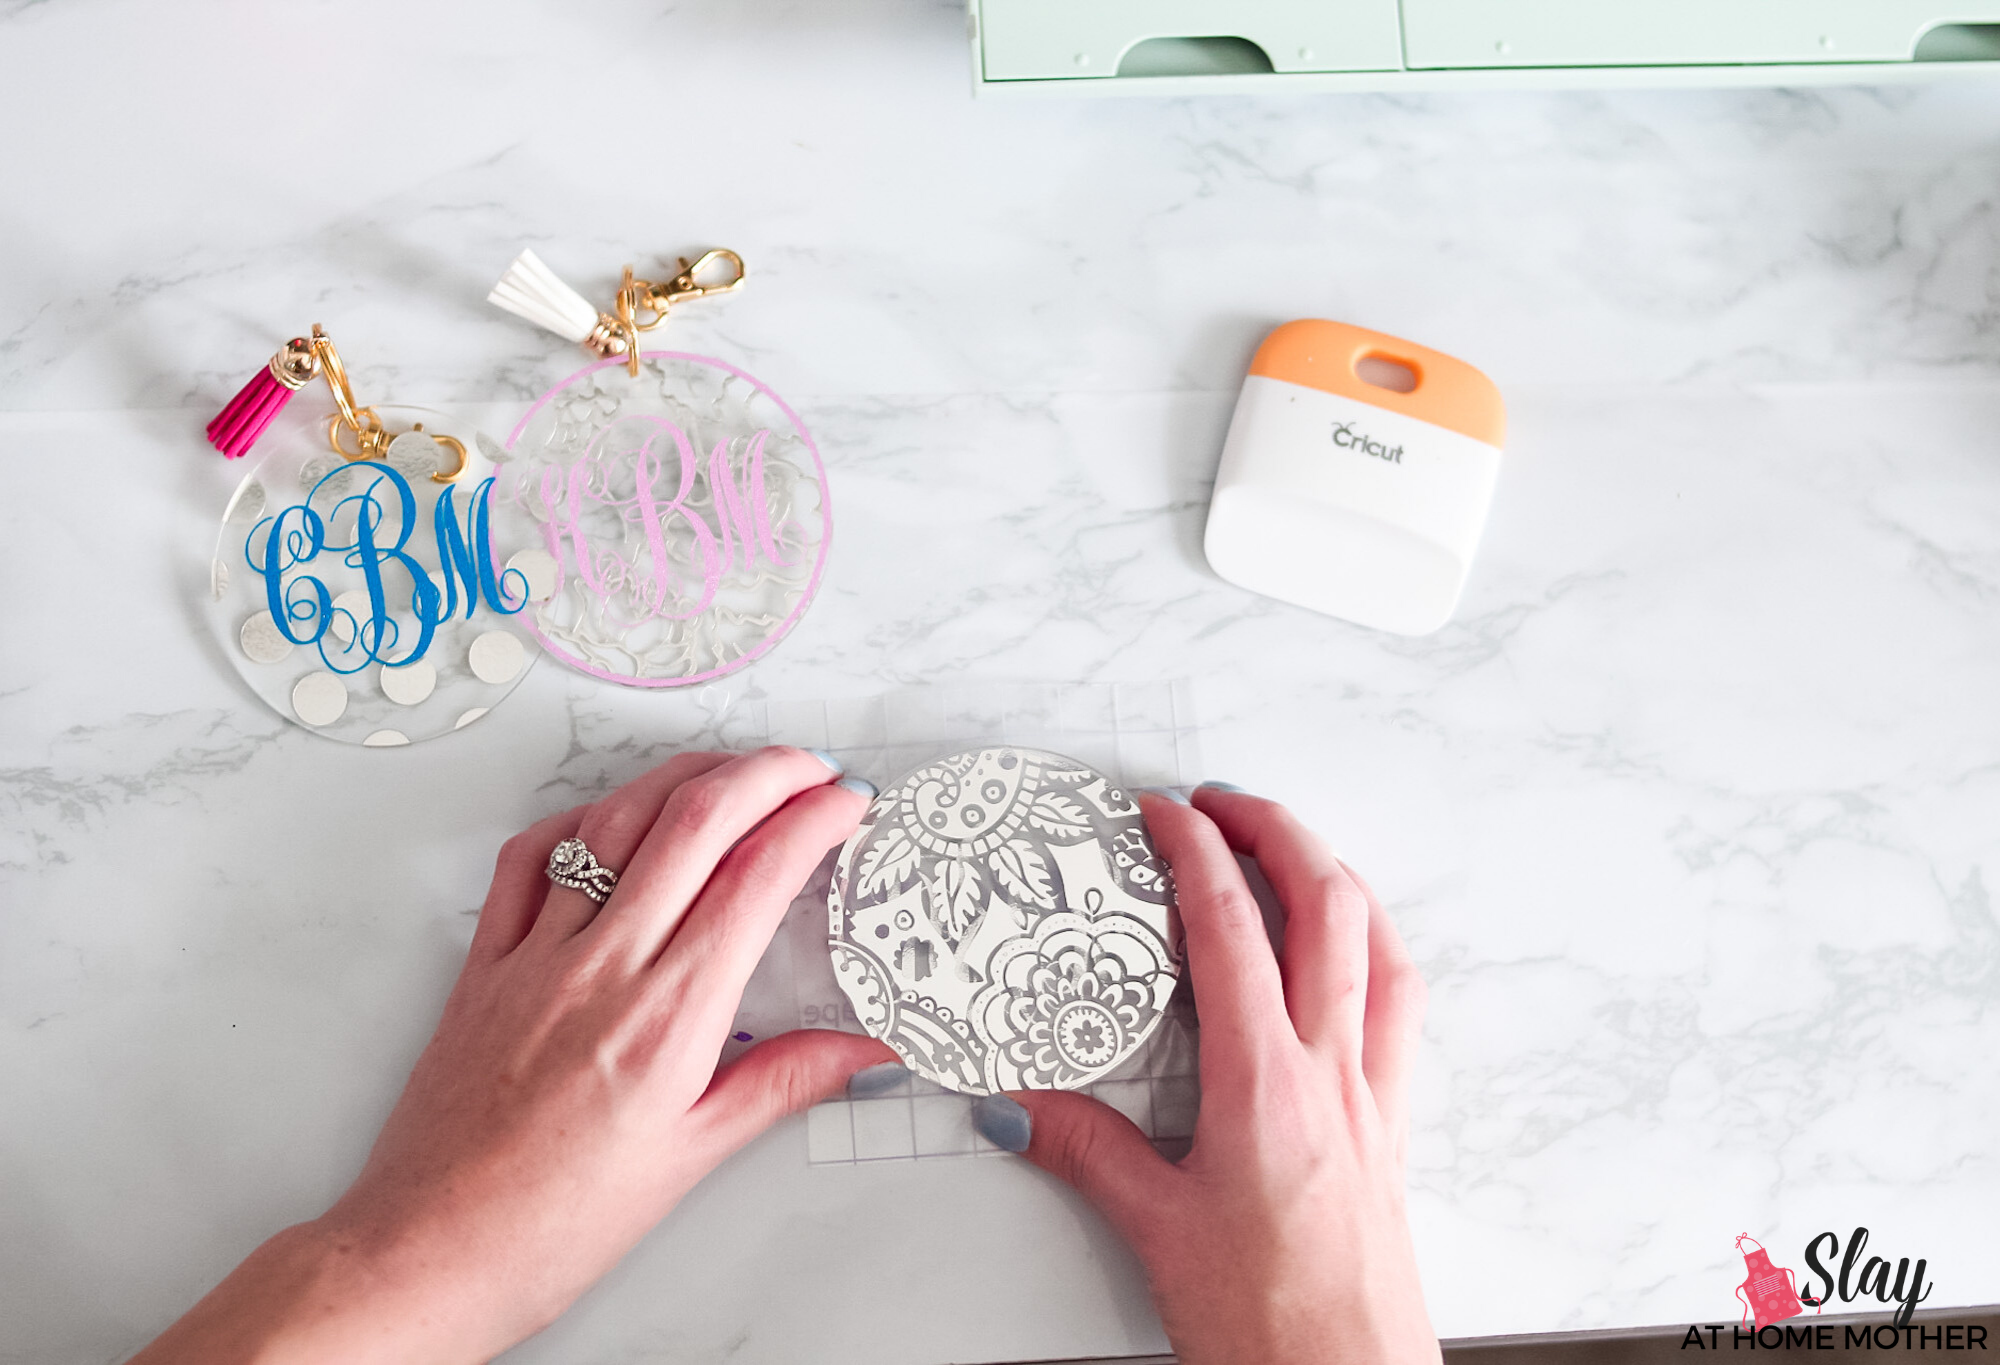
Make sure your acrylic DIY keychains are clean of debris and dry before transferring decals. Stick your decal to your keychain, rubbing the decal through the transfer tape using a scraper.
Gently peel away the transfer tape.
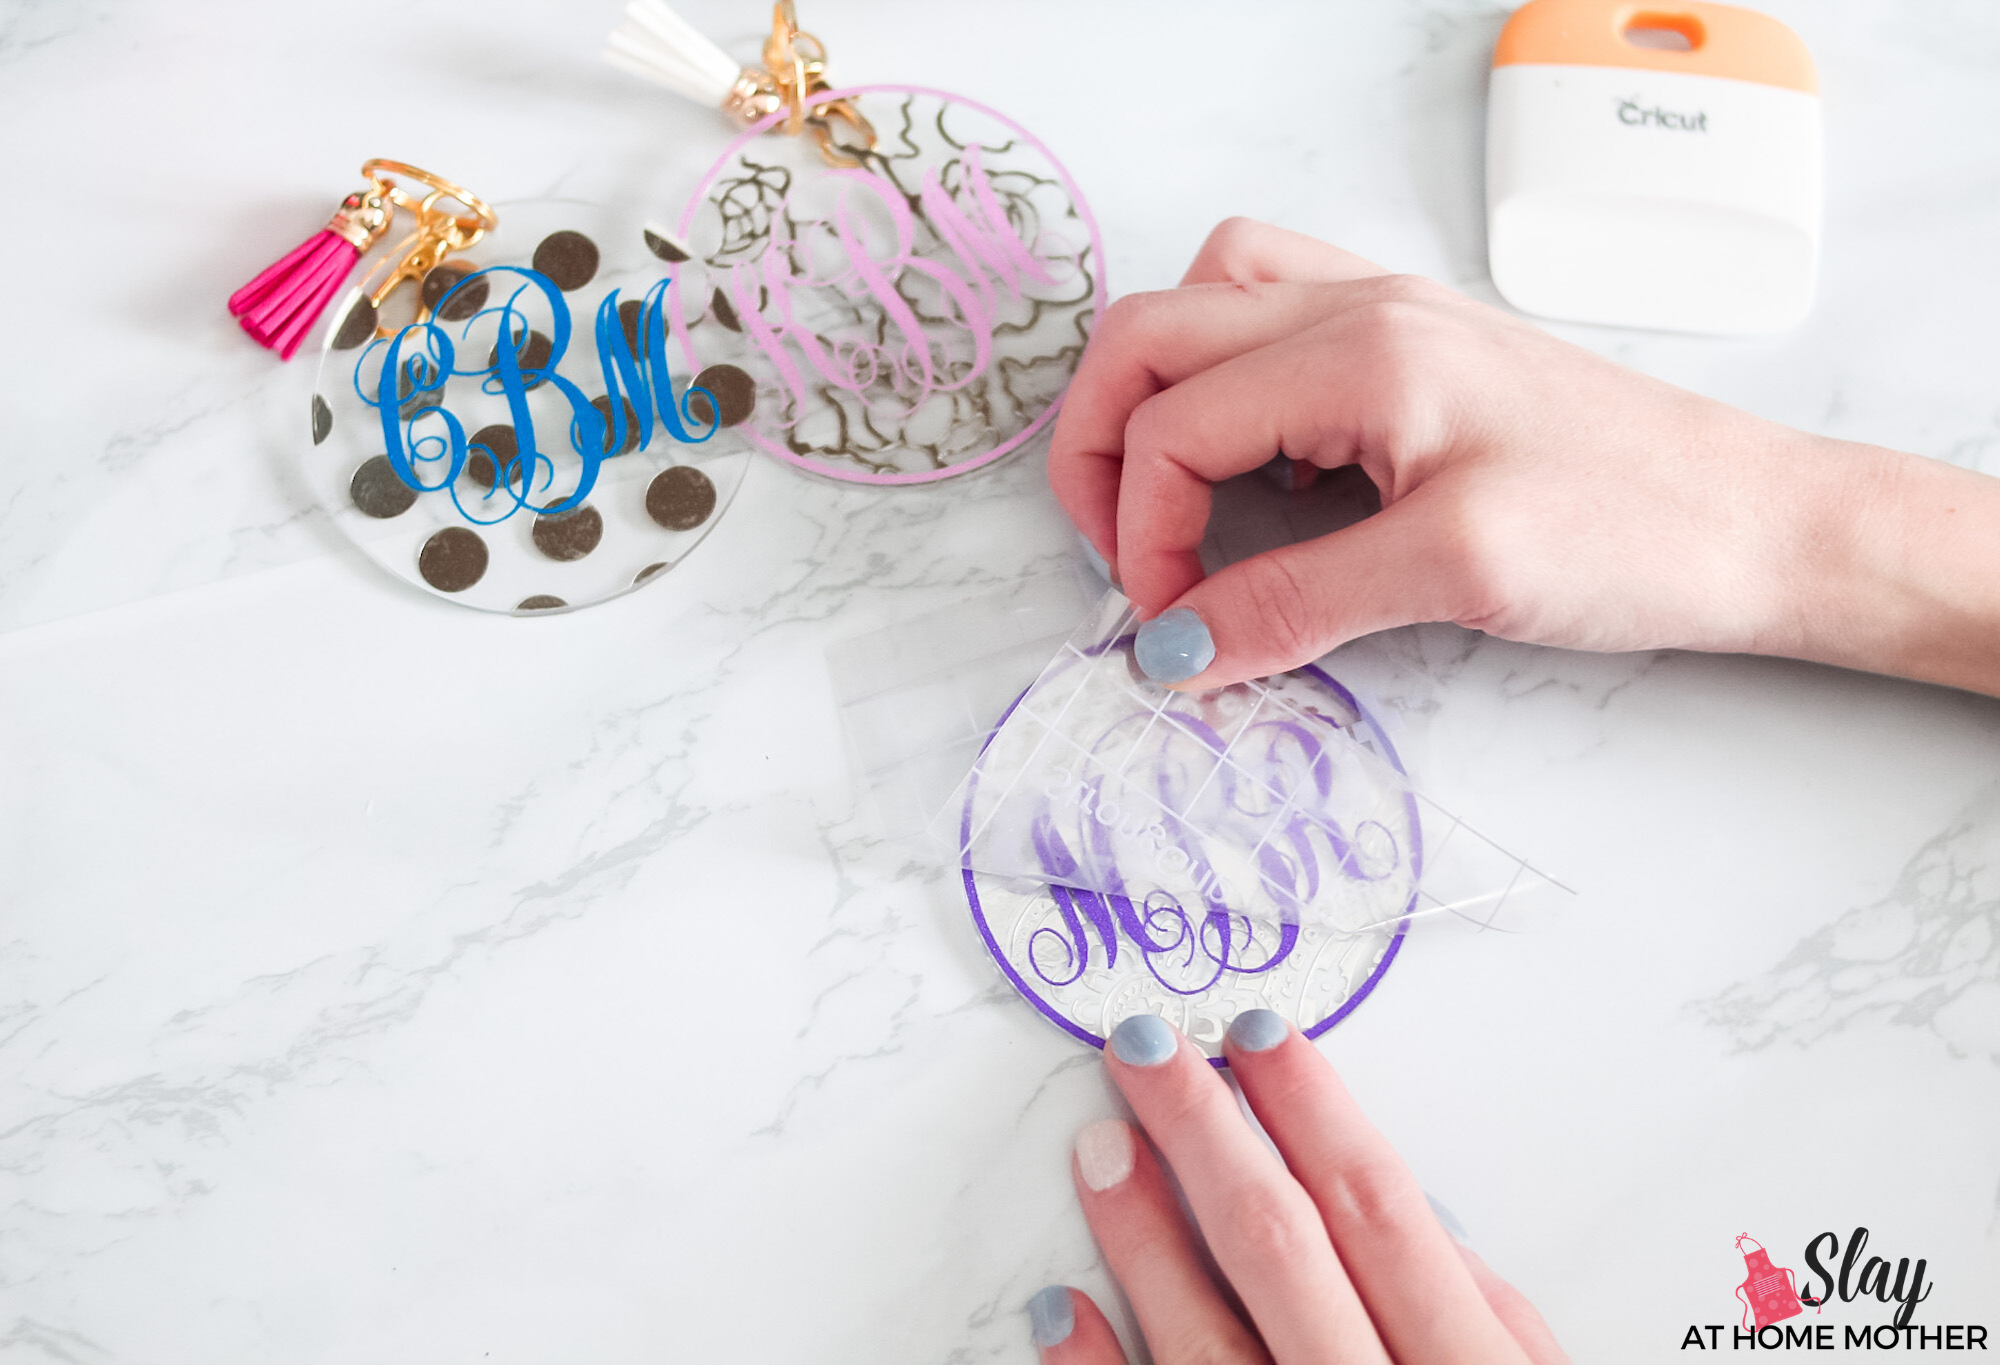
To attach the glitter monogram decal with a circle around it, there’s a little trick I do to line it up right the first time,
Place your transfer tape with your glitter monogram decal on your working surface, sticky side facing UP.
Hover your keychain over the circle and line up the circle with the edges of the keychain. Press down.
Flip your keychain so the monogram decal is facing up towards you now, and rub through the transfer tape with a scraper.

Gently remove StrongGrip transfer tape.
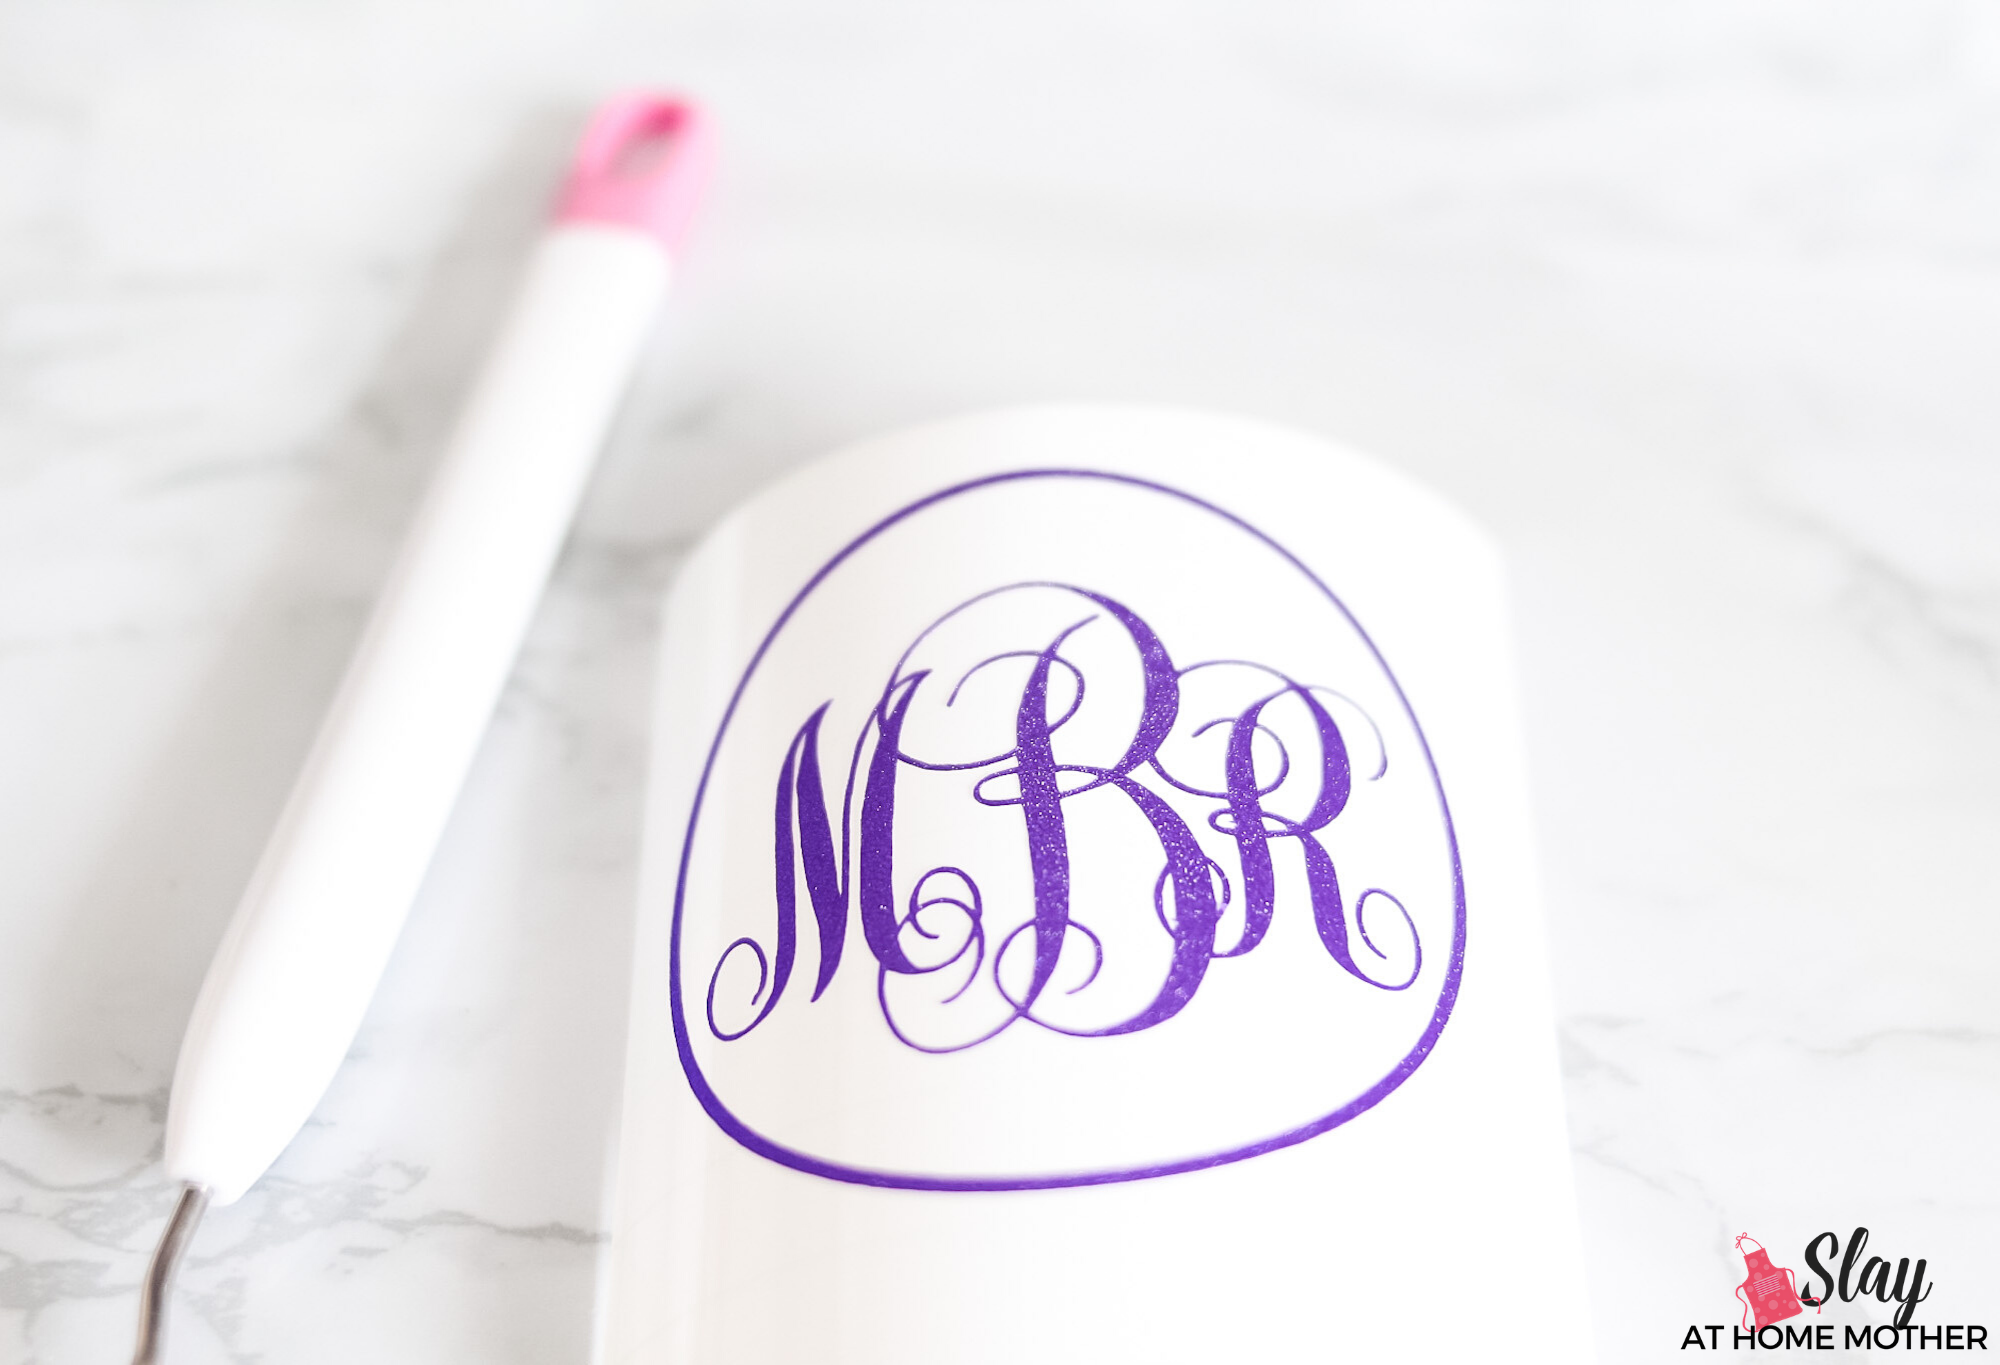
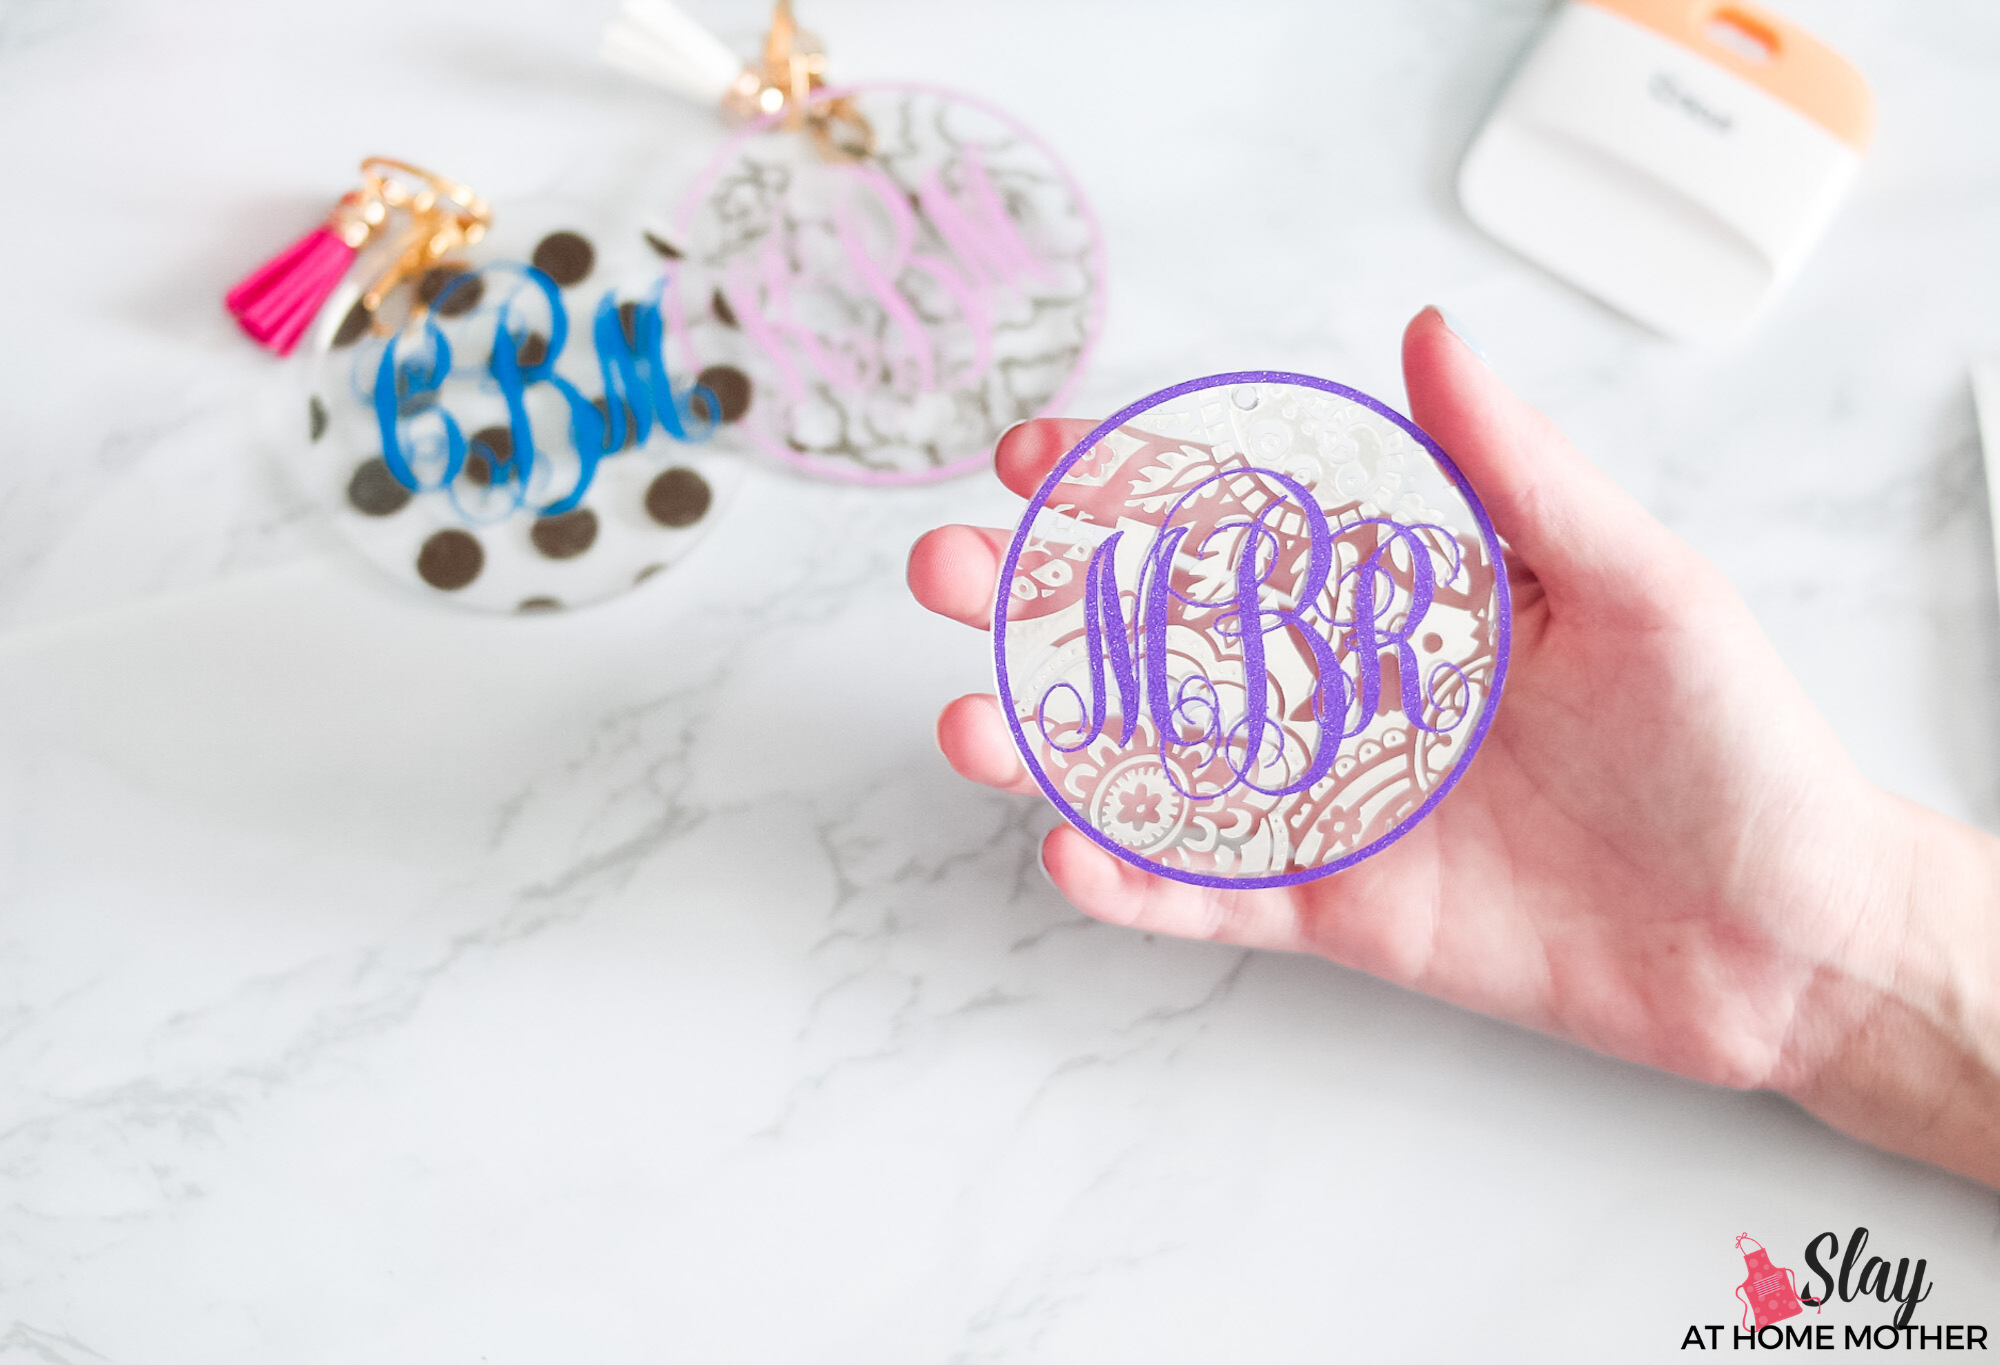
And ta-da!
Your keychain decals are put on and look beautiful.
Now you just need some hardware…
Attaching Hardware To Your Finished DIY Keychains
Because I’m using both silver and gold adhesive foil on my keychains, I’ve coordinated the color of hardware for each with the color of foil used.
Although, technically, gold foil looks silver on the adhesive side (as you can see through the clear disc keychains below) so you could absolutely get away with using silver hardware for all of your DIY keychains.
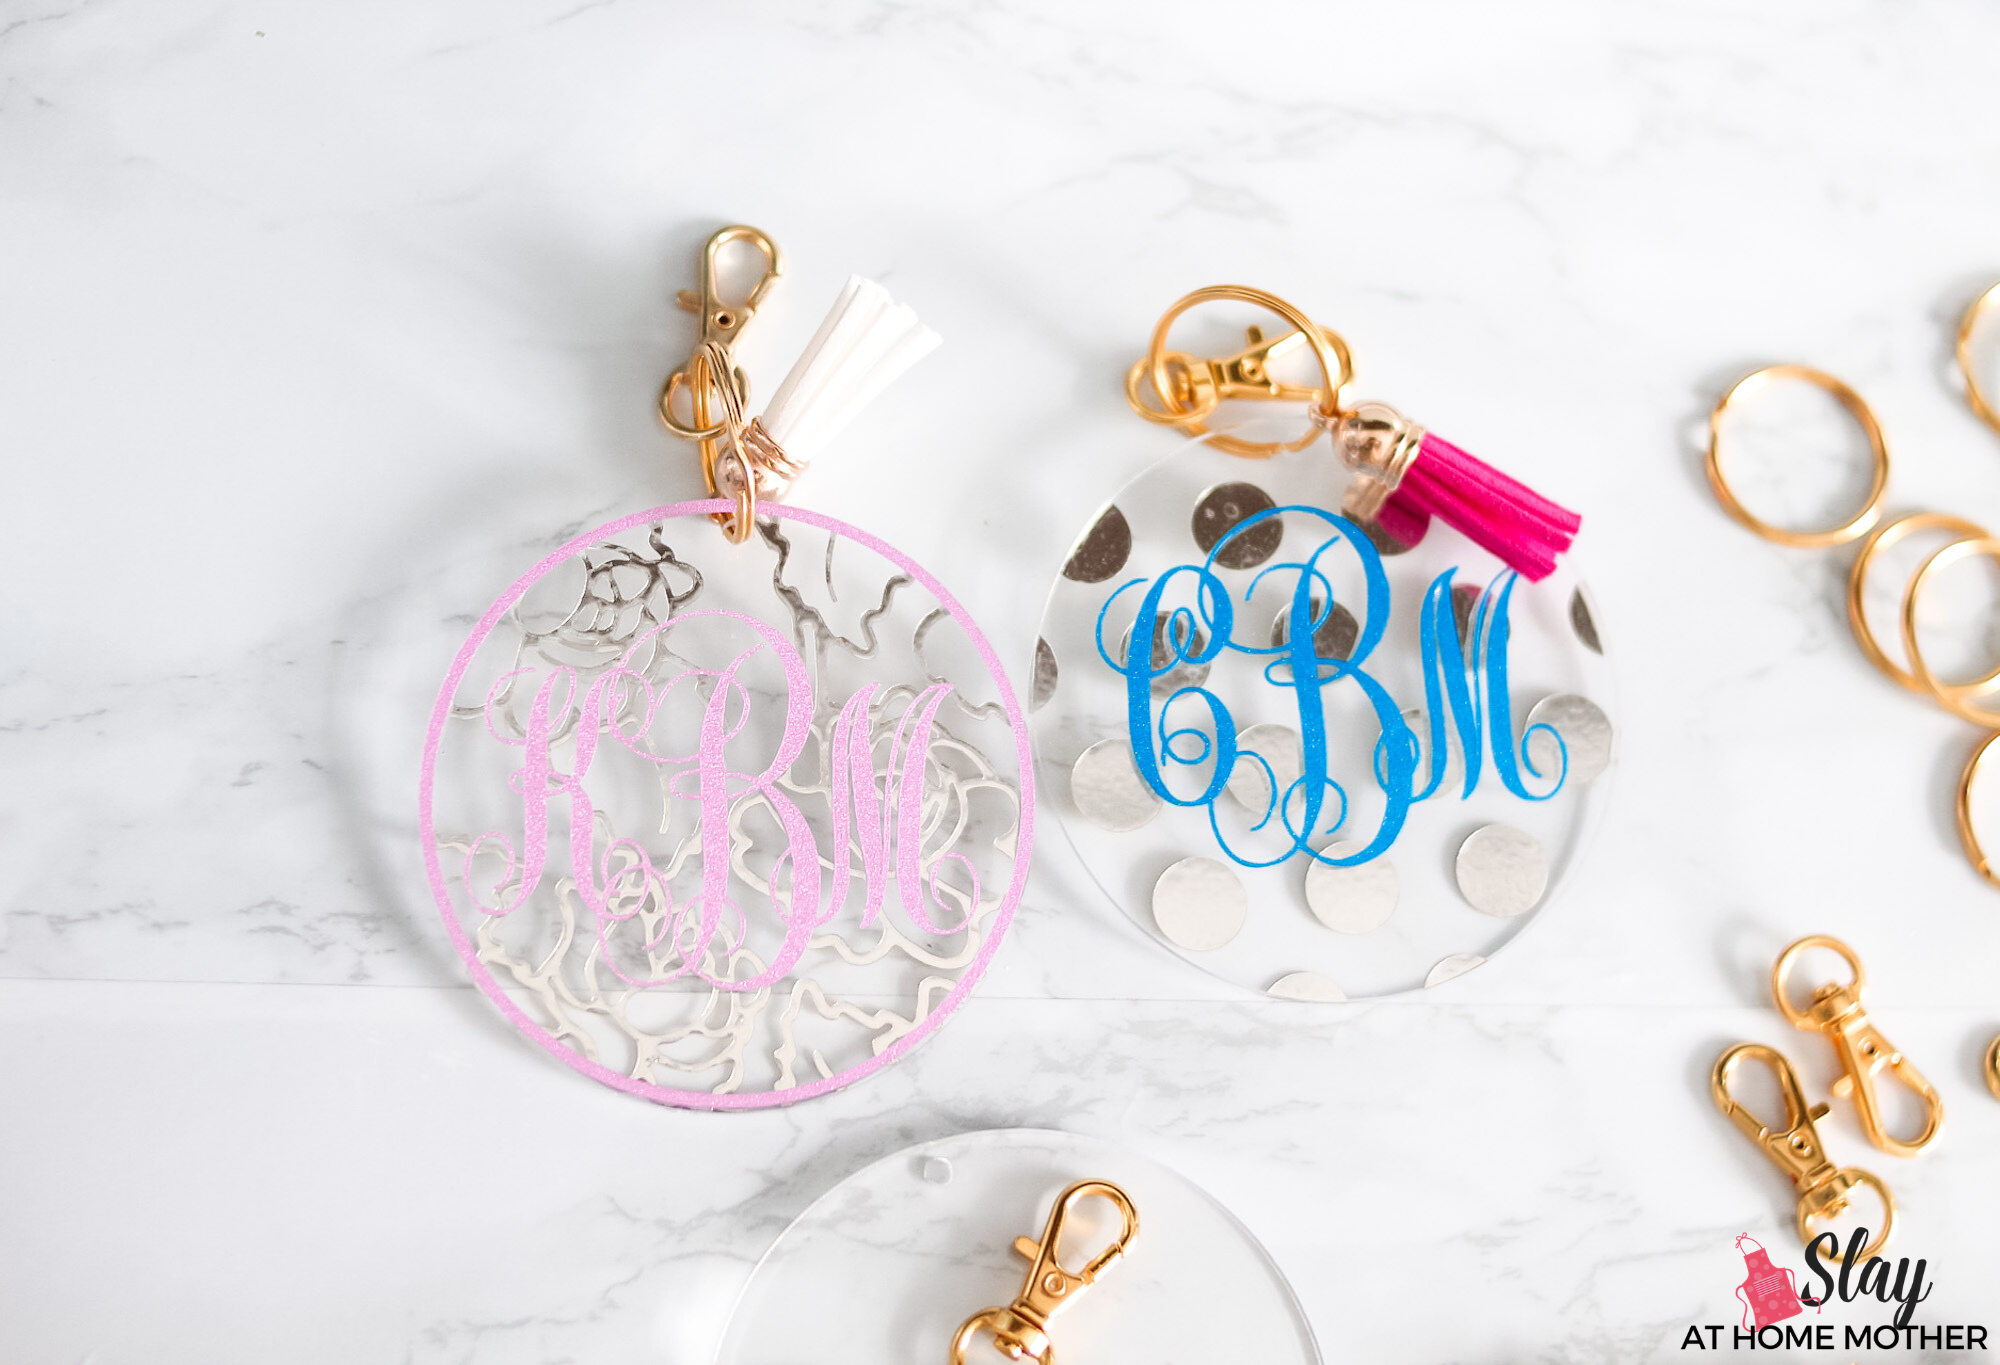
Pick out a coordinating tassel color for your keychain, and attach that and the lobster clasp to your gold keychain circle.
Then, add your acrylic keychain, and you’re all set!
I hope you all enjoyed this tutorial and found it helpful in some way!
Be sure to tag me on Instagram (@slayathomemother) if you create your own keychains so I can see your finished project! 🙂
*Post originally published Jan 2020, updated January 2023.