The ultimate craft room organization system – here’s an honest and thorough DreamBox review…
Hi friends! Today I’m sharing my office refresh/reveal featuring my new DreamBox from Create Room!
You might know Create Room by its former name, The Original Scrapbox.
They rebranded to Create Room shortly after I received my order.
I’ve been sharing little tidbits of my office transformation with my DreamBox on my Instagram stories for the last month, but I’ll admit that distance learning with two kids and a newborn has been kicking my butt and keeping me from being able to share this with you all sooner.
In this post, I’ll FINALLY be sharing my unboxing (well, uncrating) of my DreamBox, my new office setup, and complete review.
This post is in partnership with Create Room and contains affiliate links and a discount code for my readers and audience. All opinions are my own, as always. Be sure to use the discount codes in this post (SLAYATHOMEMOTHER and SLAYATHOMEMOTHER50) to save on your own DreamBox and DreamCart purchase!
What I Ordered From Create Room
Since moving to our new home, I gave up my built-in office cabinets and storage.
My new office was just an empty room.
I needed to start fresh and find a solution that worked for me that met all of the demands of my blogging, crafting, and homeschooling life.
After scrolling through Instagram over a year ago, I came across the DreamBox from what was then The Original Scrapbox.
I stalked their posts online for that entire year.
Everything was just so beautifully organized.
Their system made me feel inspired.
I also loved that you could close the DreamBox.
With little ones running around or when we leave for vacation, it would be nice to close everything up and keep it stored safely!
After saving up and buying our new home, I decided it was finally time to invest in my DreamBox.
Here’s what I ordered from Create Room:
- White Shaker-style DreamBox
- 80 tote & 77 Shelf Package
- 3 built-in drawers
- Crown light
- 2-leaf DreamCart (comes with 13 InView™ totes)
- Pre-built service
After reading about their pre-built service online, I decided it was worth the extra cost.
Create Room estimates building the DreamBox from start to finish takes about 5-10 hours.
The pre-built service cuts that down to somewhere between 1-3 hours, including the time you spend assembling the pegs, shelves, and putting in the different totes.
I also decided to get the overhead Crown light so I could see better at night when I’m crafting or working, as that’s when I do a lot of my editing and working because the kids are in bed and I have free hands to do #allthethings.
I should include that I work with white vinyl a lot of the time when I do labels, and weeding white vinyl can be tricky when you’re executing an intricate design, especially at night because white vinyl is backed by white paper.
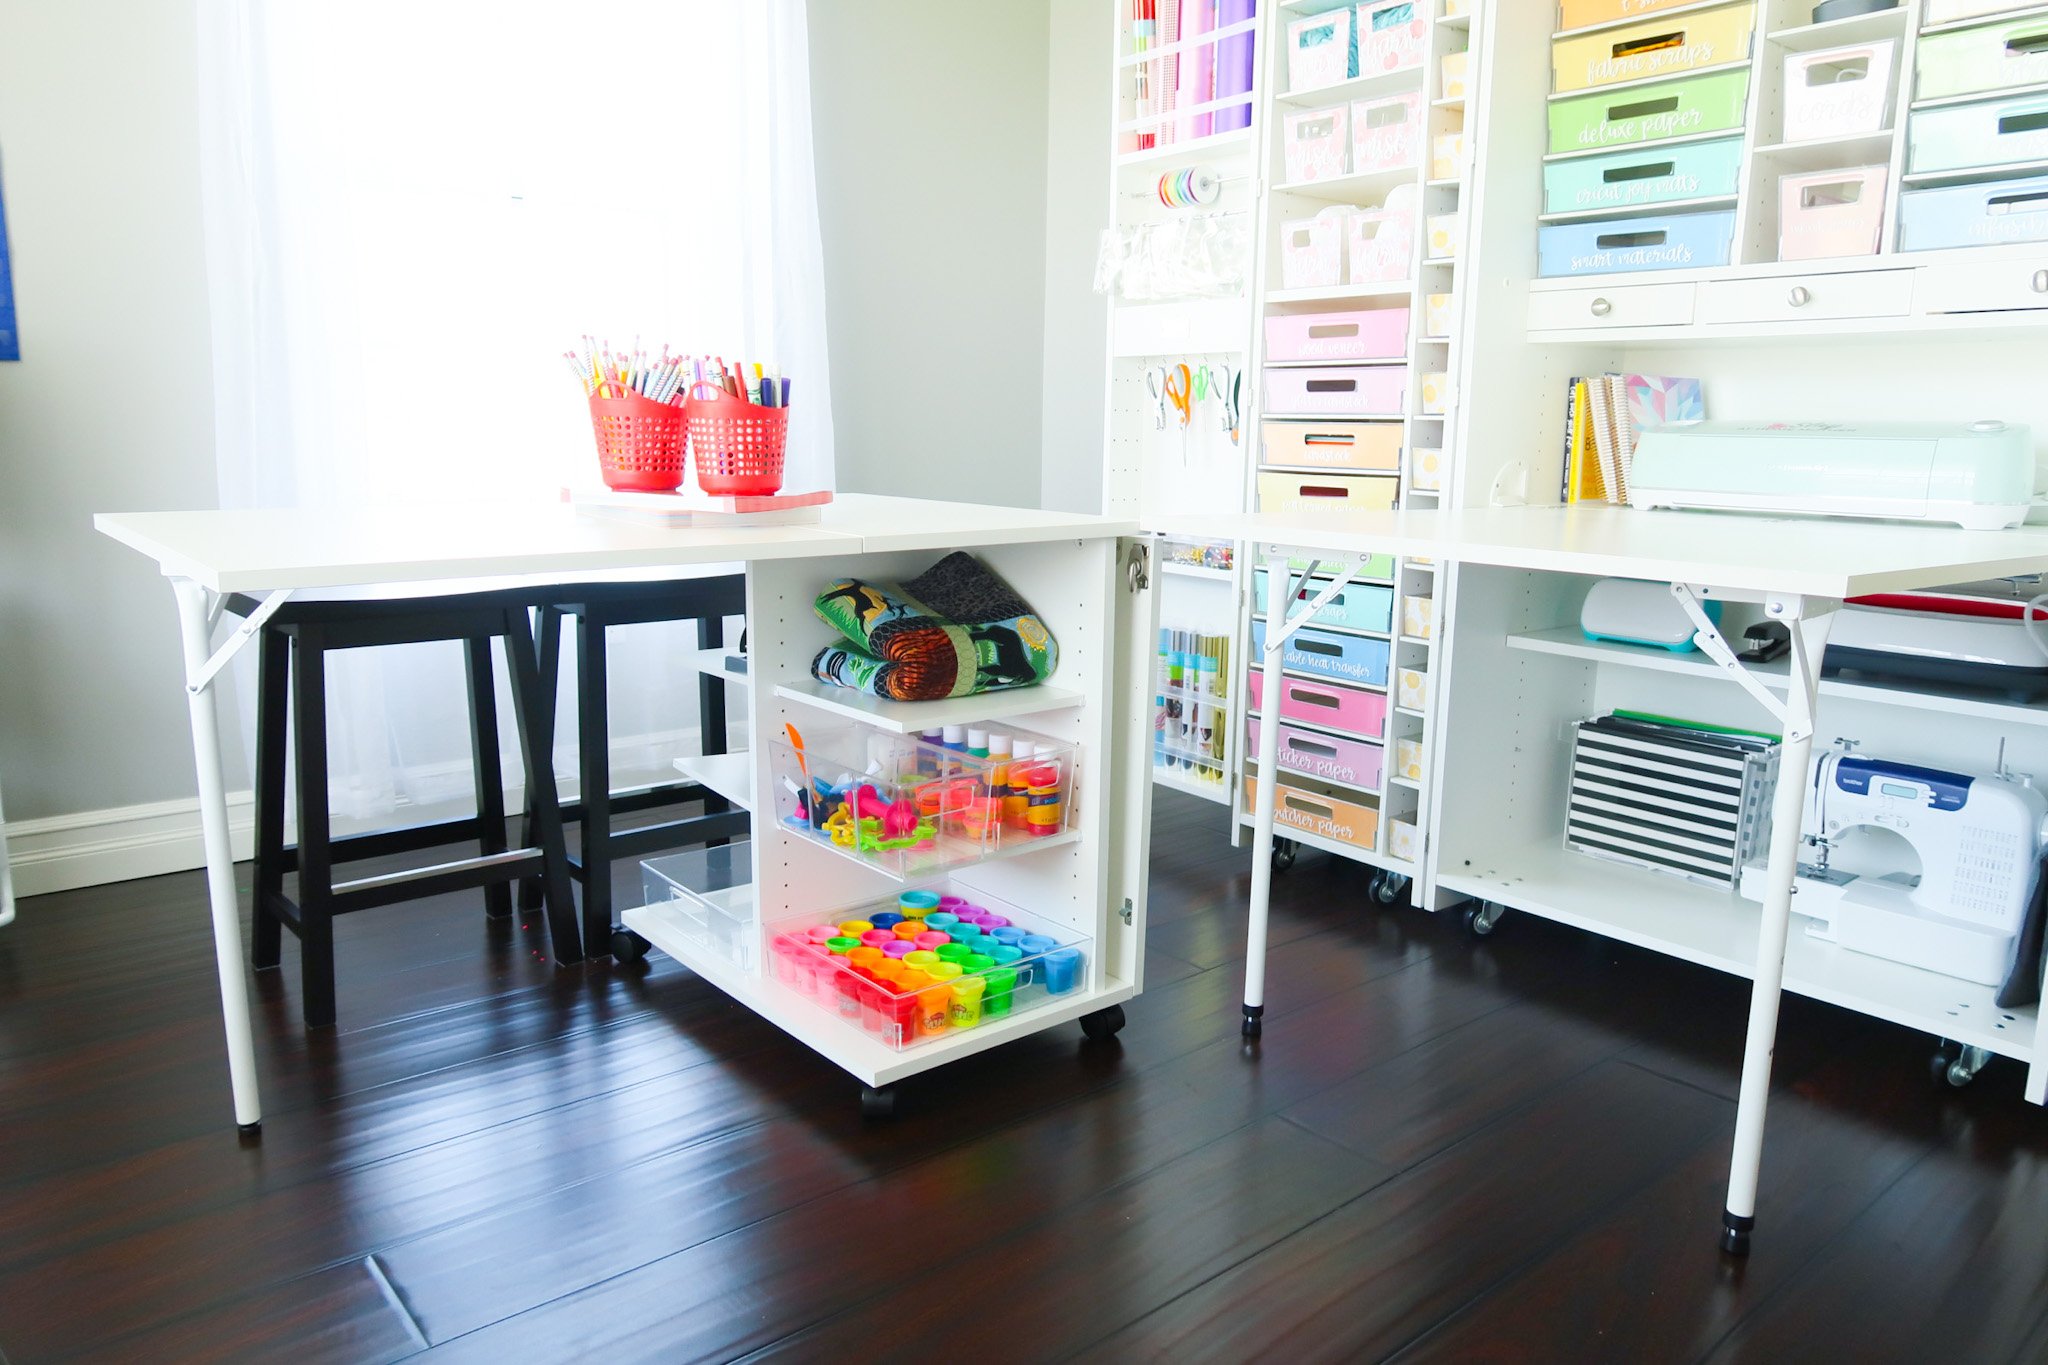
For our homeschooling needs, I thought the DreamCart would be a perfect additional working counter space for our kids to work and create.
Plus, I can use the extra room for crafting when I’m working with more than one Cricut mat or multiple colors of vinyl rolls.
I can also fold down the two leafs and roll the DreamCart to the corner of the room if I need more floor space to create or work.
DreamBox Delivery
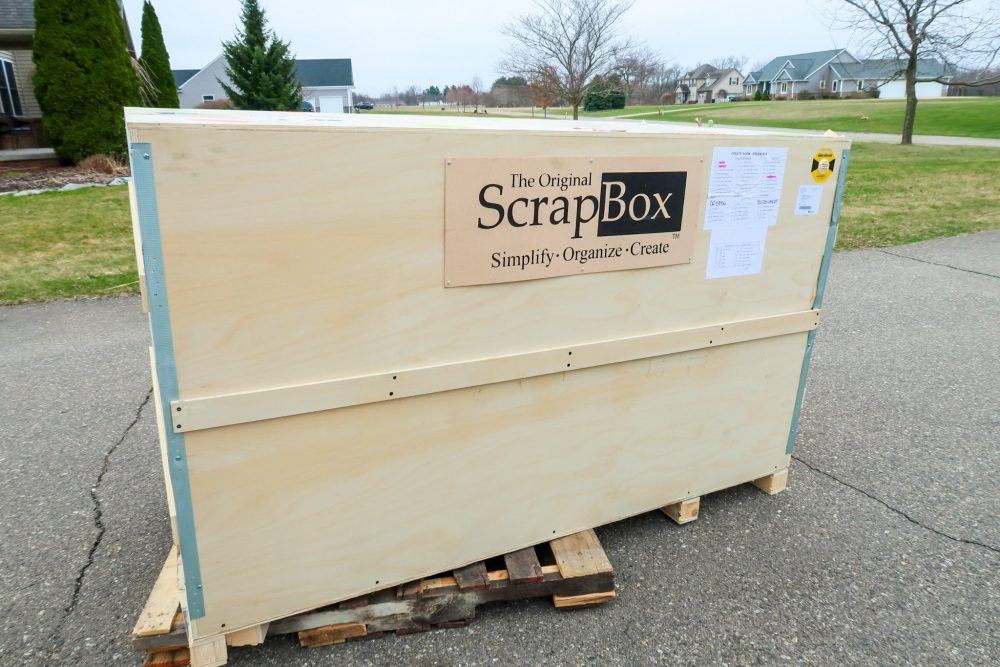
A couple of days before delivery, I received a call from the delivery service to schedule my DreamBox’s arrival to ensure I would be home to receive it.
When our order arrived, it was noted as a curbside delivery (which is standard for your DreamBox’s delivery), but we were able to persuade the delivery man to wheel our crate up the hill and our long driveway to the front of the garage.
Chris generously tipped him and helped with pushing the large crate since it was so heavy!
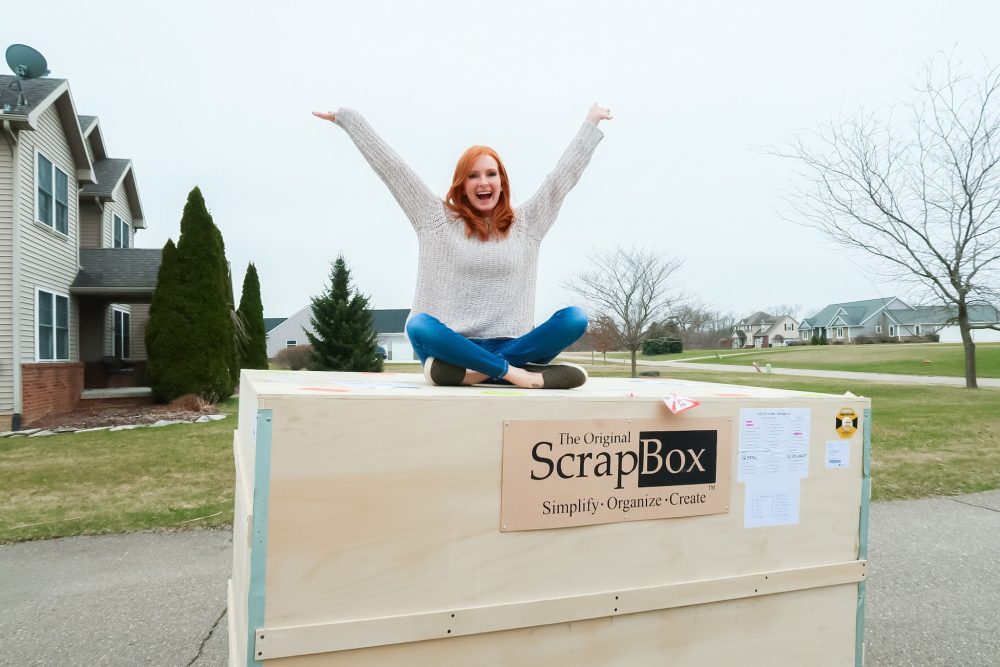
I was so excited to finally unbox this baby and carry it inside.
But I’m going to tell you this now – this thing is a beast.
You will absolutely need help! My husband and I both carried my DreamBox in, but I’m not even sure how we did it.
I would recommend having at least two, if not three, people to help you carry it indoors, especially if you have any steps that you need to go up or down.
Luckily, we only needed to worry about the two steps up onto the porch, and one step up into the house.
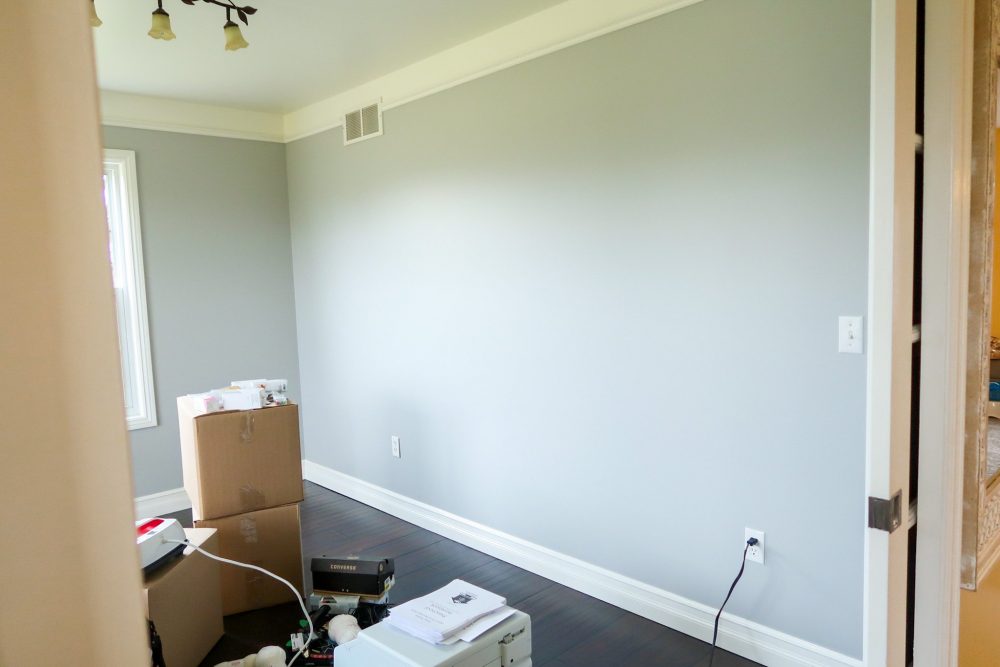
My Office – Before
Since moving into our new house, we switched up the rooms a bit.
My office was actually a small formal dining area, however, we already have a dining space off the kitchen, so it didn’t make sense to use this room as a dining space.
Soooooooo it became my office!
Well, before the DreamBox came along, it was really just a pile of my crafting and blogging stuff scattered on the floor…
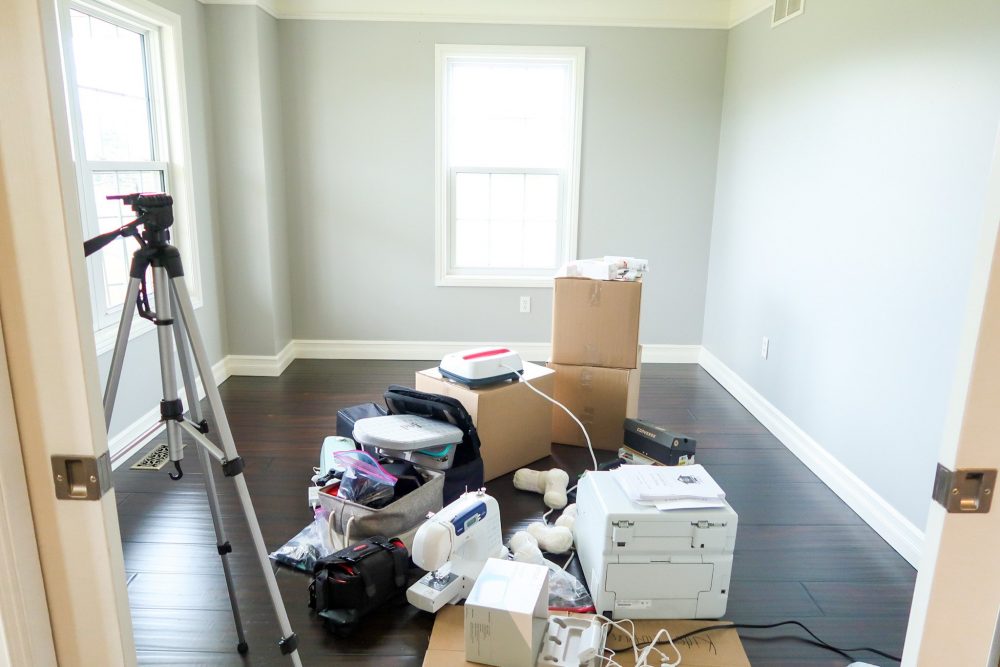
You can see the amount of clutter and mess that is piled up in the center of the room.
All of my vinyl and iron-on rolls were still boxed up in the moving boxes.
You can probably see why I needed some help with craft room organization…
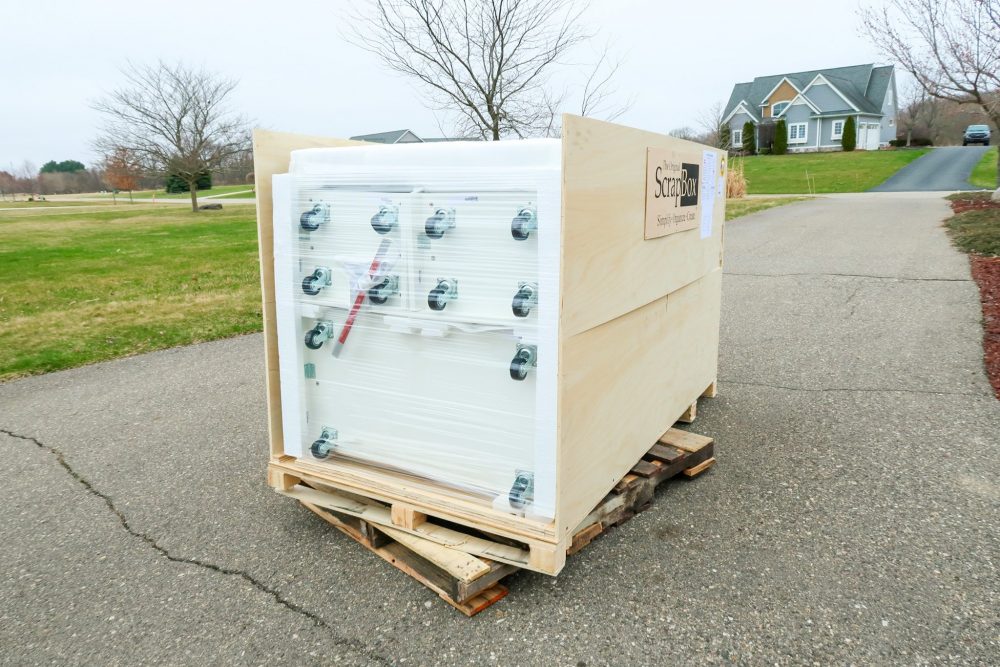
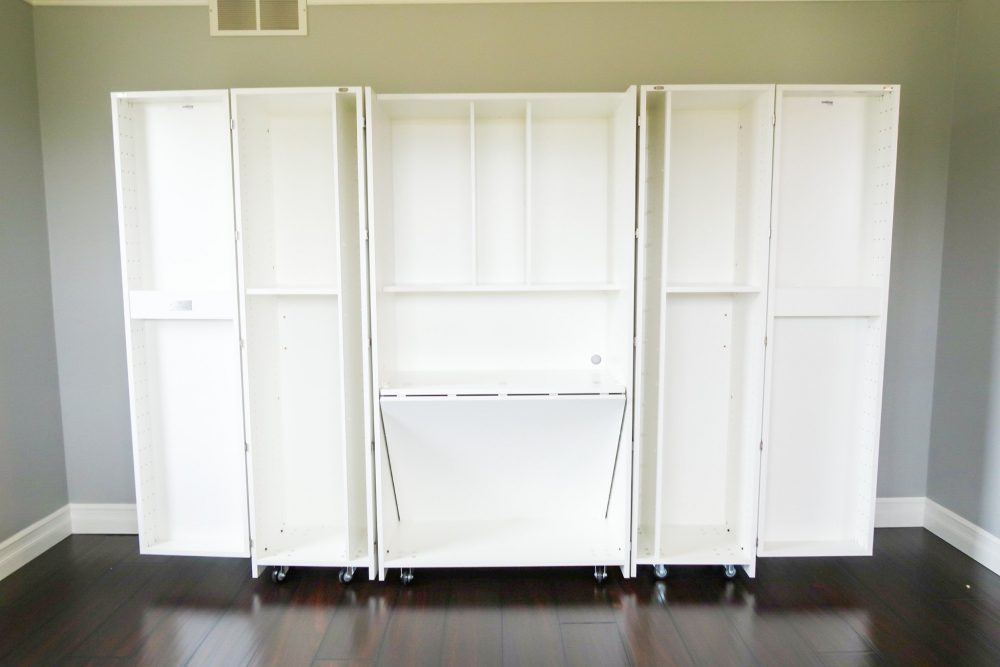
DreamBox Assembly
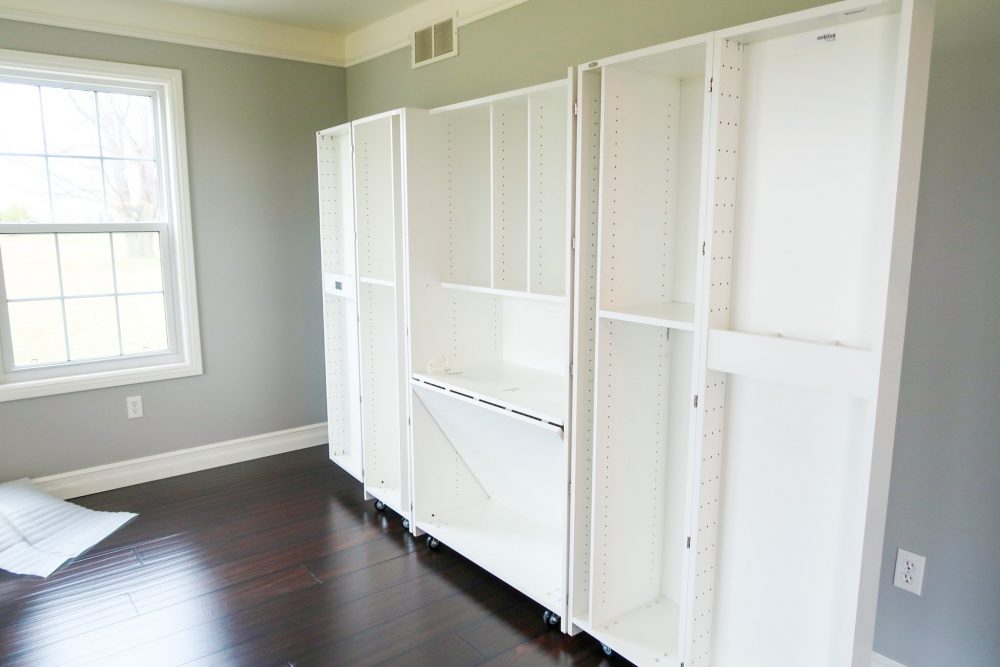
I got the pre-built service, which means the DreamBox is basically fully assembled (minus the individual pegs and shelves) when you receive it.
I highly recommend this service – it saves a lot of time, especially if you are like me with little ones running around and not a whole lot of time to spare!
We carried each door inside, and then the center portion of the DreamBox inside and attached the doors.
The fold-away table that comes with the DreamBox was already pre-installed (see below).
My husband installed the LED light for the crown and fixed the Crown to the top of my DreamBox according to the directions.
Then I began putting in the pegs and shelves.
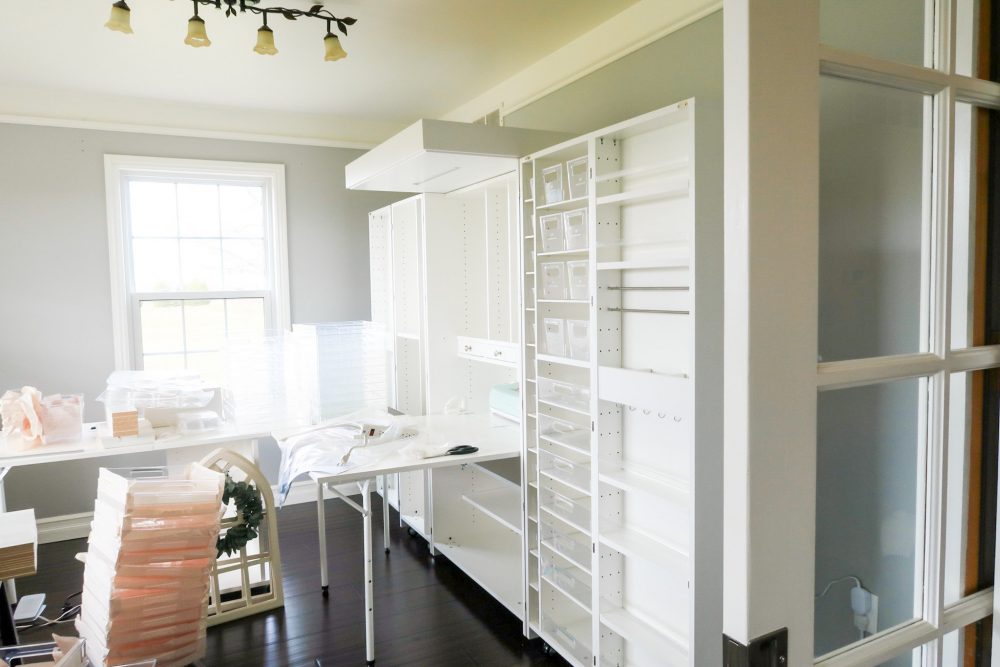
The shelves are held up by plastic pegs, which you can put in the holes using a special black peg tool that comes with your DreamBox.
Trying to do it with just your fingers can hurt after a while, so I would recommend using the tool provided.
I’ll be holding onto my peg tool even after we’ve finished installing all of the shelves and totes in case I want to switch up my shelves and totes later on – it’s seriously a finger-saver!
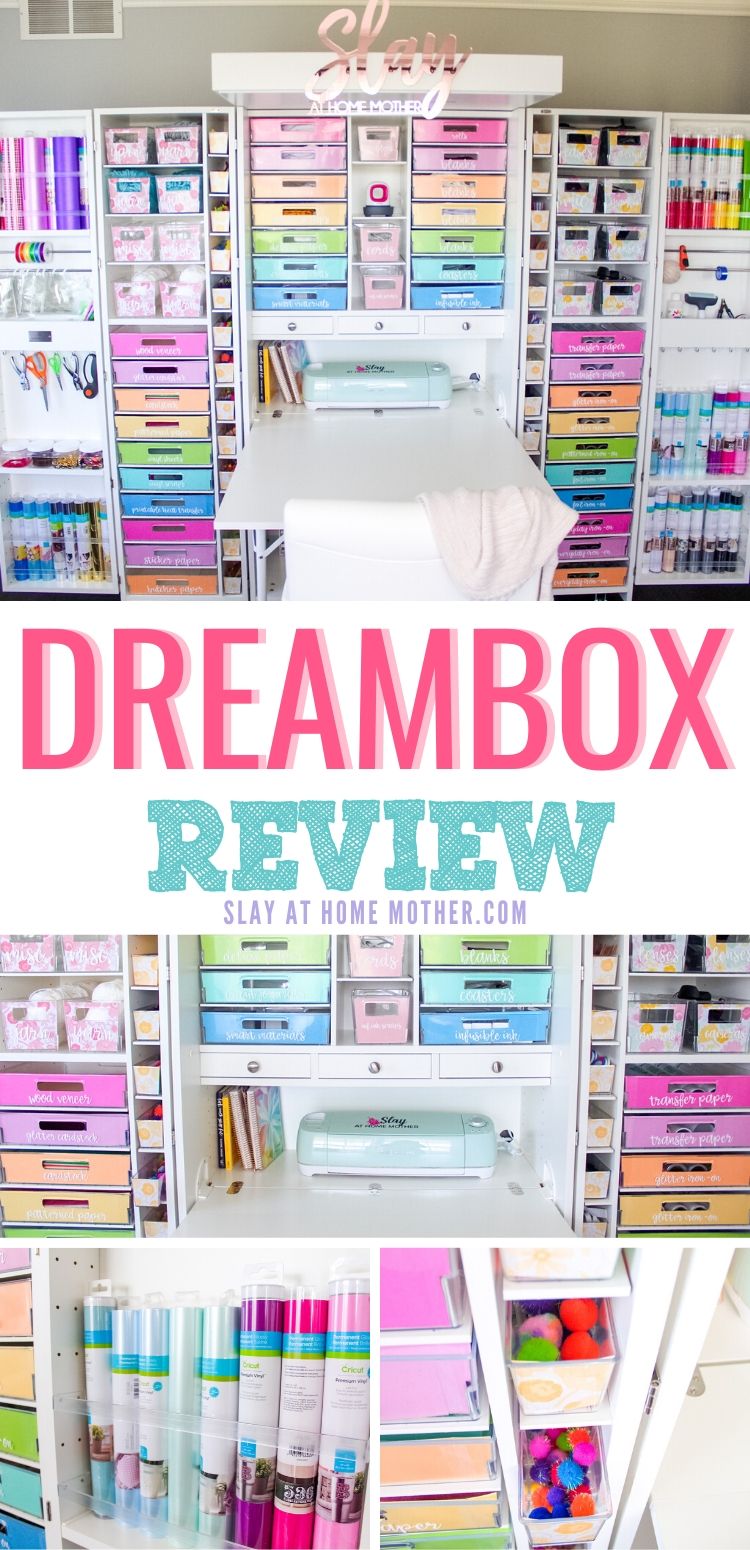
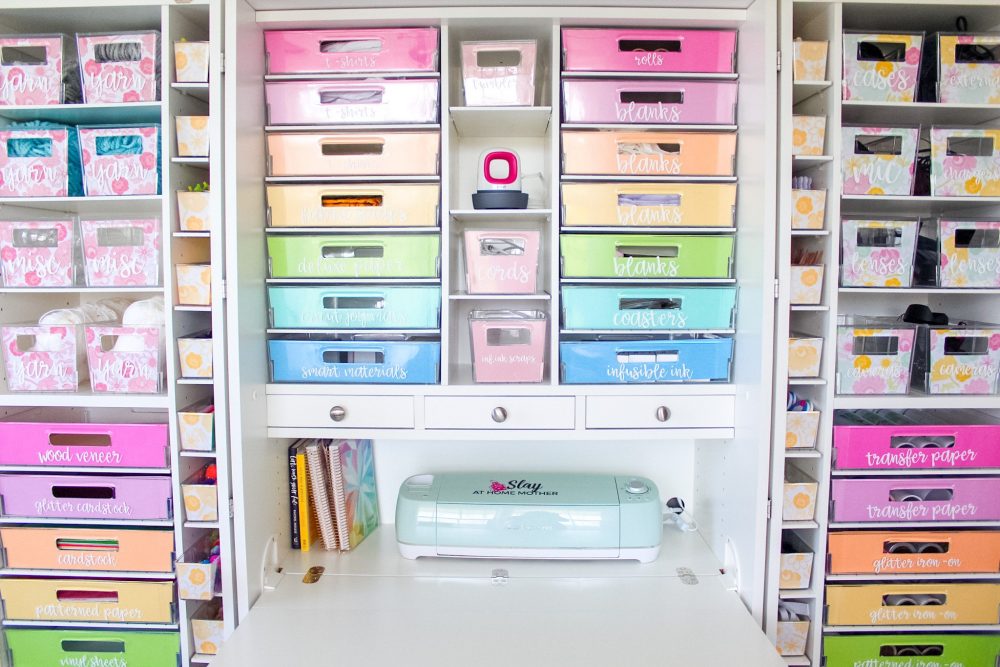
Once my shelves were put up, I started putting in the clear plastic InView™ totes that came with my DreamBox.
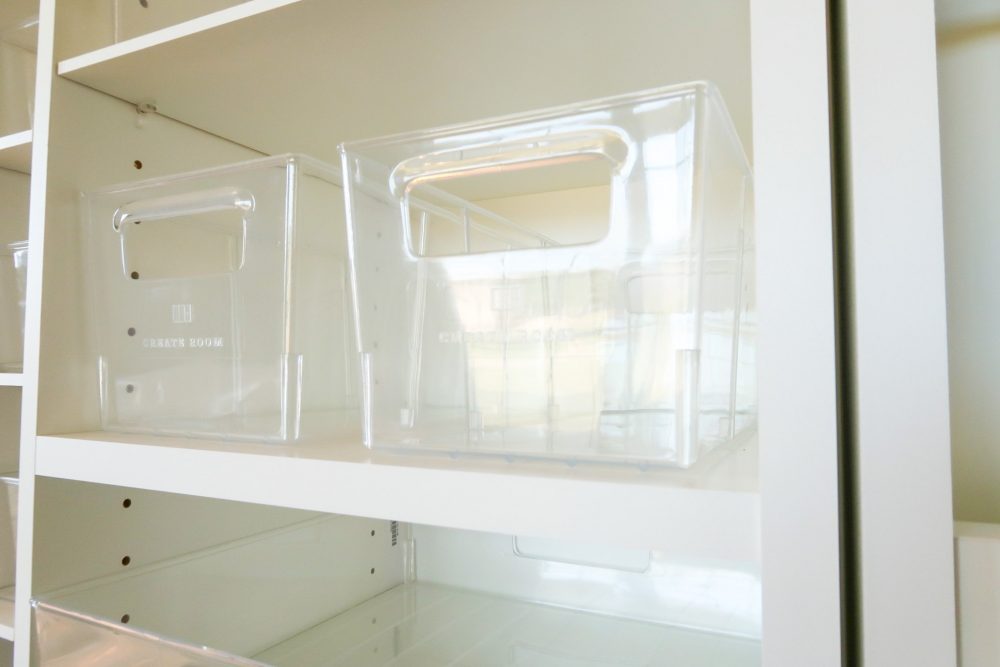
I decided to get the 80 tote and 77 Shelf package since I had a variety of different materials to store, including multiple types of paper, vinyl, and blogging materials (like cords, chargers, camera lens, etc.).
These totes are great for craft room organization and can store a variety of crafting materials.
DreamBox Dimensions
When the DreamBox is closed, it is 37″ wide, 72″ tall, and 34″ deep.
Open, the DreamBox is 102″ wide, 72″ tall, and 49″ deep (with the fold-away table extended).
The included tabletop is 34.75″ wide and 35.5″ deep. The tabletop has different heights depending on the height you set it at, and can be set to a standing height if you prefer to stand while you craft!
Also, without any craft supplies or totes in the DreamBox, it weighs between 70-80 pounds.
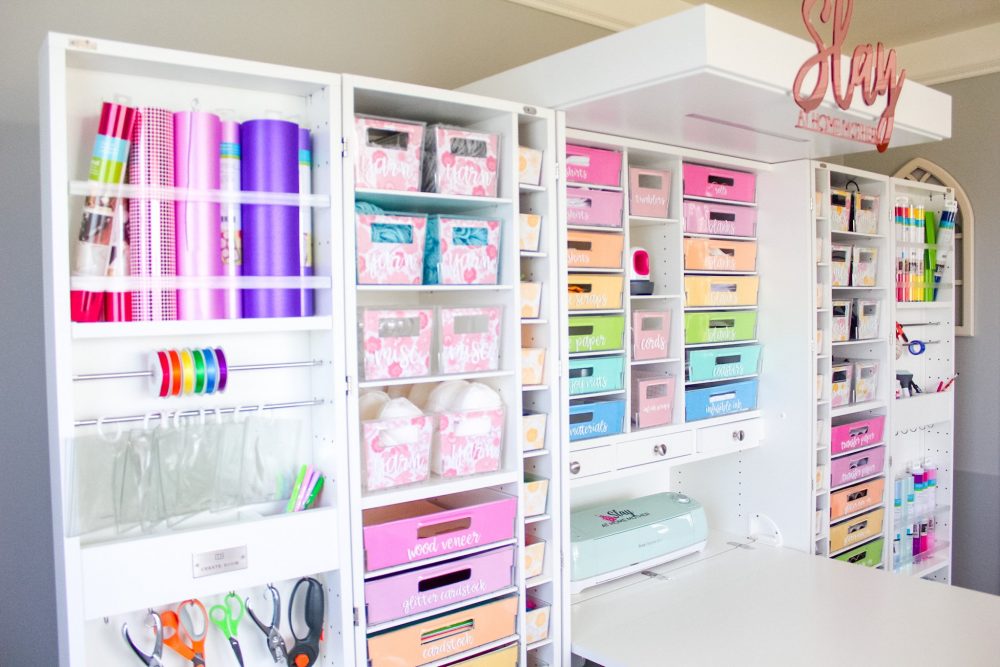
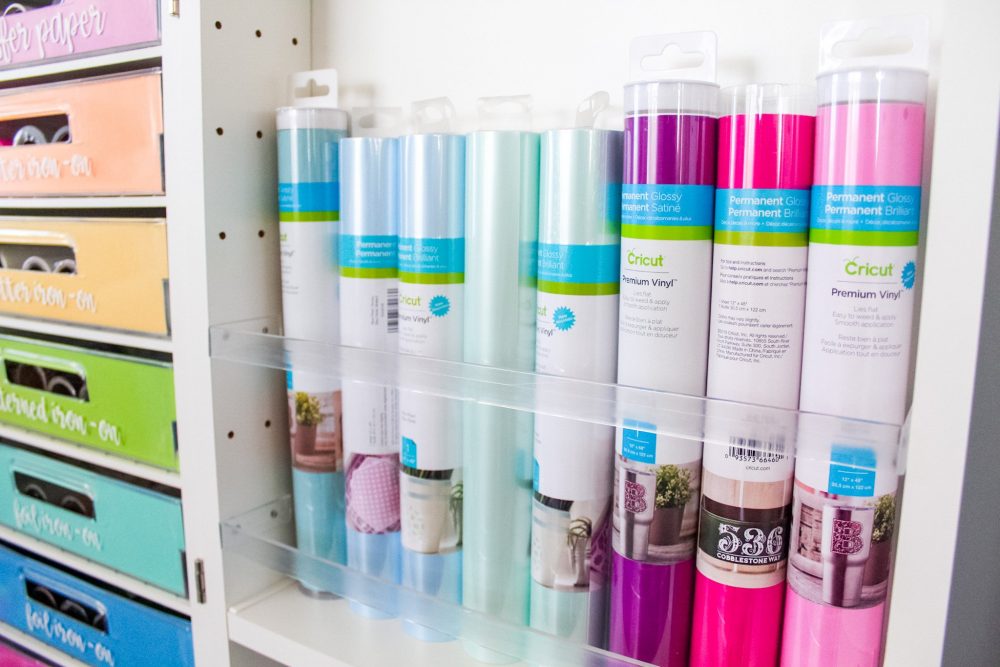
Vinyl Storage
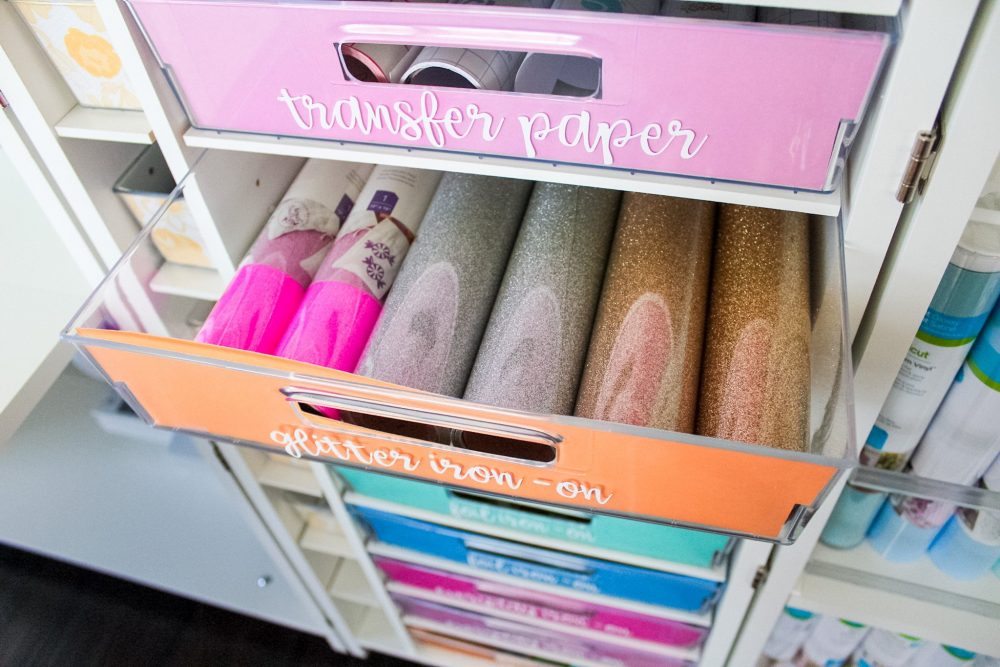
I decided to store my iron-on vinyl in the large pull-out totes (see below).
If you’re a big vinyl crafter like I am, I can tell you now that each 12.75×12.75″ container can hold 7 regular-sized rolls of vinyl or 6 boxes of infusible ink.
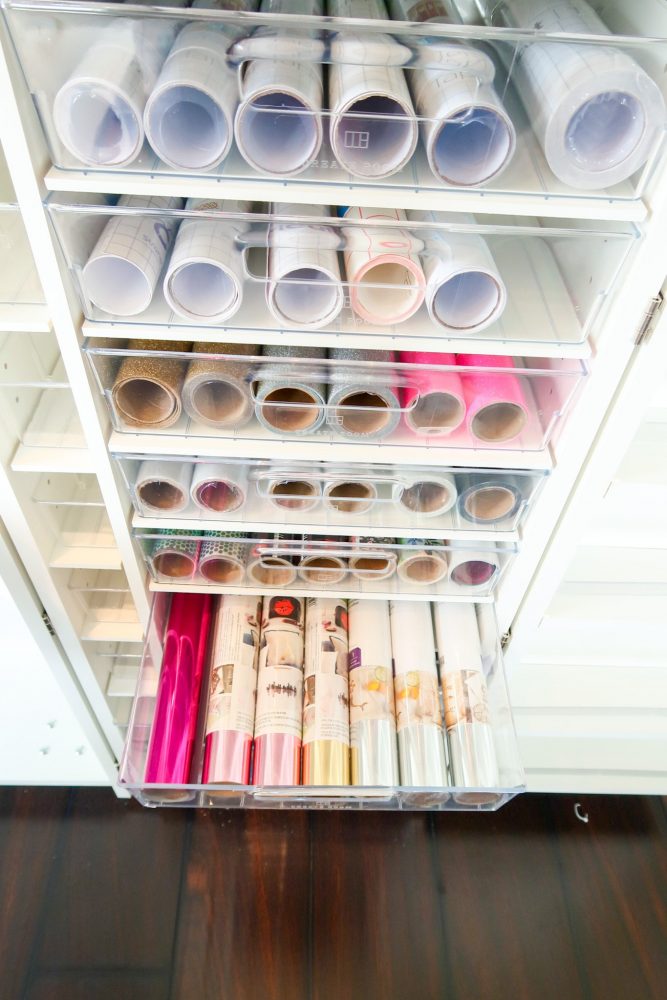
For my permanent vinyl rolls, I stood those up in the doors on the shelves and placed two acrylic bars in front of them to hold them up.
I could honestly double up the number of rolls I store this way on the door shelves as well, which might come in handy if I go on a vinyl-buying spree in the future ;).
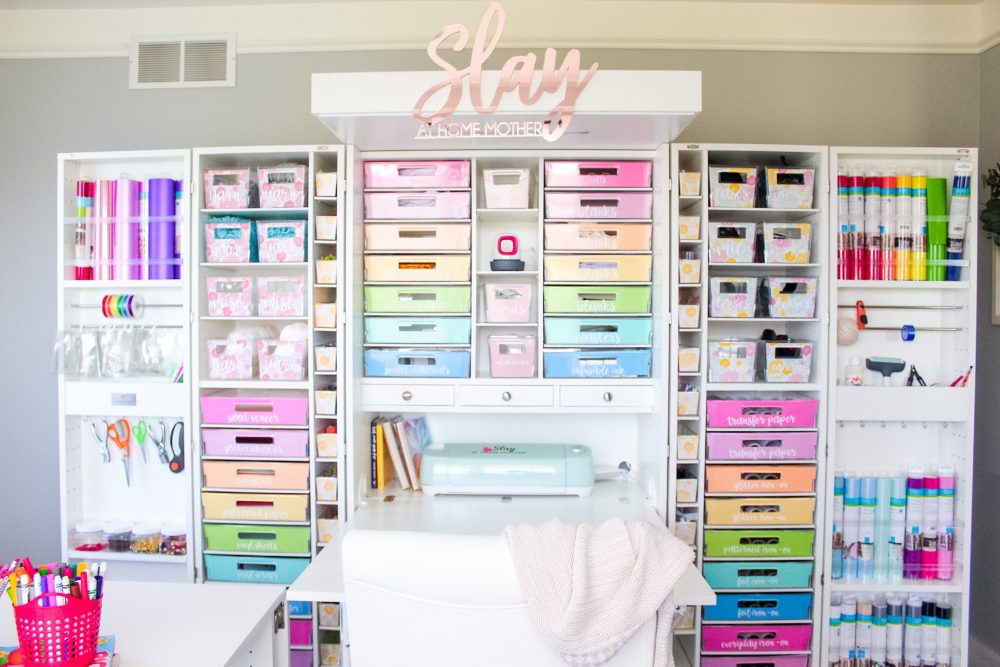
Paper Storage
I stored all of my paper and sheet crafting materials (cardstock, patterned paper, wood veneer sheets, vinyl sheets, butcher paper, etc.) in the large pull-out totes on the other side of my DreamBox, and divided them up by the types of paper and material.
Infusible Ink And Cricut Materials
All of my Cricut blanks and infusible ink materials are stored in the center part of my DreamBox in large totes and a few shoebox totes.
Yarn Storage
For my yarn, I loved the way my skeins looked stored in the shoebox totes.
If I decide to stock up on more yarn, I can always take them out of the toes and store them horizontally in the same space and stack them on each other to maximize the use of that space.
For reference, each shoebox tote can store about 4 regular-sized skeins of yarn.
Blogging Items
For blogging, filming, and editing, I have a number of cameras, lenses, and different equipment that I need to use and organize.
I decided to keep my and Chris’ cameras in different shoebox totes, as well as our lenses, external hard drives, memory card readers, and cables, and chargers.
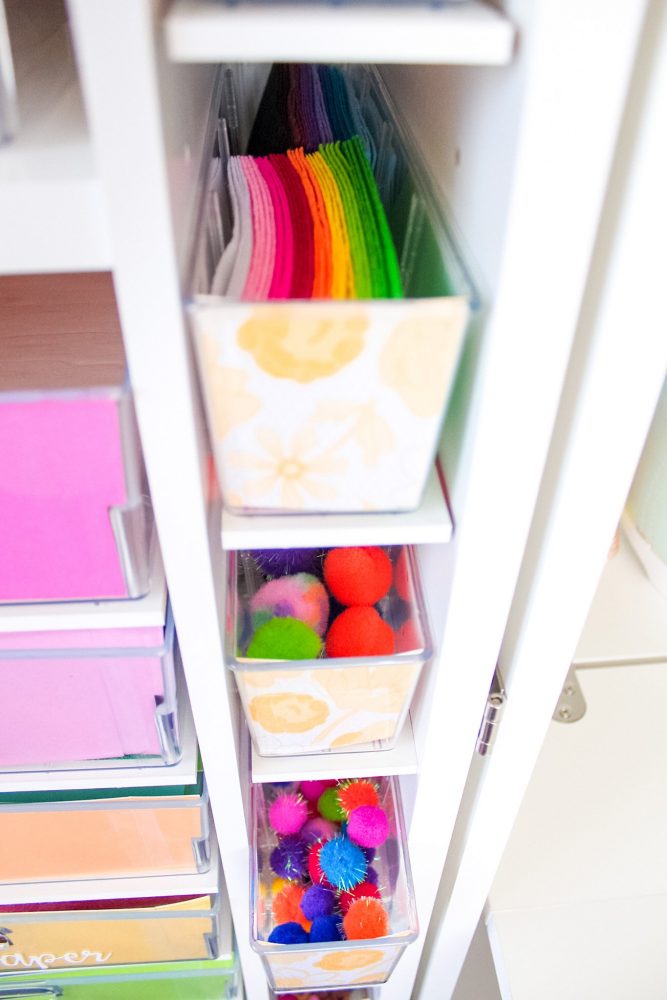
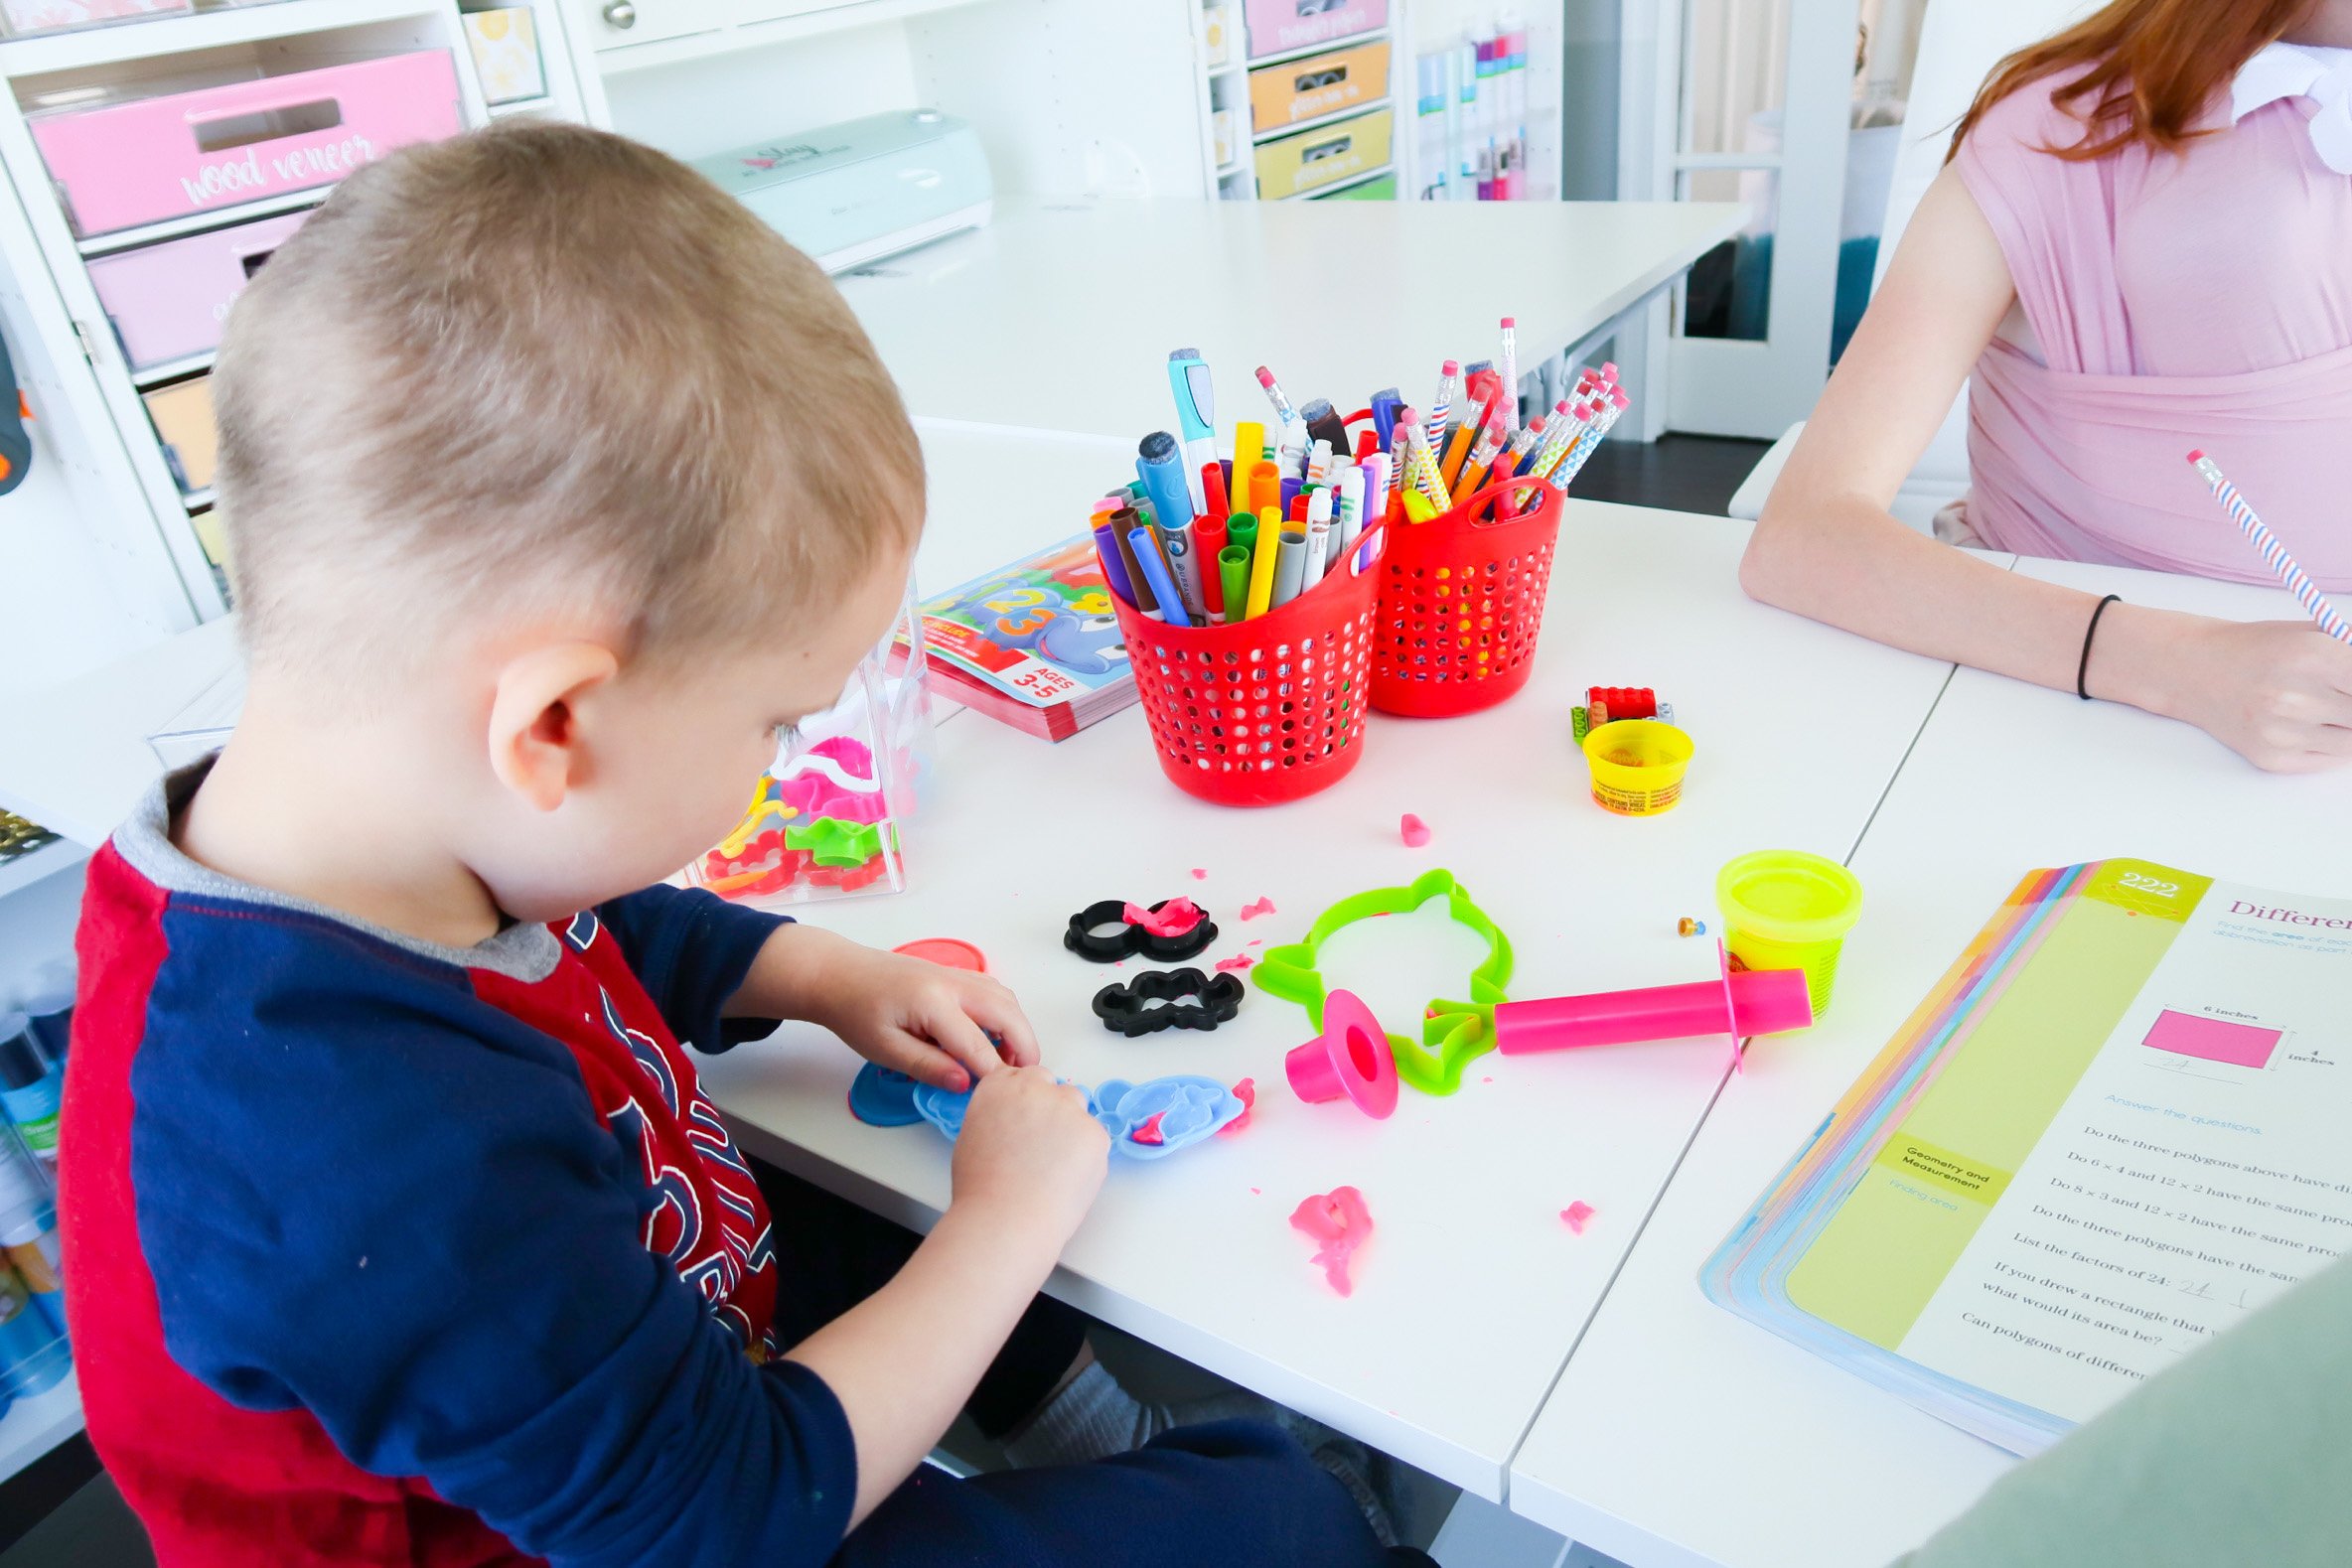
Additional Crafting Items
For the kids, I have a number of different craft items we use for free play, counting, and art.
I store those in the notions totes (the deep, narrow bins).
I also store individual projects I’m working on or weeding in these bins as well.
Crafting items are on the left, and projects are on the right.
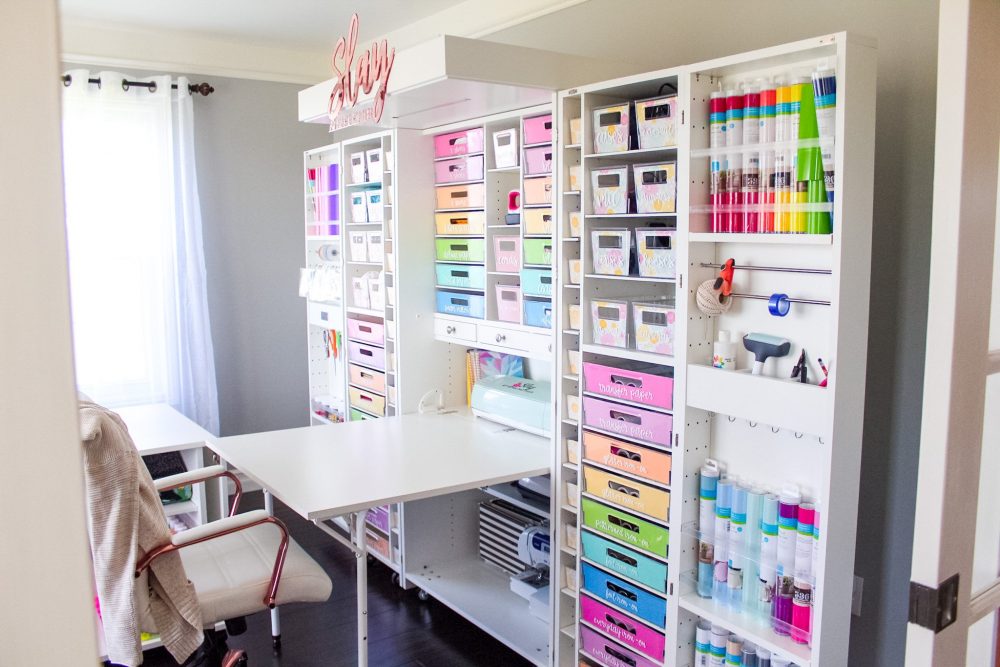
Craft Room Organization With The Dreambox
I love my new office set up with my DreamBox!
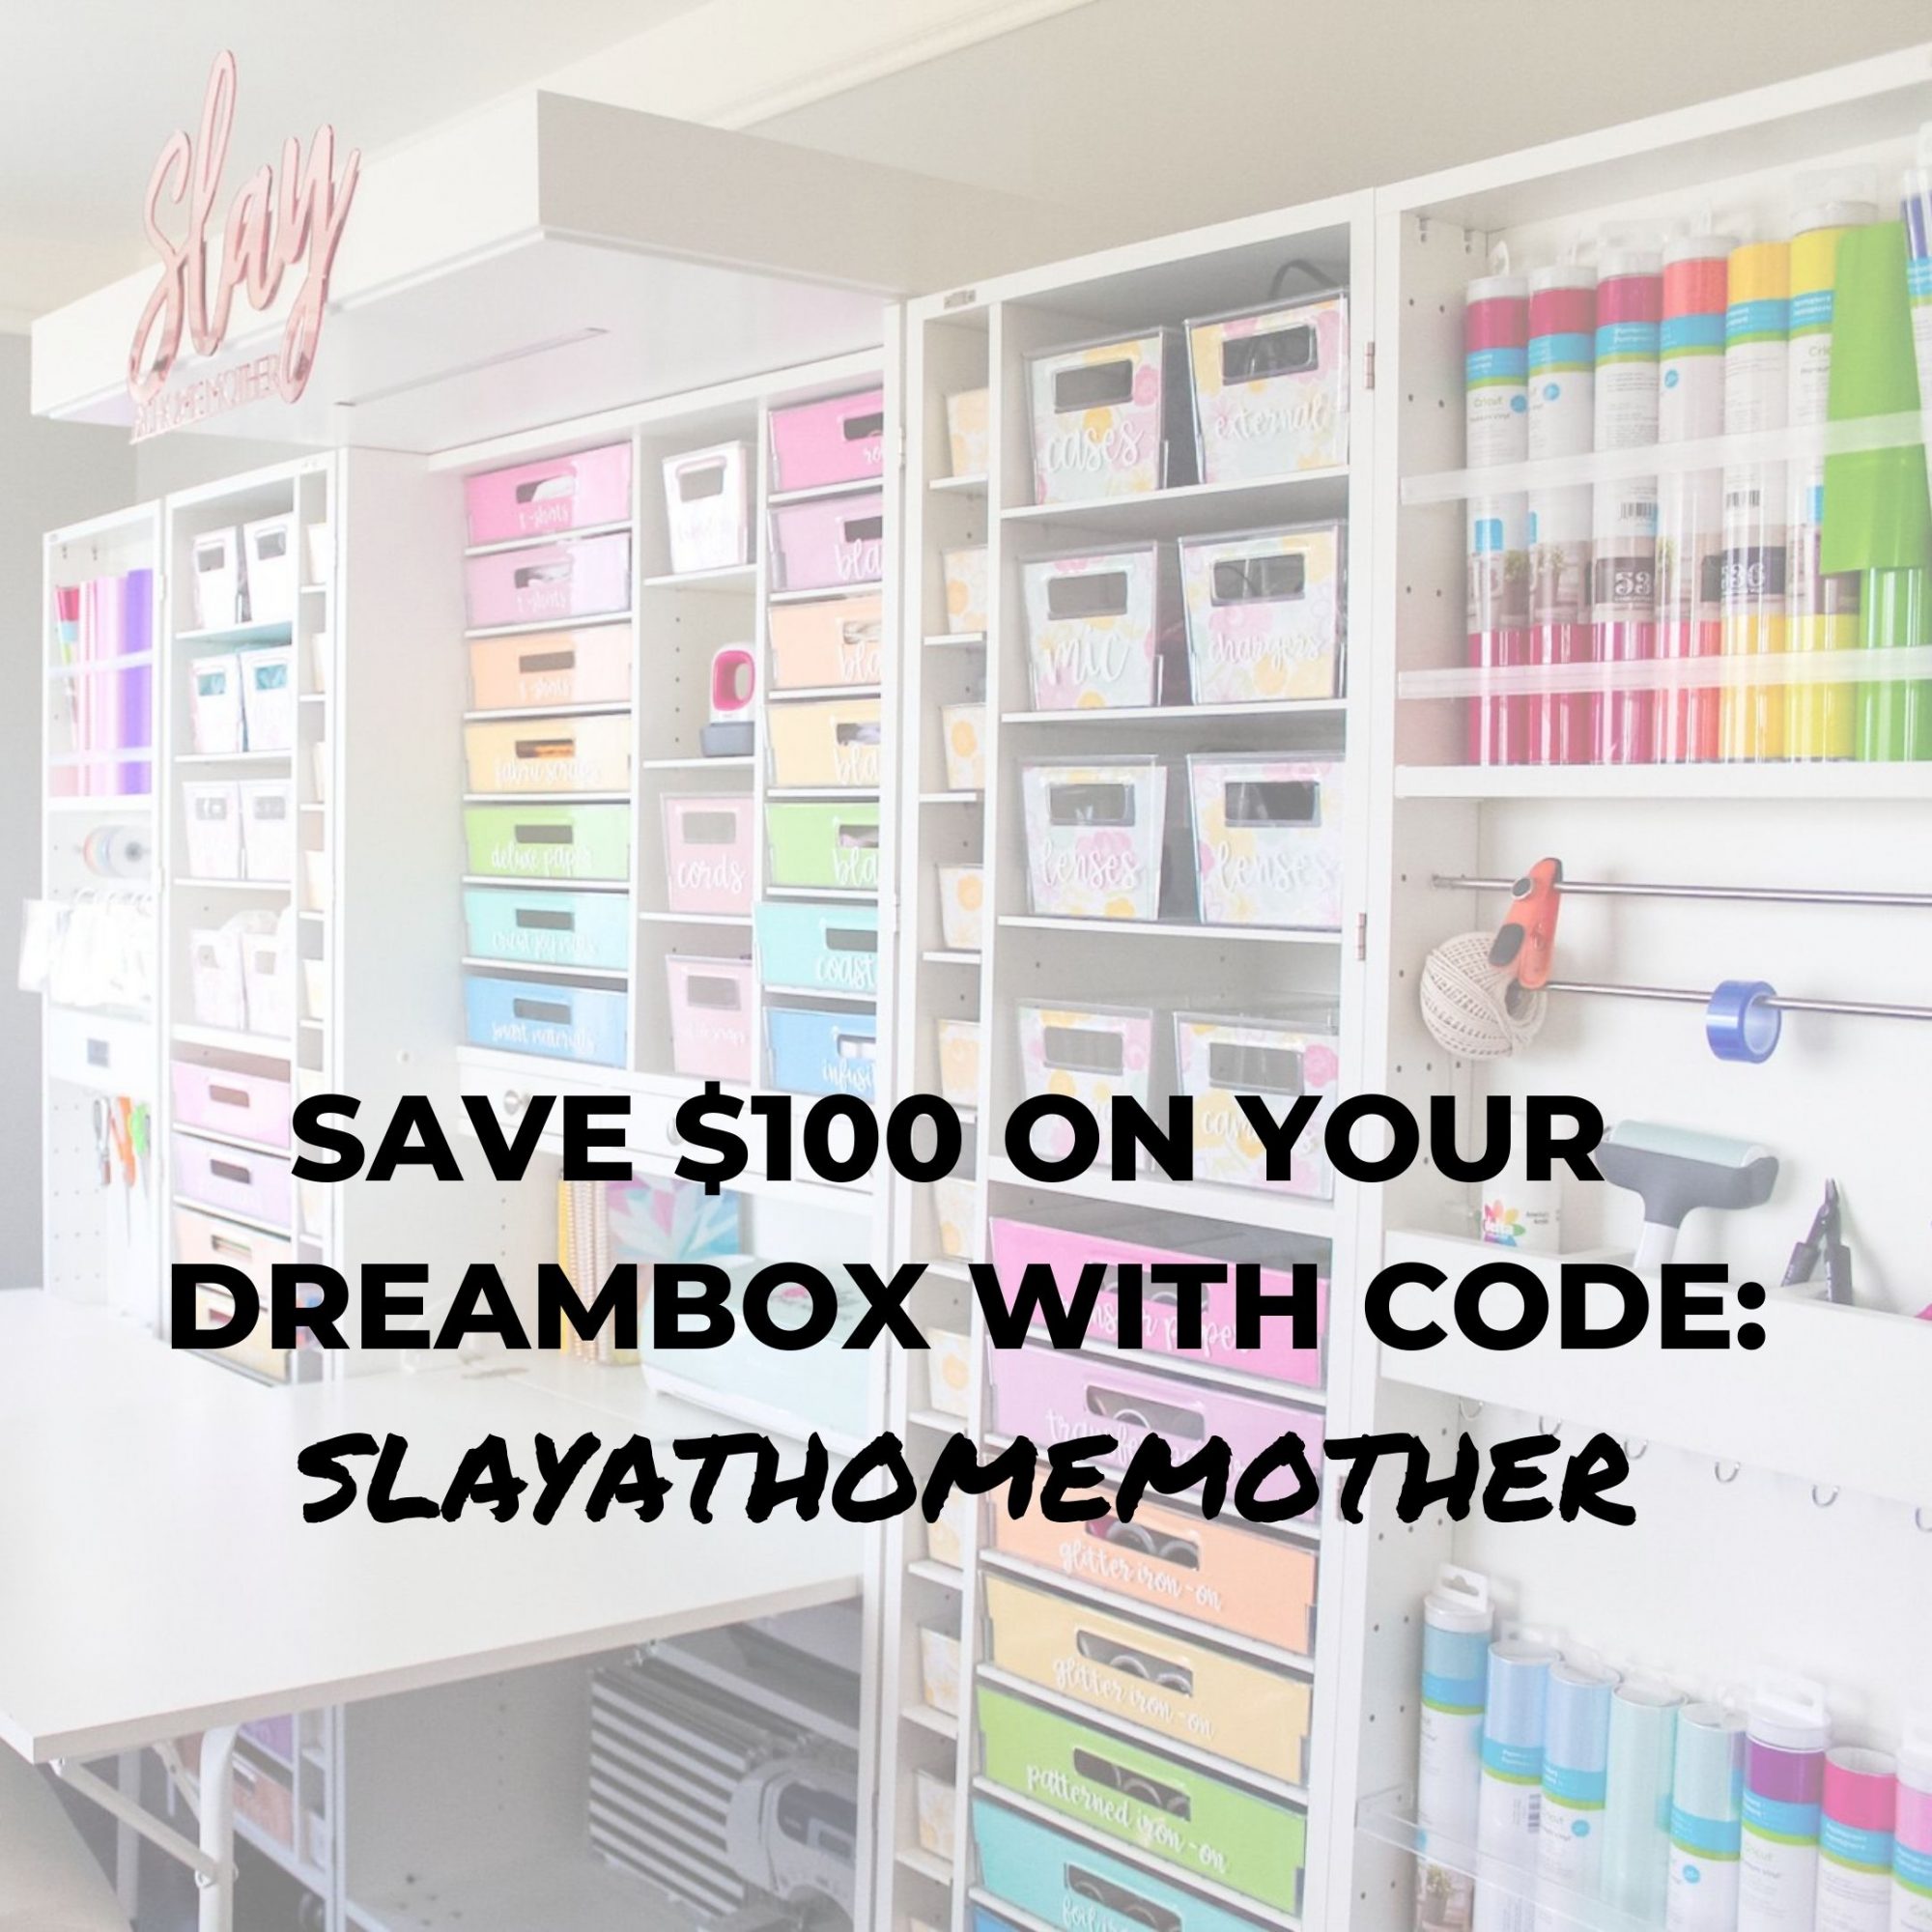
Use code SLAYATHOMEMOTHER at checkout to save $100 off your DreamBox purchase!
Talk about craft room organization on steroids ;).
I pride myself on being clean and organized, but I don’t think I’ve ever been this organized.
There are four caster wheels on each door, and four on the main center box as well.
All of the caster wheels lock in place for extra stability.
P.S. Make your own tote covers for your DreamBox bins HERE.
Everything has a place, from my many vinyl rolls and paper crafting supplies to my camera equipment and sewing machine.
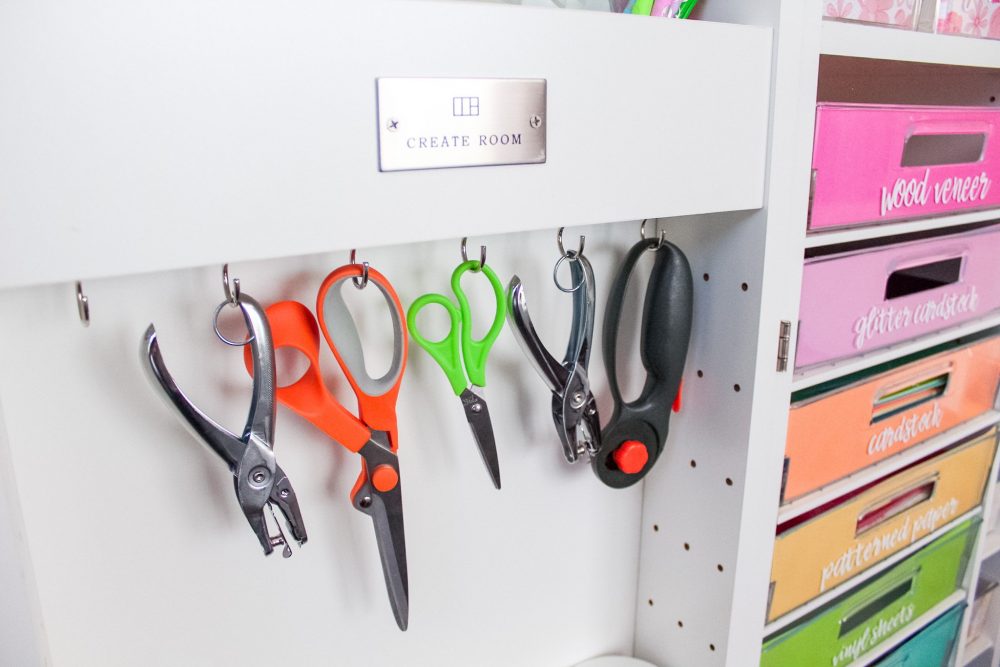
These hooks are handy for storing Cricut tools, fabric scissors, hole punches, and rotary cutters!
In my three built-in drawers, I have sewing machine needles, crochet hooks, Cricut machine replacement blades, and extra pegs for my DreamBox.
Two-Leaf DreamCart
Here’s what my two-leaf DreamCart looks like with just one leaf in use…
Save $50 off your DreamCart with CODE: SLAYATHOMEMOTHER50
And here’s with both leafs in use! This is how we most commonly use ours…
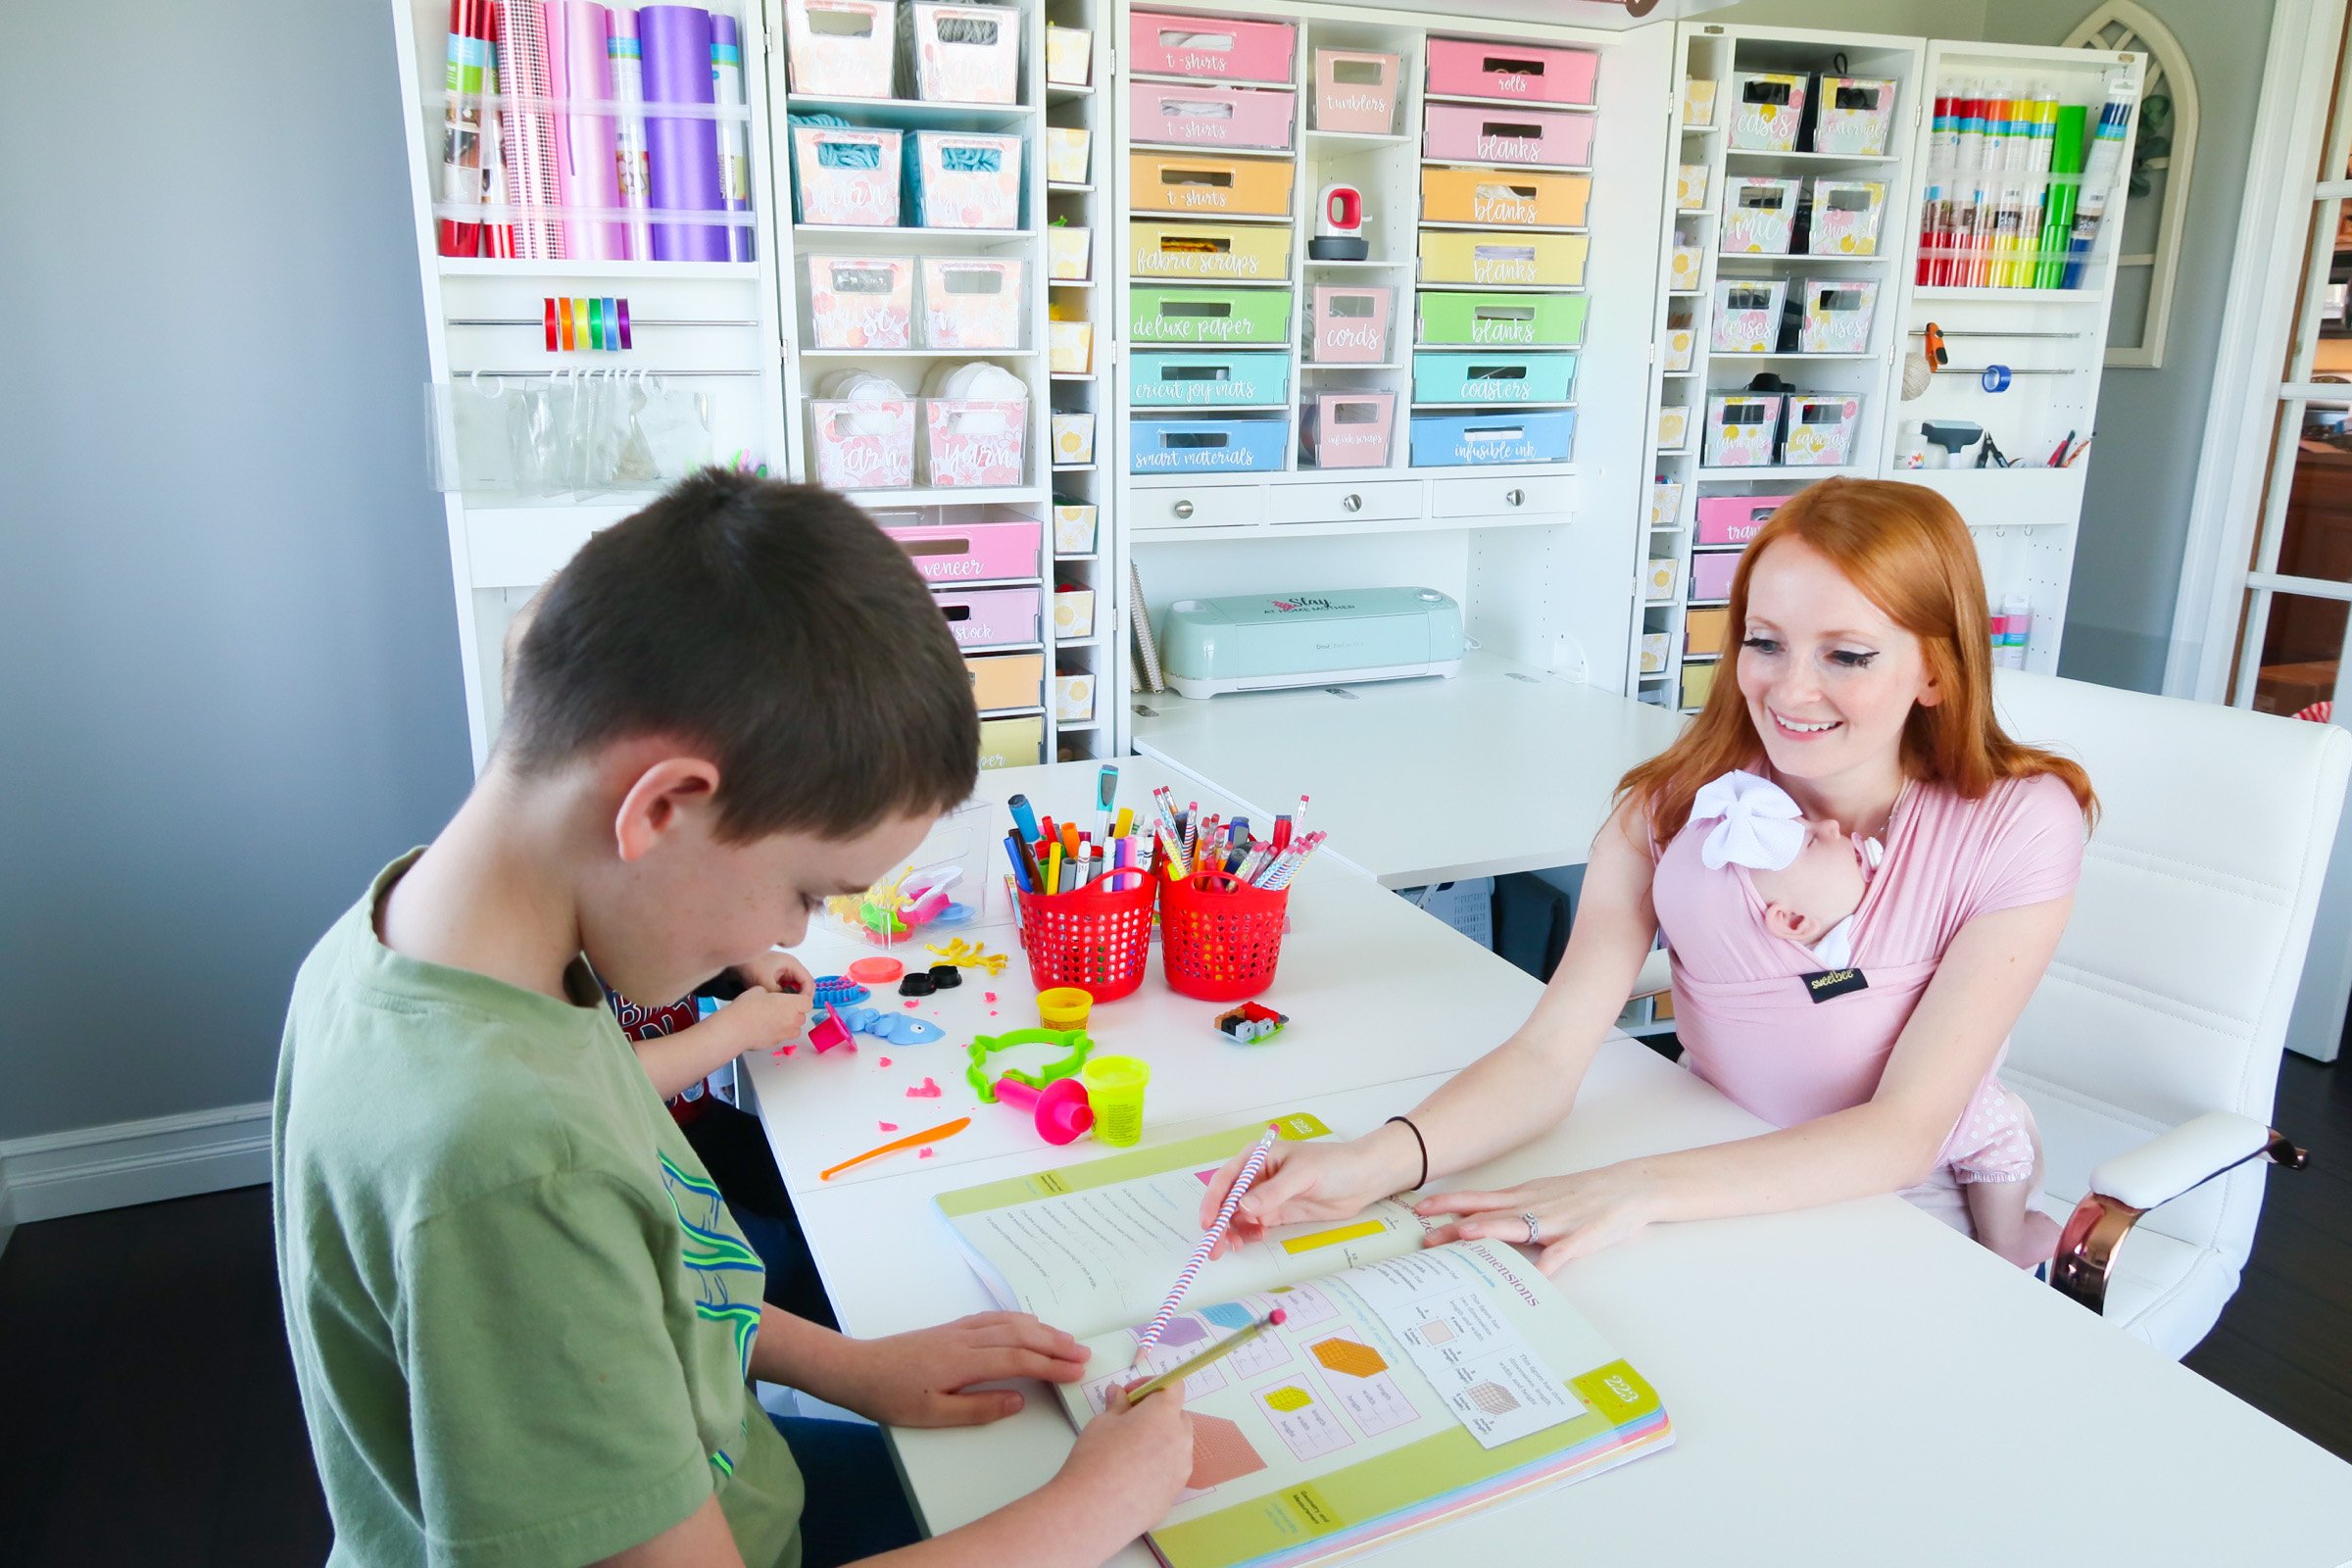
The two-leaf DreamCart adds on the perfect counter space for our kids to work on their schoolwork, projects, or just break out some crafts and get creating!
Did I mention that the DreamCart can latch to the DreamBox table for an even, connected workspace?
DreamCart Dimensions
The two-leaf DreamCart is 69 1/2″x 28 1/2″.
If you’re interested in the one-leaf DreamCart, its dimensions are 44″ x 28 1/2″.
I’m so happy with my purchase of the DreamBox and DreamCart, along with all of the accessories I chose.
It truly is the perfect setup for crafting, working, and homeschooling!
I absolutely recommend the DreamBox as a perfect solution to all of your craft room organization needs.
Create Room Financing Options
I know, this baby is a dream. And it’s also an expense.
If you need financing to get your DreamBox, DreamCart, or accessories, Create Room has great financing options with Bread, with an APR as low as 0%.
You can pay off your loan over 6, 12, 24, or 36 months with no pre-payment penalties.
Woohoo!
Applying takes literally two minutes and you’re all set.
Have you purchased the DreamBox or DreamCart, or are you thinking of getting one? Tell me in the comments below!
Save $100 off your DreamBox with CODE: SLAYATHOMEMOTHER
Save $50 off your DreamCart with CODE: SLAYATHOMEMOTHER50
*Post originally published May 2020, updated November 2020.

This is my dreeeeeeeeam organization system! Maybe one day when I have a craft room of my own. 😄
@Amanda,
It is so worth the wait….. I have been wanting this for many years…. I wish I had set aside and saved up the money to do it sooner…. it is a purchase that you won’t regret….. I had to wait till my kids were out of the house (took me 6+ yrs to finally purchase), now they have been out of the house a few years I finally gave myself permission to get it… Even my husband is on board with this now as he sees all the space it is freeing up and how nicely everything is stored.
What paper pack did you use for your totes? Can you drop a link or point me in the right direction?
Hi, Heather! I used this pack: https://rstyle.me/+1RxVNDmJu7BCtAP4ubuxFQ
Ordered my Dream Box recently…can’t wait for it to arrive. Off topic question. What color are your walls and what is the name of your floors? Our walls are Agreeable Gray and we’re looking at new floors. Your walls look similar in color. Thanks! Your room is gorgeous!
Hi Paulette, how exciting!!! We used Light French Gray by Sherwin-Williams for my office walls (it’s been the only gray I’ve found that doesn’t have an undertone like yellow, red, or blue so it’s the grayest of grays), and the floor was on clearance when the previous owner installed right before we moved in. She said she got it from Menards, but I haven’t been able to find it – we believe it’s been discontinued! 🙁
Hi. I cannot get access to the totes covers cricut files for the Dreambox. Would you be able to send them to me? Thanks you so much.
Hi Maria! I actually just wrote a post on them and have a free Cricut Design Space link and free SVGs for my readers: https://www.slayathomemother.com/dreambox-tote-covers-diy-svgs/ – hope that helps! Have a great rest of your day XO
Hi, What is the size of your room that you placed the Dream Box in? I have a small extra bedroom and I want one of these for my crafts, but I’m afraid that it would be too large for the room. Thanks for your video as it was very helpful in trying to decide if this is the right storage for my room.
Thanks so much for reading/watching! My office is about 10’x8’ 🙂
I have had my eye on this dream box for over a year. After reading your review I am sold ! I need to clear out my room so I can style my new craft room 🙂 What font did you use for your labels ?
Hi, Annie – thank you! It’s truly one of the best investments I’ve made. I used the Cricut font ‘Babette’. Here is the Design Space link for my labels if you want it:
https://design.cricut.com/landing/project-detail/5eb74997c6e8fd0cbcf81ee3
Thank you !
I have another question since I’m a beginner how should I stock up on Cardstock, iron on, vinyls etc? What colors and amounts should I stock?
Hi Annie! To stock up, I always keep an eye out for sales, and take my time! If there’s a great sale on, say, cardstock for example, at Joann’s with a coupon, I would stock up on the colors and quantities you want (based on the types of crafts you want to do), and then wait on vinyl for a sale and coupon ;). Bulk rolls of iron-on and vinyl are my favorite in the colors black and white.
If I can, I try to never pay full price. It takes longer to stock up that way, but it’s the most cost-effective :).
Sounds like good and reasonable advice, thank you !
I’m looking forward to getting my own Dreambox. Yours is so beautiful; thank you for sharing your files.
Are there holes in the back for things like the Cricut cords? If so, is there room in the center portion to setup an Imac computer for using Design Space? Thank you for your help.
How exciting!!! Thank you so much for your kind words. There is a hole in the back of the DreamBox (it’s about 2 inches wide) for cables and cords. I have a surge protector velcroed to the back wall of the inside cubby (right under the three drawers) and I thread the cord through that hole and plug it in the wall behind my DreamBox. Works great! Hope this helps.
Hi! Can you tell me how tall this is with the lighting unit on top? I can find the dimensions without it but I’m not seeing anywhere that has the top piece included. Also, do you think the wheels would roll very well on a thin carpet? I’m thinking of putting this in our finished basement and we have carpet tiles on the floor. Do you think it would be much too heavy to pull away from the wall a bit to help get the doors fully opened? Thanks for any info!
Hi! I just measured mine, from the top of the DreamBox crown light to the floor is 76″. Because it’s on caster wheels, it should roll and glide smoothly on thin carpet. I have a few friends that have thick carpet, and they placed the base of their DreamBoxes on the crate lid it was delivered to help it close easier. I am fairly petite and have no issue closing the doors or moving it from one wall to the other when I need to, once it’s fully closed. *The caster wheels are amazing!*
I hope this helps!
My Dream Box arrived about 2 weeks ago and I have been slowly putting all of my crafting supplies (a large part of mine will be scrapbooking supplies) in it. I love how you have labeled all of the bins. Is the vinyl on the paper or the bin itself? Tomorrow my Sew Station will be delivered and then my sewing machine will finally have a home!
For those considering purchasing one of these, if you can do it you should! I wish I had done it years ago! Even though I don’t have everything put away yet, as I am going through and putting it away I see how much time this will save me in the future, as I won’t be always searching for that one paper or embellishment, that I know I have somewhere!
I also have a glowforge lazer printer/cutter and most of my supplies for that will store neatly and nicely inside as well. The versatility and space in this cabinet is almost magical!
Thank you for sharing your set up with us as it has given me even more ideas on how or use the space I have…. I may even have room for the nieces to have a drawer of their own to keep their projects in!
can you please let me know what color is on your walls??
Hi! It’s Light French Gray by Sherwin Williams – it’s the perfect neutral gray 🙂
Thank you! I’ve seen many reveals, and this one was by FAR the most informative, well organized, and an absolute pleasure to read. I loved the way you explained and measured everything! I hung on every word, took notes, and I’ll be so happy when my box shows up. I feel better prepared after viewing this reveal. So I can STOP freaking out… I’ll try?
Thanks again!
Thank you, Dawn, you’re too kind! I hope you love your DreamBox as much as I love mine! 🙂